
Turning your Rag Blocks
into a Vintage Quilt
by Seema SK of Hooks, Needles and Brushes
My name is Seema, I’m a wife to a loving and supporting husband and mother to her small Pomeranian Husky. Read more about blogger below…
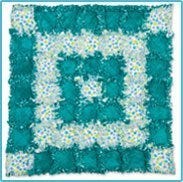
Do you love to collect scraps of fabrics or older fabrics which have a vintage look? Do you believe in going green and recycling? If you said yes to both of these questions, then those fabric scraps or older fabrics are what you need to create vintage looking rag quilts.
I am sure we all remember growing up watching our grandmothers, mothers, and aunts using old and used fabrics. The reasons for this would be to save on the cost of buying fabrics and secondly to recycle old fabrics. The rags or fabric patches used in their quilts would be of different designs, colors and materials available at the time. The entire quilt would then be hand sewn prior to the widespread use of the sewing machine.
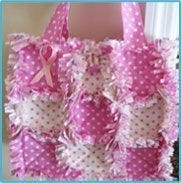
Quilting nowadays has become very easy and fun, especially rag quilting. Earlier quilters would spend days sewing these blankets and then snipping edges of the blocks in quilts to get that frayed, old vintage look. Now with AccuQuilt GO!® dies, you save the time of cutting those blocks as well as snipping the edges. You eliminate the hassle of hand-cutting the fringe. You can create a baby rag quilt or a tote bag in one day. In addition, larger rag quilts can be an easy weekend project. AccuQuilt GO! dies are available in different shapes and designs that you could use to get the design you’re looking for.
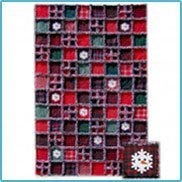
Rag quilts no longer have to be a simple quilt. You can create a nine patch or even an appliqué designed quilt by using GO!® rag shapes like the flowers, circles, hearts, and stars. You can even use other GO! appliqué shapes to use inside the rag squares.
AccuQuilt has various dies available
as mentioned below to make rag quilting easy and fun.
-
-
GO! Rag Rectangle-5 1/4" x 8 1/2" AccuQuilt.com Exclusive (Item 55080)
Cuts 5 1/4"W x 8 1/2"H (13 cm x 21.5 cm) with 3/4" (2 cm) fringe and finished size measures 3 1/4"W x 6 1/2"H (8 cm x 16.5 cm)
-
GO! Rag Square-5 1/4" (Item 55033)
Cuts one rag rectangle 5 1/4"W x 8 1/2"H (13 cm x 21.5 cm) with 3/4" (2 cm) fringe and finished size measures 3 1/4"W x 6 1/2"H (8 cm x 16.5 cm).Four Rag Square-5 1/4" sewn together equals one 8 1/2" square
-
GO! Rag Square-8 1/2" (Item 55013)
Cuts 8 1/2"W x 8 1/2"H (22 cm x 22 cm) square and finished size measures 6 1/2"W x 6 1/2"H (16 cm x 16 cm) square plus fringe
-
-
-
GO! Rag Flower & Circle
AccuQuilt.com Exclusive (Item 55336)Cuts 4 13/16"W x 4 13/16"H (12 cm x 12 cm) with 3/8"H (1 cm) fringe and rag circle 4 13/16" (12 cm) with 3/8"H (1 cm) fringe and finished size measures for Rag flower 4 13/16"W x 4 13/16"H (12 cm x 12 cm) and rag circle 4 13/16" (12 cm)
-
GO! Rag Heart & Star
AccuQuilt.com Exclusive (Item 55337)Cuts size Rag heart 4 13/16"W x 4 1/2"H (12cm x 11 cm) with 3/8"H (1 cm) fringe and rag star 4 13/16"W x 4 5/8"H (12 cm x 11 cm) with 3/8"H (1 cm) fringe finished size measure for Rag heart 4 13/16"W x 4 1/2"H (12cm x 11 cm) and rag star 4 13/16"W x 4 5/8"H (12 cm x 11 cm)
-
Rag quilts are prominently made using flannel or fleece; however, you can also use cotton fabric depending on your projects like a tote bag, handbag, lap quilt, or baby quilt.
As far as the construction of rag quilts projects go, you have to construct each block of a rag quilt before you put the entire quilt together. The process is pretty simple and even a beginner can create a beautiful tote or quilt easily.You can sandwich the batting between the two fabric pieces or choose not to use batting if you desire a quilt that is not too thick. For the 5 1/4" size rag square, you will need to cut one piece of fabric for the quilt top, another fabric scrap for the backing fabric, and a 3 1/4" sized square for the batting. Keep in mind that the measurement for the batting square excludes the fringe. Then place the right side of backing square face down. Place batting square on top of the backing square and finally lay the right side of main fabric face up. Stitch the three fabric squares together with a X design sewing from corner to corner. Once you have completed this, you can begin to construct your quilt using the rag squares you’ve already put together. You can also find the video tutorials of these instructions below.
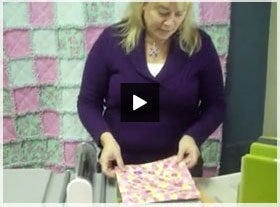
Watch Video:
How to use the GO! Fabric Cutter
to cut 8 1/2" rag squares

Watch Video:
How to sew rag squares together after cutting
with the AccuQuilt GO! Fabric Cutter
Helpful Hint:
If you are cutting fleece or flannel, I suggest using one or two layers of fabric in your GO! Baby™ Fabric Cutter. If you are using cotton fabric, then you can cut up to six layers of fabric in your GO! Baby easily. If you want to give stability and warmth to your quilts, use batting or denim. If you decide to go with denim, it is not necessary to use batting.
About Blogger:
Seema SK is a wife to a loving and supporting husband and mother to her small Pomeranian Husky. Seema blogs and shares her passion for crafting and quilting with sewing tutorials on Hooks, Needles and Brushes. In addition, she offers patterns on Ravelry and her blog for crocheted Amigurumi toys. She is a Chef for Moda Bake Shop and you can find her tutorials on Moda Bake Shop.
Hooks, Needles and Brushes
seemask.blogspot.com/