Fowling around with my GO!
by Vicki Welsh, Field Trips in Fiber
Vicki Welsh is a fabric dyer that sells fabrics exclusively on the web at her Etsy shop. She specializes in being able to match and recreate color. Read more about blogger…
Each time I develop my new fabric palette, I like to create a project using the fabrics to help show how they will work together. Often the project is a placemat design that can be made quickly and easily. I received my AccuQuilt GO!® Fabric Cutter from my friends as a 50th birthday gift. I love having it in my quilting studio. I have cut dozens of tumbler quilt kits for my mom’s guild to create quilts for local children’s homes. However, I particularly love it when I am developing a project for my fabric palette. The GO! Fabric Cutter shaves so much time from the process and I can get my feature projects done in no time. As I was working on my latest placemat design, I knew immediately that I wanted to use my new GO!® Folk Art Fowl die.
Until I received my GO! Fabric Cutter, I never did any appliqué. I hated the process of cutting the shapes, even simple shapes because I couldn’t get smooth lines with my scissors. I certainly wouldn’t have ever considered cutting out a chicken and a rooster!
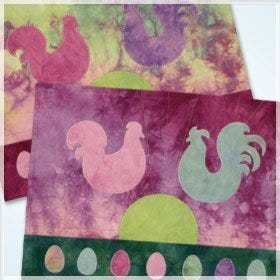
For my placemat, I cut one of the birds with the fabric right side up and the other right side down so that I would get center-facing fowl. I used the 5" circle on the GO!® Circle-2", 3", 5" die as the sun. I use the GO! Circle-2", 3", 5" die all the time for all kinds of applications.
The eggs from the GO! Folk Art Fowl die make a perfect bottom border for my Rise and Shine placemat. I love to cut my appliqué shapes pre-fused so that I only have to do a simple machine appliqué technique. For this project, I used a machine blanket stitch but a straight stitch would work fine, too.
If you would like a full detail tutorial for this gorgeous placemat, go to my blog and check it out.
While I had the GO! Cutter out, I remembered that I had two linen dresser scarves that I had over-dyed. A friend of mine finds me all kinds of treasures when she is thrift shopping. It’s okay if they are stained when I get them because the dyeing process will cover all of that up.
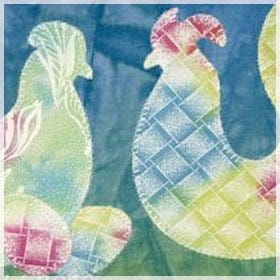
I had dyed these two dresser scarves blue and dyed one with a green edge. I decided that they would be a perfect setting for the chicken and rooster from the GO! Folk Art Fowl die.
I found these two over-dyed white-on-white fabrics in my stash. These are some of the very first fabrics that I ever dyed and this was a perfect use for them.
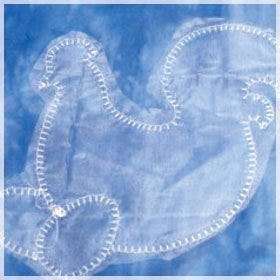
I applied Mistyfuse to the fabric before cutting out the shapes. They were fused to the linen and then stitched with a machine blanket stitch. If you use a fusible web that is not paper backed, put a sheet of waste paper between each fabric layer to keep the fabrics from sticking together.
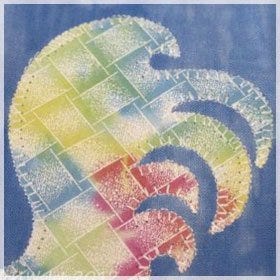
In the photo above, you can see a close up of the machine blanket stitch. I stitch with straight stitches just on the outside edge of the appliqué so that only the zigzag stitch is on the fabric. This gives a nice outline and makes sure the appliqué is perfectly stable at the same time.
Something like this always needs stabilizer and my favorite is a water soluble stabilizer. I pin it to the back of the fabric, behind the appliqué and stitch through all layers. After stitching, I trim the stabilizer close to the edge of the stitching and then put the whole thing in a sink full of cold water to soak. The stabilizer melts away easily and quickly.
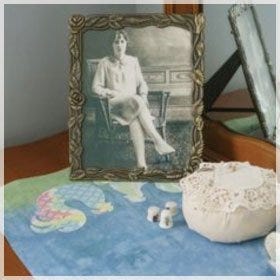
Here’s my grandmother enjoying the new view on her dresser in the guest room. That was a very quick little project and lots of fun to do.
I already know that I’m going to create Folk Art Fowl tote bags, pillows and even a Fowl quilt in my future.
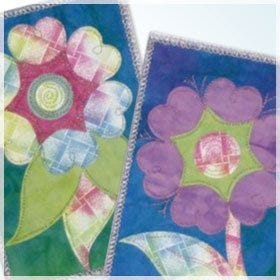
I had some fabric left from these projects so I decided to “whip up” some postcards using my GO! Fabric Cutter. I used the GO!® Round Flower die.
All of these shapes came from that one die. It’s a very versatile die and I really should use it more often. I have several girl birthdays coming up so these should be perfect.
For projects like this, I layer my fused scraps over the various shapes in the die and cut away. I just try to get a mix of shapes and color. The fun part is taking the shapes and playing with arrangements on the postcards. Once I have everything the way I like it, I fuse it all down and then do the decorative stitching.
All of the stitching is done free motion with Superior® Metallic thread and the serged edge is done with Superior® Razzle Dazzle. I love this thread for finishing the edges of postcards. If you don’t have a Serger, just wind some on a bobbin and do a zigzag stitch over the edges with the back of the card facing up.
I’m already thinking about my next GO! project and I can’t wait to get started!
Watch Video:
AccuQuilt GO! Folk Art Fowl (55375)
die by Bill Kerr
About Blogger:
Vicki Welsh is a fabric dyer that sells fabrics exclusively on the web at her Etsy shop. She specializes in being able to match and recreate color. Six times a year she creates a fabric palette based on the colors in a photograph. Vicki creates a set of textured “solids” and a patterned gradient and offers them for a special price for eight weeks. Her shop is always stocked with shibori, gradients and other one-of-a-kind fabrics as well.
Vicki has a very active blog where she share free projects and ideas for using her hand dyed fabric or other fabrics in her stash. Every Spring she also shares a photo log of the activities in her Bluebird nesting boxes.
Her goal is to introduce quilters to the great colors and textures of hand dyed fabrics. Vicki knows a lot of quilters who are afraid to use hand dyed fabrics because they are frequently not colorfast. She’s worked to develop a process to ensure that her fabrics will be safe in your quilts and projects. You can read about her process and even use it yourself on your commercial fabrics or quilts if you run into a “running” problem.