
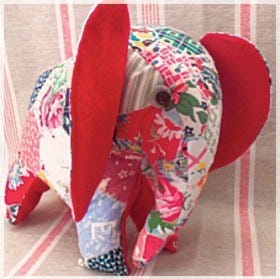
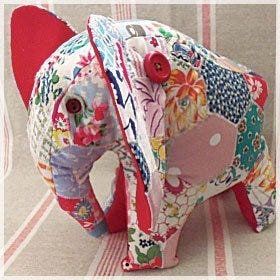
Charlie the Patchwork Elephant
by Helen Dickson, Bustle & Sew
Helen Dickson started her online pattern business, Bustle & Sew, in 2009. She creates designs for patterns that are lively, interesting and fresh, and will inspire others to pick up fabric and thread to produce their own piece of work… Read more about blogger.
- Perle cotton in contrasting shade to felt
- Toy stuffing
- Spray fabric adhesive or Bondaweb
as preferred - Sharpie or other felt tip pen
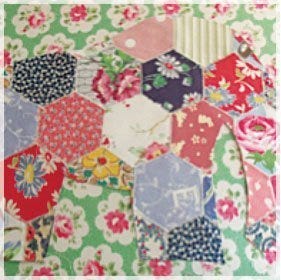
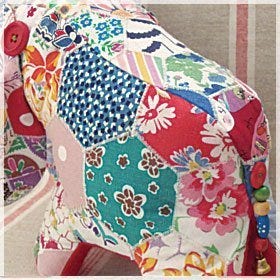
Charlie is a most cheerful elephant, easily created from your leftover scraps from other projects. I’ve made no attempt to stick to a particular color theme, just chosen my brightest, more cheerful scraps. No worries about tricky piecing your hexagons – just use this really easy method to achieve great results.
To make this elephant measuring 10" high x 11" long, you’ll need the following supplies:
- Scraps of cotton fabric sufficient to cut:
50 hexagons measuring 3" using the GO!- Hexagon-2", 3", 5" (55011)
50 hexagons measuring 2" using the GO! - 50 hexagons measuring 2" using the GO!
Hexagon-2", 3", 5" (55011)
- Hexagon-2", 3", 5" (55011)
- 1/2 yard of 48" wide of quilting weight white cotton/cotton mix fabric (must be non-stretchy) for lining of hexagon fabric
- 24" square piece of felt for insides of ears and underbody
- 2 x 1/2" buttons for eyes
- Tiny scrap of light colored felt for eyes
- Selection of beads and a little bell (optional)
for his tail - 2 large buttons for ears (1") and one 1/2"
button for base of tail
If making this toy for a young child, please do not use buttons for eyes and decoration. You can substitute black felt for eyes – or embroider them, omit buttons on ears and at base of tail and stitch a fabric or yarn tail into place.
Hexagons must be accurately cut using your AccuQuilt GO!® Fabric Cutter. The GO! Fabric Cutter gives you accurate cuts every time with no measuring or math and saves you so much time. You’ll save hours of cutting time as the GO! cuts fabric up to 90% faster than rotary cutters or scissors.
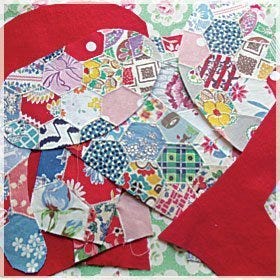
First, use your GO!® Hexagon-2", 3", 5" (55011) to cut out 50 of each size hexagon. The smaller hexagons will be used for Charlie’s ears and top gusset and the larger ones for the sides of his body.
You will need to resize your template to achieve a 10" high elephant. The dimensions are shown on the templates below. When you’ve printed them to the correct size, cut out two underbodies and two ears in felt.
Place your templates on your white lining fabric and draw around them with your Sharpie or equivalent felt tip pen. You want the line to show through on the reverse of the fabric. Do not cut them out yet.
Cut two side bodies and two ear pieces. Don’t forget to reverse your template before drawing the second pieces and one gusset.
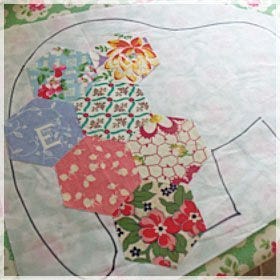
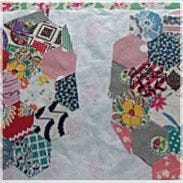
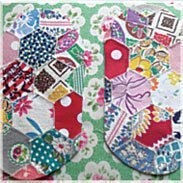
Arrange the larger hexagons on the lining fabric over the shape you drew. Line them up carefully so there are no gaps. You may need to cut them to fit into small spaces at the edges. When you’re happy with the positioning secure in place using spray adhesive or Bondaweb.
Set your machine to a wide zig-zag with a short stitch - as you would use to make buttonholes - and zig-zag over all the joints between the hexagons. This will secure them firmly in place and cover all the raw edges.
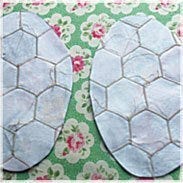
Press lightly and turn over.
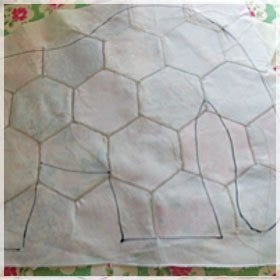
You can still see the lines you need to cut as the felt tip pen penetrated through the fabric. Cut out your shape and repeat for the second side of the elephant.
Now repeat this process using the smaller hexagons for the top gusset and ears.
Now you’re ready to assemble your elephant. All pieces should be joined with right sides together and a 1/4" seam allowance is included in the pattern.
- Stitch under bodies together from A to B leaving a 3 1/2" gap to insert stuffing.
- Stitch under body pieces to main body pieces matching points A and B.
- Stitch the head gusset into place along the back to his bum matching points B and C on templates.
- Stitch around bottom of trunk and up as far as C (where the head gusset is placed).
- Clip curves and corners so you’ll have a nice flat seam when you turn him the right way round. Pay particular attention to his trunk.
- Turn Charlie right side out. You may want to press him lightly at this stage, as his trunk in particular may have developed wrinkles in the turning out process.
- Now you can begin stuffing your elephant. Use small pieces of stuffing to avoid lumpiness and push into corners. Keep checking your stuffing for good shape and nolumpiness. Stuffing is really important and it can make (or ruin) the appearance of a toy.
- When you’re happy with his appearance, close the seam in the center of the underbody. First, slip stitch with matchingthread, then it’s nice to take a contrasting thread or floss and work cross stitches over your hand-stitched seam. This adds extra strength and also looks pretty.
- Place the ear pieces right sides together and stitch around curved edges. Clip seams and turn. Slip stitch straight edge closed and press. (TIP: to make sure the pieces are properly turned out, moisten your finger and thumb and gently roll the seams backwards and forwards. This will give a nice finish).
- Position on sides of head and pin in place. Do this by placing the ear backs against the body and pinning flat. Then slip stitch straight edge in place. When you take the pins out you can fold the ears forward which will make them stand up nicely.
- Mark positions of eyes using pins, then cut two small circles of felt and sew into place, adding buttons on the top.
- Sew large decorative buttons to his ear backs where they join his body.
- Thread beads and bell onto strong thread and attach to his bum, covering your joining stitches with decorative button.
- Note: Omit these stages and simply embroider eyes and sew fabric tail if making for a very young child.

Watch Video:
How to use the GO! Fabric Cutter
to cut GO! Hexagons & Equilateral Triangles
About Blogger:
Helen Dickson started her online pattern business, Bustle & Sew, in 2009. She creates designs for patterns that are lively, interesting and fresh, and will inspire others to pick up fabric and thread to produce their own piece of work with all the sense of achievement and satisfaction that brings. She loves stitching and is passionate about sharing with others through her website, blog and monthly e-zine. Connect with Helen at http://bustleandsew.com and find out more about her e-zine at http://bustleandsew.com/magazine.