


Sunshine Pin Cushion
by Ebony Love, LoveBug Studios
Award-winning quilter Ebony Love is the owner of LoveBug Studios, a
long-arm quilting and quilt design business…Read more about blogger.
I love adding three-dimensional elements to my projects, and one of my favorite treatments is prairie points. Even though my Studio™ Fabric Cutter is fully capable of cutting perfect squares for making prairie points, I appreciate any shortcut that can make this task easier.
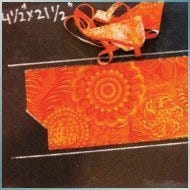
Fortunately, there’s a die for that; three of them, in fact! The Studio Quick Points™ die comes in three sizes—1", 1-1/2", and 2"—and makes quick work of folding and spacing prairie points.
Because of the sizes, it’s easy to accurately place these prairie points in any block. For example, if you have a 12" block, the 2" prairie points will perfectly space six prairie points along the side; the 1-1/2" prairie points will evenly space 8 prairie points, and the 1" die will evenly space 12. If you can’t decide which one to get first, I recommend the 1" prairie point die, it’s the most versatile and will also help you make this featured project!
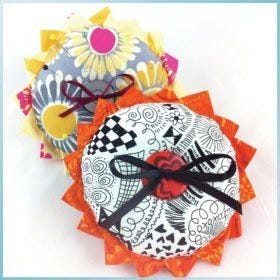
Sunshine pin Cushions
Example of Prairie Points
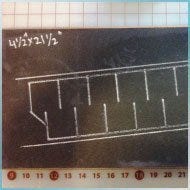
Here are the sizes of strips that you will need.
You can make single color prairie points, or even two-color prairie points!
Studio Die |
Strip width for single color |
Strip width for two colors |
1" Prairie Point (50780) |
4 1/2" |
2 1/2" |
1 1/2" Prairie Point (50781) |
6 1/2" |
3 1/2" |
2" Prairie Point (50782) |
8 1/2" |
4 1/2" |
Materials:
- Studio Quick Points™ - 1" (50780)
- Studio Circles-5 1/2" (Jumbo – 50029)
- 4 1/2" x 21" fabric for prairie points
- 6" square of fabric for top of pin cushion
- 6" x 12" rectangle of fabric for the bottom of pin cushion
- Two large 2-hole buttons
- 18" length of 1/4" wide ribbon
- Large upholstery needle
- Stuffing of your choice
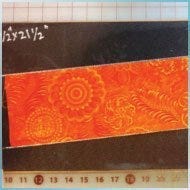
Lay your 4 1/2" x 21" strip on the die, so that it covers all the blades of the die and is centered between your registration lines.
Tip: If you want to make two-color prairie points, take two 2 1/2" strips, stitch them together, press the seam open, and lay on the die so the seam runs down the center of the shape.
Lay your mat on top (you need the 10" x 26" mat) and run the die through the cutter.
If you wanted to make more prairie points, you could fanfold long strips onto the die; however, because this is a closed shape, you will always get individual sections of prairie points that are the length of the shape.

Time to start pressing!
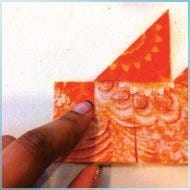
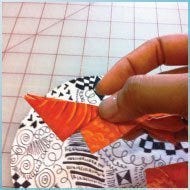
Take your cut strip to your ironing board with the wrong side up, and begin the first fold with the top row. Fold the top left corner of each section to the bottom right, so that you have triangles marching across. You’ll deal with that tiny triangle on the end shortly.
With the top row done, start pressing the bottom row.
Fold the tiny triangle down so that it is on the bottom section; this also gives you a hint for which way to fold!
Fold the bottom section over so that the bottom left corner reaches the top right. You’ll see the triangles being formed are offset by half—this is what spaces your prairie points!
At the other end, make sure you’ve folded that tiny triangle into your last prairie point.
Now you are ready for the next fold, and you’ll start to see your prairie points take shape.
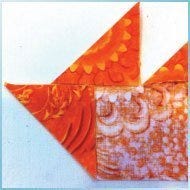
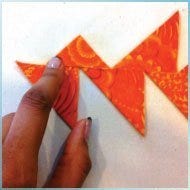
On the top row, take the top right corner and fold it to the bottom left. Repeat this along the entire top row.
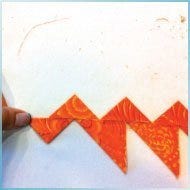
Repeat this along the bottom row, this time folding the bottom right to the top left.
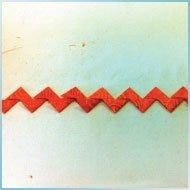
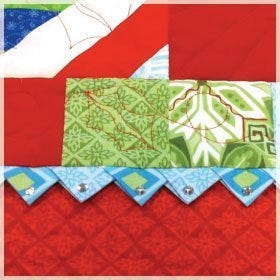
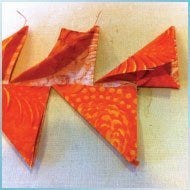
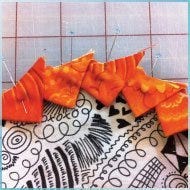
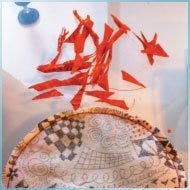
When you’re finished, you get this fun zigzag shape. This could also be something fun to use in a project, just like this.
Layer your pin cushion fabric onto the die. My pieces are a little bit larger, but you get the idea. Make sure your blades are covered.
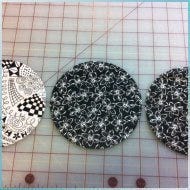
You’ll end up with three circles—two for the back, and one for the front.
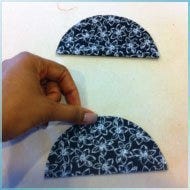
Take the two back circles and fold them in half. This should look familiar from the Gift Tissue Covers we made a couple of weeks ago.
Now it’s time to work with your prairie points. Starting from one end, fold your prairie point strip in half, so that the prairie points overlap. You should be able to nest one inside the other.
I like folding prairie points as I go, but if this is your first time working with them, you might want to fold them all first until you get the hang of it.

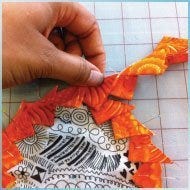
Pin this first prairie point to the right side of the pin cushion top, so that the points face in.
As you work your way around the circle, allow the free end of the prairie point to extend past the circle. This is what will help you make the prairie points conform to the circle.
Pin every prairie point to hold it in place while you work your way around.
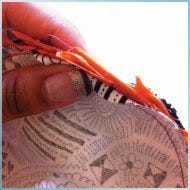
When you get all the way around the circle, you will see which prairie point needs to get cut off. My thumb is on the prairie point that needs to be removed.
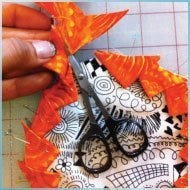
Open up the prairie points and cut off the excess prairie points.
Don’t throw those extra ones away, they make great accents in smaller projects.
Pin the last prairie point into place. You won’t be able to tell where your points begin and end.
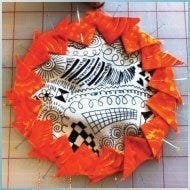
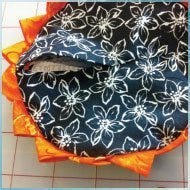
Take the two folded circles and layer them on top of the prairie points, aligning the raw edges and pinning them in a couple of places to hold them securely.

Using a 1/4" seam, stitch around the circle through all layers. I stitched with the pin cushion top facing up.
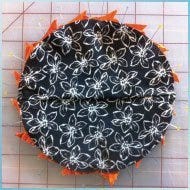
When you have stitched all the way around, fold back the circles to expose the edges of the prairie points. Cut out the excess bulk of the prairie points, making sure not to cut your circles.
You should now have a smoother circle, with all the bulk removed. Turn the pin cushion right side out.
With a sewing needle and matching thread, start sewing the back of the pin cushion, overlapping the sides slightly and using small whipstitches. When you get about halfway across, stop stitching, but do not remove your needle.
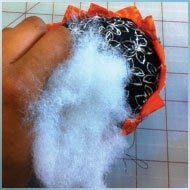
Stuff your pin cushion through the opening.
This takes more stuffing than you can possibly imagine! Stuff it tightly, making sure you pack the stuffing to the edges to make the prairie points pop out.
Once the cushion is completely stuffed, stitch the rest of the opening closed.
You’ll be tempted to remove some stuffing, but don’t. Just use your thread to draw the sides closed. This is the tough part!
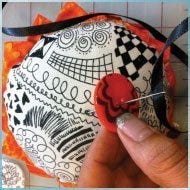
Thread the length of ribbon onto an upholstery needle, then thread that through a decorative button.
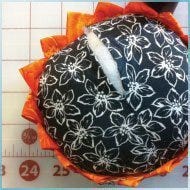
Insert your needle into the center of the pin cushion until it exits the other side.
You may need a pair of pliers to pull the needle all the way through!
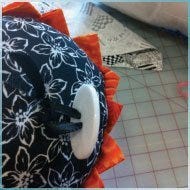
When the needle is completely out of the back side, thread the ribbon through both holes of your second button.
Insert the needle into the pin cushion about 1/4" away from the original hole, and push it through the top side.
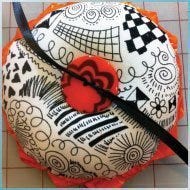
Thread the needle through the second hole of your top button, then cross over the ribbons and pull tightly. This will compress the pin cushion in the center.
Tie a square knot to keep the buttons in place, tie a decorative bow, then cut off the excess ribbon ends.
The prairie points will look a little lackluster by this step from all the handling and stuffing, but just yank on them a bit and they will stand out from the pin cushion.
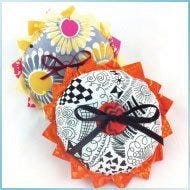
These are so fun to make, I’ll bet you’ll make another, just as I did! These little pin cushions are just adorable, and since they are so fast to make, I’m sure you’ll fill your house with them in no time!

Watch Video:
AccuQuilt Studio Quick Points
for Prairie Points


About Blogger:
Award-winning quilter Ebony Love is the owner of LoveBug Studios, a long-arm quilting and quilt design business. She publishes her patterns and offers die cutting services under the brand Quilt Possible!, and is also the publisher and editor-in-chief of a new digital publication, Blocks to Die For!, especially for fabric die-cutting enthusiasts. Ebony is recognized as one of the leading experts in fabric die cutting techniques, and she regularly produces free videos featuring tips & techniques for getting the most out of your dies. You can find dozens of her videos on YouTube under the username “LoveBugStudios” or in AccuQuilt’s video library.
Studio Dies

Studio
Quick Points - 1"
Save 25%

Studio
Quick Points - 1 1/2"
Save 25%

Studio
Quick Points - 2"
Save 25%

Studio Circles - 5 1/2"
Save 25%