
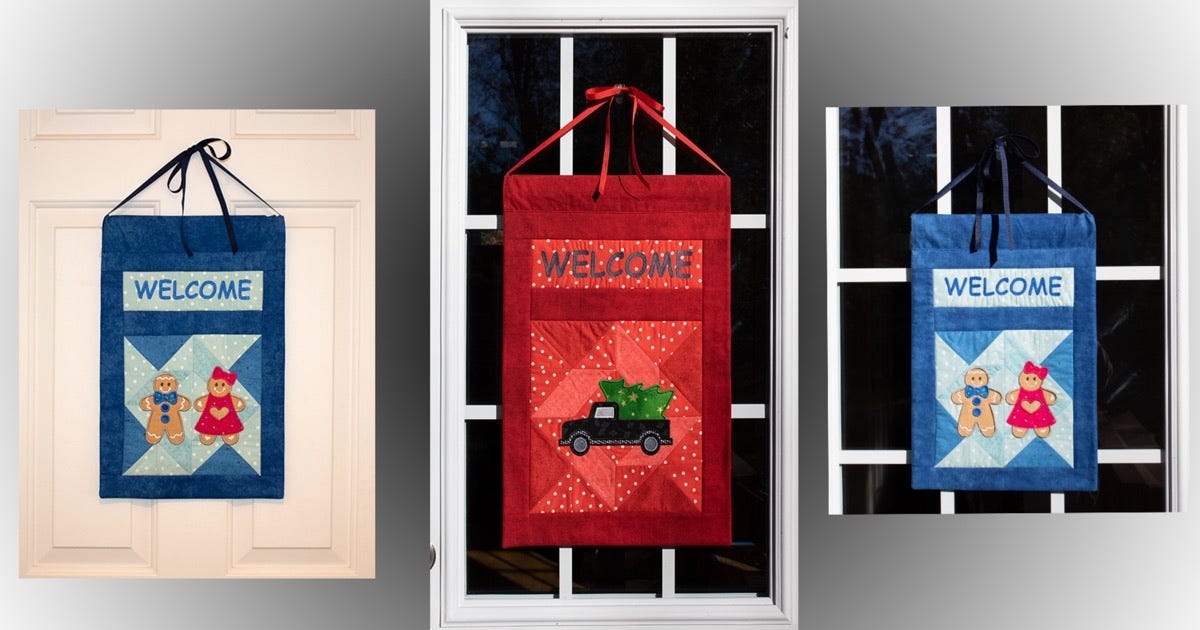
You know how much I love yard flags, door banners and wall hangings. These homemade banners are a perfect holiday decoration for a covered porch entry door, an inside door in your home or as a wall hanging.
I think the little GO! Gingerbread Cookie appliqué and the accompanying GO! Cookie Decorations die (55211) would be perfect for just the right place in your kitchen or breakfast room. And the GO! Pickup truck die (55187) and the Christmas tree from the GO! Holiday Medley die (55043) make a great alternative to a wreath for an entry door. There are two sizes because of the size of the embroidery. Using the GO! Qube system makes changing the block size as easy as choosing the fabric and cutting. There is no calculating or manipulation of any kind when the block size changes.
Once I made the first, test banner that my husband really liked (rare praise from that sector), I started making more banners. I think I ended up with four or five in the end. My personal preference is to use a 12-inch quilt block with the pickup truck and an 8” or 9” quilt block with the gingerbread cookies.

Supplies
I used the Whirlpool Quilt Block (PQ10590Q) for each banner.
Dies
- GO! Pickup Truck Die (55187)
- GO! Gingerbread Cookie (55862)
- GO! Cookie Decorations (55137)
- GO! Qube Mix & Match 12” Block for the Pickup Truck Banner
- GO! Qube Mix & Match 9” Block for the Gingerbread Cookie Banner
- GO! 2-1/2” Strip Cutter (2" Finished) (55017)
Embroidery
- GO! Free Embroidery for the Pickup Truck or GO! Free Embroidery for the Gingerbread Cookie
- Alphabet Embroidery (purchased from vendor of your choice) for the Welcome letters – choose letters that will fit within the banner width.
- Embroidery supplies: Embroidery machine and supplies including medium weight tearaway stabilizer, coordinating thread, bobbin thread, and either water soluble glue stick (Elmer’s purple glue stick or a fabric glue stick or pen) OR temporary spray adhesive for fabric (Sulky KK2000)
Other Supplies
- Fabric for Banner (I used coordinating Fat Quarters from the Painter’s Palette set by Riley Blake to make the blocks)
- Quilt Blocks – coordinating fabrics in three colors for the blocks and Welcome letters background
- Borders and Back – 1 yard coordinating solid fabric
- Thin Cotton Quilt batting 20” x 18” (optional)
- Assortment of fabric scraps for applique that coordinate and contrast with background fabric
- Iron on fusible web or water-soluble glue stick
Make Quilt Blocks
Cut block shapes for banner as shown. The block chosen is Whirlpool from the original GO! Qube 72 block set and is a block made of all half square triangles. I modified the block to simplify it using the parallelogram and the quarter square triangle so that there were fewer seams, and the block was easier to stitch. All seams are pressed open.

Cut the following shapes for a single block:
- Shape 5 Half Square Triangle - Cut 16 of Color 1
- Shape 4 Quarter Square Triangle - Cut 4 of Color 2
- Shape 7 Parallelogram - Cut 4 of Color 3

Cut the remaining shapes as shown on the diagram for the "welcome" letters embroidery background and the borders of the banner.

Piecing the Blocks
Stitch half square triangles (Shape 5) to both sides of the quarter square triangles (Shape 4). Press seams open.

Stitch half square triangles (Shape 5) to the long sides of the parallelogram (Shape 7). Press seams open.

Stitch the quarter square triangle units to the parallelogram units to make a quarter block.


Stitch two quarter blocks together to make a half block.

Stitch half blocks together to make a whole block.

Prepare and Cut Appliqué Shapes
Follow manufacturer’s instructions for applying iron-on fusible web to wrong side of fabric scraps. If using glue stick method, press scraps well before cutting.
Cut appliqué shapes as follows:
Place right or wrong side of appliqué fabric to be cut onto die based on the direction the cut shape will be facing on the finished banner. The pickup truck and tree embroidery can be stitched in either direction. The Gingerbread cookies are placed right side of fabric facing up on the die.
For shapes cut with fusible web, cut shape before removing paper backing from fusible web. To remove paper from the wrong side of the cut shape, use a large pin or the tip of a seam ripper to score the paper, then peel paper from the back of the shape.
Complete Machine Embroidery Stitching
Hoop stabilizer and quilt block:
Hoop quilt block to be stitched by hooping stabilizer first. Center the quilt block carefully in hoop matching centering marks on hoop to horizontal and vertical center of background fabric.
Secure quilt block to the stabilizer in the hoop using spray adhesive, water soluble glue stick, or a sticky stabilizer. Use straight pins on the very outer edges of the quilt block to make sure it does not buckle while stitching.
Use the center seam intersection as a center mark on the quilt block and consult the machine embroidery manual as needed for instructions on how to center the block accurately.
Before beginning the embroidery, use the basting function on the embroidery machine to baste a rectangular boundary around the embroidery. This will help keep the quilt block in place with the stabilizer during stitching.
Stitch the embroidery
Follow the step by step instructions provided in the machine embroidery design set. When all stitching is complete, remove basting stitches and tearaway stabilizer. Press from back side of embroidery.
Assemble Banner
Assemble front of banner as shown in the picture below.

- Stitch quilt block to upper border and then stitch embroidery welcome block to border.
- Stitch right and left side borders to block.
- Stitch top and bottom borders to block.
Assemble Banner for Hanging
Cut the backing for the banner using the front as a pattern. Extend the back banner fabric at the top an extra 4 inches.
Stitch front and back of banner together:
Lay banner front (with batting underneath) and banner back with right sides together, matching the sides and bottom edge. The back of the banner is longer than the front and will extend beyond the top of the banner. This extra fabric at the top will be folded over to make a casing for hanging the banner.
If needed, trim any excess fabric from the sides or bottom of the banner so that the layers lay flat. Stitch the sides and bottom of the banner together with a ¼” seam. Turn inside out and press. Use your fingers to work the side seams into a sharp crease before pressing.
Fold ¼” edge on top extension over to make a smooth edge for the casing. Fold top extension over again and press so that the edge of the casing just covers the top edge of the front of the banner. Edge stitch the casing onto the top edge of the front of the banner.

Top stitch in the ditch around the quilt block and the "welcome" letters. I used polyester invisible thread on the blue banner because of the different dark and light colors used in the block and the thread needed to be truly in the ditch and invisible.
The banner is now finished and ready to use on an entry or inside door or hanging on a covered deck or porch.


