


Autumn is my favorite season, so today I’ll show you how to make my cute little Turkey Trot table runner and a traditional Southern dish known as Sweet Potato Soufflé.
Getting into the Season
Each September as the leaves begin to turn and the air takes on a crisp feel, I gather the last of my vegetable garden's bounty and pack away my light and airy summer decor.
Autumn is my favorite season. I love all the fall things. I love pumpkin patches, apple orchard visits, chili in a crockpot, Saturday football games, and large piles of fallen leaves for jumping.
I feel often autumn gets overlooked in our rush to get ready for Christmas. We often decorate our homes for Halloween and as soon as that's over we start pulling out our Christmas decorations. For our family autumn is a special season. Yes, we love dressing up for Halloween and carving pumpkins.
This will be my first Thanksgiving as a true empty-nester. My youngest son left for college this last August. For the last twenty or so years, I have prepared the Thanksgiving meal. But, this year just weeks after my son left for college, my in-laws move here close to us.
We are for the first time in a long while, having a truly big family Thanksgiving.
I'm Sentimental about Family
I am often extremely sentimental about my three boys and the precious moments I've shared with each one as they've grown.
One of my favorite memories has been when each of my boys began preschool. The preschool they attended often used little songs and poems to teach. There is a turkey song each of them sang to me in their little preschool voice about five fat turkeys.
I cherish those moments when they sat in my back seat and sang to me. I do not know who authored this little rhyme or I'd give him/her credit.
The music for this cute little ditty is said to be an American folk song. This little sweet table runner was inspired by that five fat turkeys' song.
Here's that little song:
Five fat turkey as we,
We slept all night in the tree,
When the cook came around,
we couldn't be found.
And, that's why were here. You see?

AccuQuilt's Cornucopia Quilt Block
When I saw this cornucopia block it really spoke to me. I don't know if you remember, but I used an almost identical block in my South Beach Bella quilt. I called that border a Bird of Paradise border. It was an 8" block [diagram shown above]. So, I thought it would be appropriate to reallocate this same design for a different bird.
AccuQuilt made an amazing BOB (Block on Board) Cornucopia Die and my cute little Turkey Trot table runner was born.
Dies Used
For handy reference, here is a list of the AccuQuilt Dies I used on this table runner:
1. AccuQuilt BOB Cornucopia Block
2. AccuQuilt GO! Qube Mix & Match 4" Block
3. AccuQuilt GO! Qube Mix & Match 10" Block
This whole table runner can be cut efficiently and precisely using your AccuQuilt GO! Fabric Cutter.
I absolutely fell in love with this new line from Louis and Irene called A Winter's Nap. The wood grains and hibernating forest animals are adorable.
I added a few fabrics from my stash just for some additional color and contrast. The ombre of colored falling leaves just makes it a lovely and seasonally appropriate collection to use for this project.
How to Create the Center Star Block
To begin, I made the center star block. I used the GO! Qube Mix and Match 10" Block to make this center star.
From your GO! Qube Mix & Match 10" Block you will need the GO! Square 55803 (Die #1), the GO! Square 55 804 (Die #2), the GO! Half Square Triangle 55807 (Die #5), and the GO! Rectangle 55810 (Die #8).
See the diagram here for the exact dies I used for each location.
| Part of the Block | Fabric | Die Used | Quantity Needed | Number of Cuts |
| Center Square | Background | 55803 | 1 | 1 |
| Corner Squares | Background | 55804 | 4 | 4 |
| Half Square Triangle -"Wing" | 1 Each of 8 colors | 55807 | 8 | 4 [Die cuts 2 at a time] |
| Side Rectangle - "Body" | Background | 55810 | 4 | 2 [Die cuts 2 at a time] |

The best part is that you can cut the entire block with just one pass through the machine of each die since Accuquilt has made it so that you can layer the fabrics one on top of the other for up to 6 layers!

- Sew the side rectangles and the half-square triangles to form the side flying geese units. Make 4. I put the colors in order: brown, dark eggplant purple, burgundy, barn red, vermillion, orange, gold, and mustard. Two colors on each flying geese unit.
- Then sew 2 of the side triangles to either side of the center square. Press the seams toward the center.
- Sew the remaining 2 flying geese units between 2 corner squares. Make 2.
- Press the seams toward the corner squares. This will allow your seams to nest as you complete the block.
- Sew the block together. Press seams. This will make on 10-inch star block for the center.
- Set aside while you make the rest of the blocks you need.

How to Create the Pumpkin Blocks and Star Topper
Next, I made the two pumpkin blocks. You will use the GO! Qube Mix & Match 4" Block to create the star topper for the pumpkins.
Pumpkin Block Instructions
Use the 2 1/2" strip die to cut the squares. Cut the squares first. You will need at least 34 assorted orange 2 1/2" squares for the blocks.
Pro Tip: I cut the assorted fabrics into 2 1/2" strips then turned them 90 degrees and made them 2 1/2" squares. You will use 17 in each pumpkin and you are making two.
Pumpkin Topper Instructions
Using the GO! Qube Mix & Match 4" Block and the following chart cut the pieces you will need to make the pumpkin star topper. The 4" pumpkin star topper is made the same way we made the center star.
You will be keeping it in two halves to more easily construct the whole pumpkin block. From your GO! Cube Mix &n Match 4" Block you will need the GO! Square 55232 [Die #2], the GO! Half-Square Triangle 55547 [Die #5], and the GO! Rectangle 55236 [Die #8].
See the diagram here for the exact dies I used for each location. You will leave this block in two halves so do NOT make the final seam at the center.
| Part of the Block | Fabric | Die Used | Quantity Needed | Number of Cuts |
| Corner Squares | 1 orange1, 1 orange 3 and 2 squares of Background | 55232 | 4 total - 2 background and 2 orange | 1 |
| Side & Center Rectangles | 1 background, 1 orange 2 and two dark brown | 55236 | 4 total -2 dark brown, 1 orange 2 and 1 background | 1 |
| Half Square Triangle | 8 dark brown, 1 orange 1, 1 orange 3, 2 orange 2, 4 background | 55547 | 8 dark brown, 1 orange 1, 1 orange 2 ,2 orange 3, 4 background | 2 |

- Piece the four center flying geese units.
- Sew them into two pairs. Press the seams.
- Make 2 half-square triangle units using 2 backgrounds and 2 dark brown half-square triangles.
- Sew the half-square triangle units to the 2 background squares. Press the seams.
- Sew these to either side of the double flying geese unit. Press the seams.
- Repeat for the pumpkin half of the block.
Pro Tip: Be sure to keep all the orange 1 fabrics on the left, all the orange 2 fabrics in the middle, and all the orange 3 fabrics on the right.


Once you've constructed two star halves, finish these two top pumpkin rows. The top row is finished with [2] 3 1/2" X 2 1/2" rectangles.

The second row is finished with [1] 1 1/2" X 2 1/2" rectangle of orange 1, [1] 1 1/2" X 2 1/2" rectangle of orange 3, and [2] additional 2 1/2" orange squares.

- Next, make 3 rows of 5 squares each.
- Press the seams, then join the 3 rows together.
- Then, sew the second row to the top of these three rows.
- Once the four lower pumpkin rows are seamed together, cut [4] 2" squares.
- Mark the diagonal on each square.
- Place one in each corner of the pumpkin.
- Sew directly on the drawn line.
- Press the triangle back into the corners to round the pumpkin.
- Trim away the bottom two layers leaving only a 1/4" seam allowance.
- Sew the top finished background row to the top of your pumpkin.
- Make 2 pumpkin blocks. Each should measure 10 1/2" square.
- Sew one block to the top of the center star block and one to the bottom of the center star block.

How to Create Cornucopia Blocks
We are to the final blocks for the table runner. You need to make two cornucopia blocks for the ends of our table runner.
The new AccuQuilt Cornucopia Block on Board is perfect to make a 10" cornucopia block. On the packaging that comes with the die, are complete instructions on how to cut and sew the pieces you need for the cornucopia block.

AccuQuilt also just posted a Youtube video on how to create your cornucopia quilt blocks. The instructions on the packaging and the video are both excellent.
One thing I discovered is if your sewing machine has a memorized piecing function, you can use it to make perfect Y-seams in constructing these blocks. If your machine does not have memorized piecing start and end each of the Y-seam segments with a locking stitch or a couple of backstitches.
This will prevent any seams from coming loose as you piece the rest of the Y-seams.

After cutting the pieces, I needed to make my cornucopia blocks I discovered that I could bring them to the sewing machine in an organized fashion by just bringing the entire die with the pieces on top.
This way I can grab the piece I need and follow the instructions without getting confused about which piece goes where.

I used background fabric on the cone section "B" of both of my Cornucopia blocks so the top part looks like a fan. This is so I can applique my turkey and the fan portion will be his tail feathers.
Once the piecing is complete for the cornucopia blocks, sew them to the ends of the table runner. See photo for proper orientation. The cones should be facing the ends of the table runner and the fan section of the cornucopia block should be attached to the bottom of the pumpkin blocks.

I added borders prior to completing the applique of my turkey. I added a 1/2" inner border. For this you will need [4] 1" strips of the inner border fabric. I used a brown wood grain fabric.
You can use the Accuquilt 1" strip die (55052) for these strips. You will need to use 1 1/2 strips for each side inner border and 1/2 strips for each end.
- Attach the side borders, trim to the length of the table runner. Press toward the border strip.
- Then, cut the end inner border pieces to 10 1/2" and add a mustard-colored cornerstone to each end of this piece.
- Sew the end pieces of the border with cornerstones to the table runner - making sure to align the cornerstones with the side borders.
- Finally, I added a 2" outer border. I used the same 2 1/2" strip die that I made the pumpkin squares with to cut the strips for this outer border.
- Repeat the same process with these side outer borders as you did with the inner border.
- For the end pieces, I again cut and added cornerstones. The cornerstones are 2 1/2" squares.
- Trim the end outer border piece to 11 1/2" X 2 1/2".
- Sew the cornerstones to either end.
- Sew the outer border end pieces to the table runner making sure to line up the corners stone with the outer border side pieces.
All the piecing for your table runner is now complete! You only need to add the applique.

How to Create the Applique
Just look at how wonderful pieced these Blocks on Board come out when you are piecing. My little turkey hides a multitude of sins. But with this Cornucopia BOB Die, you can let your intersections show and be proud of the accuracy you've achieved.

Often our table runners are pretty and elegant. If that is what you desire you can leave the appliqued turkeys off your runner. It will still be a pretty and mature-themed runner.
But, if you have grandbabies visiting for Thanksgiving a special little fun table runner for them to enjoy may make some memories for your family.
- I prepared all of the applique pieces by transferring them to the paper size of the fusible webbing I am using. You will need 2 of each piece.
- Once all you pieced are drawn, fused to the wrong side of your fabrics, and trimmed to the exact shape you drew; you can begin applying them to the table runner.
- I first add the turkey's body. I sit him where the lower edge of his body section stretches from one side seam of Section B to the other side seam of Section B.
- You can press as you go or press once everything has been placed.

Do whatever you like the most.
After the main body section is placed properly, I add the lighter turkey tummy section.
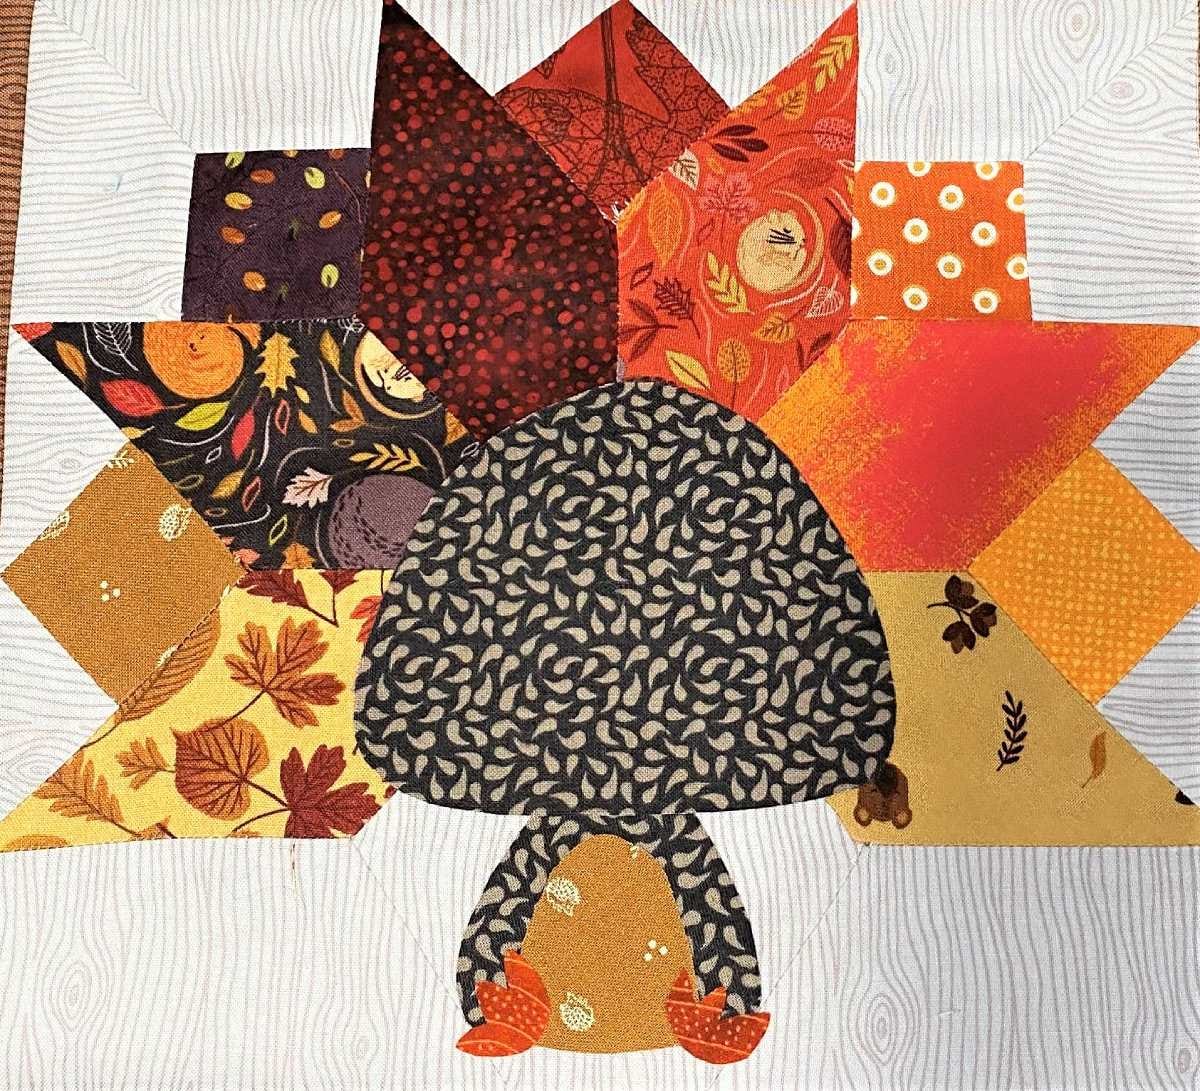
Then, I add the head and the feet. Notice that the flat side of the head is the bottom of the head. Place the feet over the seam between the body and the tummy sections.

Next, add the turkey's beak. Place it low on the head and centered between the two sides.
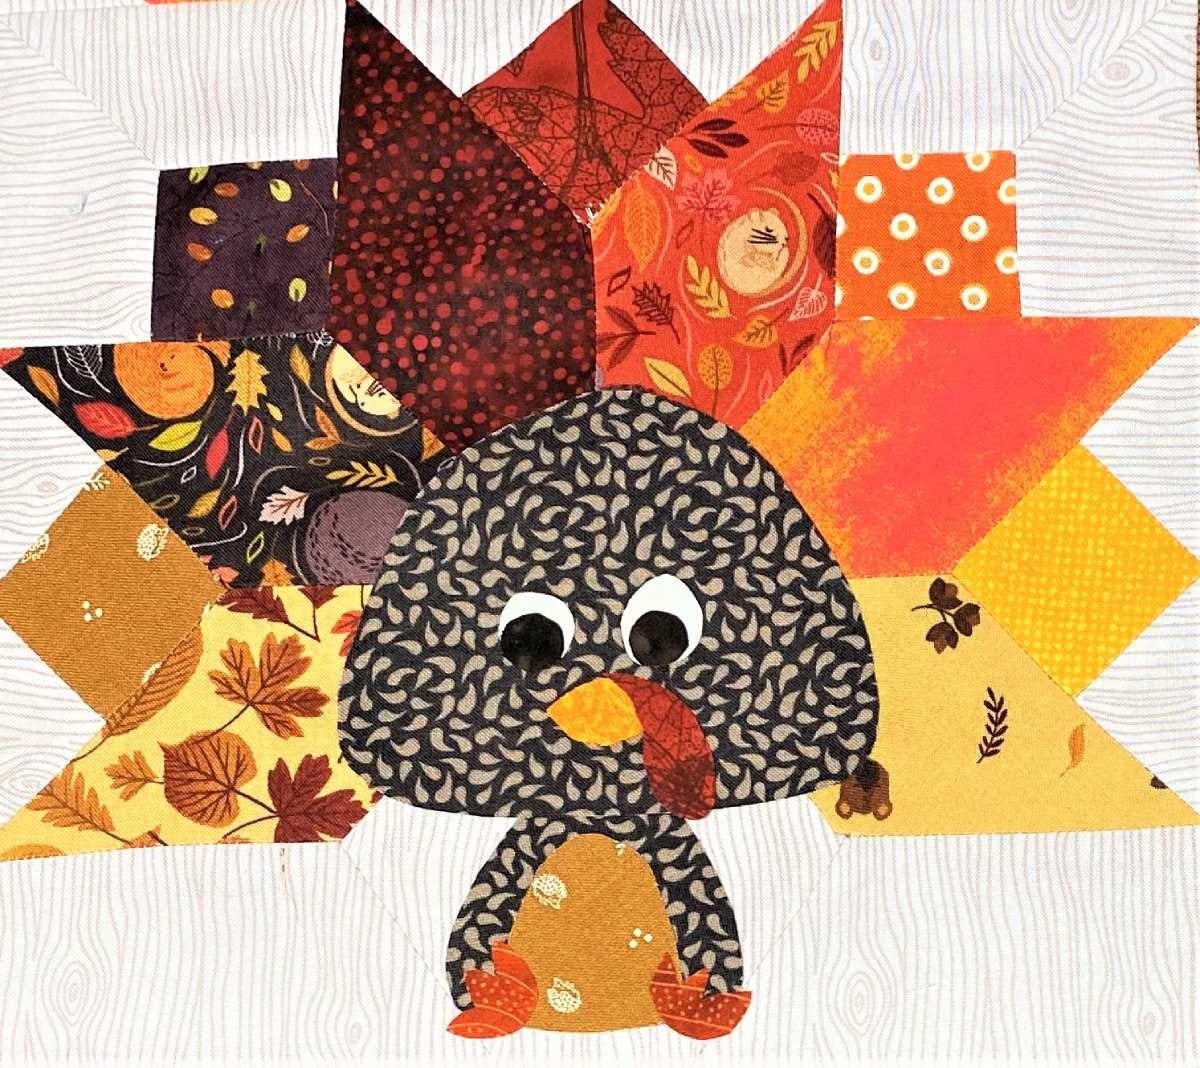
Finally, add the turkey's eyes. Each eye has both a white part and a dark brown center. Place the dark brown part at the bottom of the eye otherwise, the eyes will look like they are on an insane or possessed turkey. Place the snood atop his beak. Press all the turkey parts into place. Finally stitch around the pieces using a blanket stitch, a satin stitch, or an applique stitch to secure them.
Once that is complete you can add your backing and batting. Then, quilt and bind as you desire. For a copy of the applique templates please visit my website. They are available as a free download.
Bonus Thanksgiving Recipe!

What do you serve at Thanksgiving that is a family tradition for your family? For my family, we enjoy a traditional Southern dish known as Sweet Potato Soufflé.
This wonderful creamy dish can be served with marshmallows melted on top or a crunchy pecan toasted top. I like it both ways so I make a ring of mini marshmallows around the edge and fill the center with chopped pecans.
The Blue Willow’s Sweet Potato Soufflé
The recipe I like to use each year is one I first had at The Blue Willow Restaurant in Social Circle, Georgia. Miss Billy's recipe is the best I've found. So here it is The Blue Willow's Sweet Potato Soufflé.

- Mash sweet potatoes with whisk or potato masher. You can use your Instapot to cook fresh sweet potatoes in about ten minutes. You can also use 1 large can of canned sweet potatoes
- Drain off the liquid before mashing potatoes.
- Combine all ingredients except marshmallows and mix well. I use a stand mixer. A good high-speed whipping will make your soufflé light and airy.
- Pour into a 9x13 inch casserole dish and bake at 350 degrees for 25-30 minutes.
- Top with mini marshmallows.


