
Welcome to the GO! Big Crazy Quilt-10" Finished Block on Board® (BOB®). This BOB is crazy fun and easy. Already I have made three crazy quilts with this die—and I love it. The packaging on the die has some great ideas for Crazy Quilt variations. One of the suggestions is to mix the Crazy Quilt blocks with a pieced quilt block. This die makes a finished 10" quilt square. That means it will work with the GO! Qube Mix & Match 10" Block. With that idea, I made the Crazy Quilt blocks and also made some classic Square in a Square Blocks using a set of RJR Sparkle Fat Quarters. The finished quilt is 40" x 40".

GO! Fabric Cutter
Studio Fabric Cutter with GO! Adapter (50450, 506503)
GO! Cutting Dies
GO! Big Crazy Quilt-10" Finished Die (55861)
GO! Qube Mix & Match 10" Block (55797)
- Shape 3 (55805) 5" Finished Half Square Triangle (HST)
- Shape 4 (55806) 5" Finished Quarter Square Triangle (QST)
- Shape 5 (55807) 2½" Finished HST
- Shape 6 (55808) 4-1/16" Square on Point (SOP)
GO! Strip Cutter-2½" (2" Finished) (55014 or 55017)
GO! Strip Cutter-3½" (3" Finished) (55032)
Fabric:
10 Fat Quarters for Crazy Quilt Blocks
NOTE: To get blocks with different fabrics in every piece, you will need 10 different fabrics. Each fabric layer makes a complete block. If you prefer, the same fabrics can be used for different layers and this will create a different and beautiful design also. You will only need five crazy quilt blocks for this quilt, so with 10 layers, you can make two of these quilts or you can add additional layers as I did to make a second complete crazy quilt with only crazy quilt blocks.
Green Fabric for Triangles and Inner Border ⅓ yard
- Cut 1—6¼" x width of fabric (WOF) strips. Sub cut into 8—5" finished Shape 3 HSTs.
- Cut 1—4½" x WOF strips. Sub cut into 4—5" finished Shape 6 Square on Point.
- Cut 4—2½" x WOF strips. Sub cut into 2—2½" x 32½" horizontal borders. Sub cut 2—2½" x 30½" vertical borders.
Red Fabric for Triangles, Outer Border and Binding ¾ yard
- Cut 1—6½" x WOF strips. Sub cut into 16—5" finished Shape 4 QSTs.
- Cut 4—3½" x WOF strips. Sub cut 2—3½"x 40½" horizontal borders. Sub cut 2—3½" x 34½" vertical borders.
- Cut 4—2½" x WOF for binding.
Backing 48" x 48" inches
Batting 48" x 48"
Crazy Quilt Block (Make 5 blocks):
The crazy quilt die is laid out as shown in the picture below. It is most important to keep the layers in order as you work.

Cut as follows:
Carefully press and match the edges on two sides of the Fat Quarters. Lay the Fat Quarters on the rotary cutting mat and rotary cut a six-layer 13½" square inside the selvedge edge. Set aside the remaining fabric to be used for the Square in a Square blocks. Continue in this manner and cut as many layers as you plan to use—you will need at least 10 layers as noted above.
Layer six of the cut squares on the Crazy Quilt die board. Cover with a mat and cut with the GO! Big. As the pieces are cut, keep them stacked in the same order as the original stack of layers. I layer them on a 16½" batting covered ruler or arrange them back on the die cutting board itself after all layers are cut. The cut layers will look like this before sorting for piecing.

Sort for piecing:
Take the top piece of Shape B and move it to the bottom of the B stack.
Take the top two pieces of Shape C and move them to the bottom of the C stack.
Take the top three pieces of Shape D and move them to the bottom of the D stack.
Take the top four pieces of Shape E and move them to the bottom of the E stack.
Take the top five pieces of Shape F and move them to the bottom of the F stack.
Take the top six pieces of Shape G and move them to the bottom of the G stack.
Take the top seven pieces of Shape H and move them to the bottom of the H stack.
Take the top eight pieces of Shape I and move them to the bottom of the I stack.
Take the top nine pieces of Shape J and move them to the bottom of the J stack.
When your pieces have been sorted, the stacks will look like this. Each stack will have a different fabric on top.

The blocks may be sewn together in two different methods. One method is to make one block at a time. If this is the first time you have made a Crazy Quilt using this die, it may be easier to make one block at a time.
The second method is to sew all of the pieces in two stacks together, keeping them in the exact order of stacking and then moving to the next stack of blocks. Both methods follow the same order of piecing. With this method, it is critical that all pieces be kept in the same stacked order as you work.
The first step is to sew the individual sections together. Sew pieces A and B together and then AB and C together. Then sew Pieces D and E together, pieces F and G together, pieces H and I together, and pieces HI and J together.

Next sew the sections together. Start by sewing the HIJ section to the FG section.

Then sew the FGHIJ section to the DE section.

And finally sew the DEFGHIJ section to the ABC section.

Square in a Square Block (Make 4 blocks):
The Square in a Square block uses the following shapes from the AccuQuilt GO! Qube Mix & Match 10" Block. Use the fabric that is left after the Crazy Quilt precut square from the Fat Quarters.

Sew the blocks together as shown in the picture below.
Step 1:
Stitch a shape 5 light HST to opposite sides of the square on point. Press seams open. Stitch a shape 5 light HST to the remaining two sides of the square on point. Press seams open.


Step 2:
Stitch a shape 4 QST to opposite sides of the Step 1 unit. Stitch a shape 4 QST to the remaining two sides of the Step 1 unit.


Step 3:
Stitch a light shape 3 HST to one side of the Step 2 unit. Stitch a dark shape 3 HST to the opposite side of the Step 2 unit. Stitch a light and a dark shape 3 HST to the remaining two sides of the Step 2 unit as shown in the picture below.


Quilt Assembly:
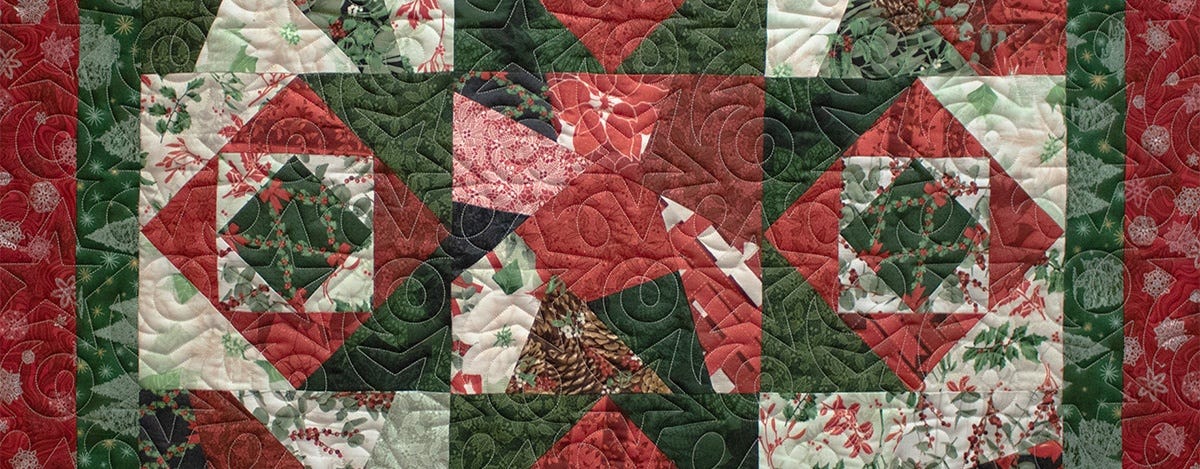
Arrange the nine blocks as shown, making sure the dark star points are pointing out to create the star design. Stitch the blocks together to make three rows and then stitch the rows together to complete the quilt. In order to emphasize the star points, I turned the lighter areas of the crazy quilt blocks toward the corners of the star.

Add Borders to the Quilt:
Cut the Inner Border using the GO! Strip Cutter-2½" (2" Finished). You will need 4—2½" x width of fabric (WOF) strips for the inner borders.
Cut the Outer Border using the GO! Strip Cutter-3½" (3" Finished). You will need 4—3½" x WOF strips for the outer borders.
Measure through the vertical center and left and right sides of the quilt and average the three numbers. Use that measurement to determine the length of the vertical borders and cut to measurement. Stitch the borders to the quilt.
Measure through the horizontal center and top and bottom sides of the quilt and average the three measurements. Use that number to cut the horizontal borders to size. Stitch the borders to the quilt.
Repeat this process for the green inner border and again for the red outer border.

Quilt as desired. Bind and Enjoy!
By Marjorie Busby


