


Hello Friends! It's Melissa Corry from Happy Quilting here and I am thrilled to be bringing you a new quilt tutorial along with a bonus pillow tutorial as well. It is always fun to work with a rainbow of colors, and throw in a half Hexi and you have Over the Rainbow. And I just couldn't resist adding some adorable Gnomes, how fun are they! These projects are fun and fast, and you are going to love making them, and you can get them done just in time to welcome in Spring.
So without further ado, here is my Over the Rainbow Quilt and Pillow!! The quilt features the large GO! Half Hexagon Die and the GO! Gnome Die. The pillow features the small GO! Half Hexagon Die and again, the GO! Gnome Die.
Aren't they just so happy making!!!
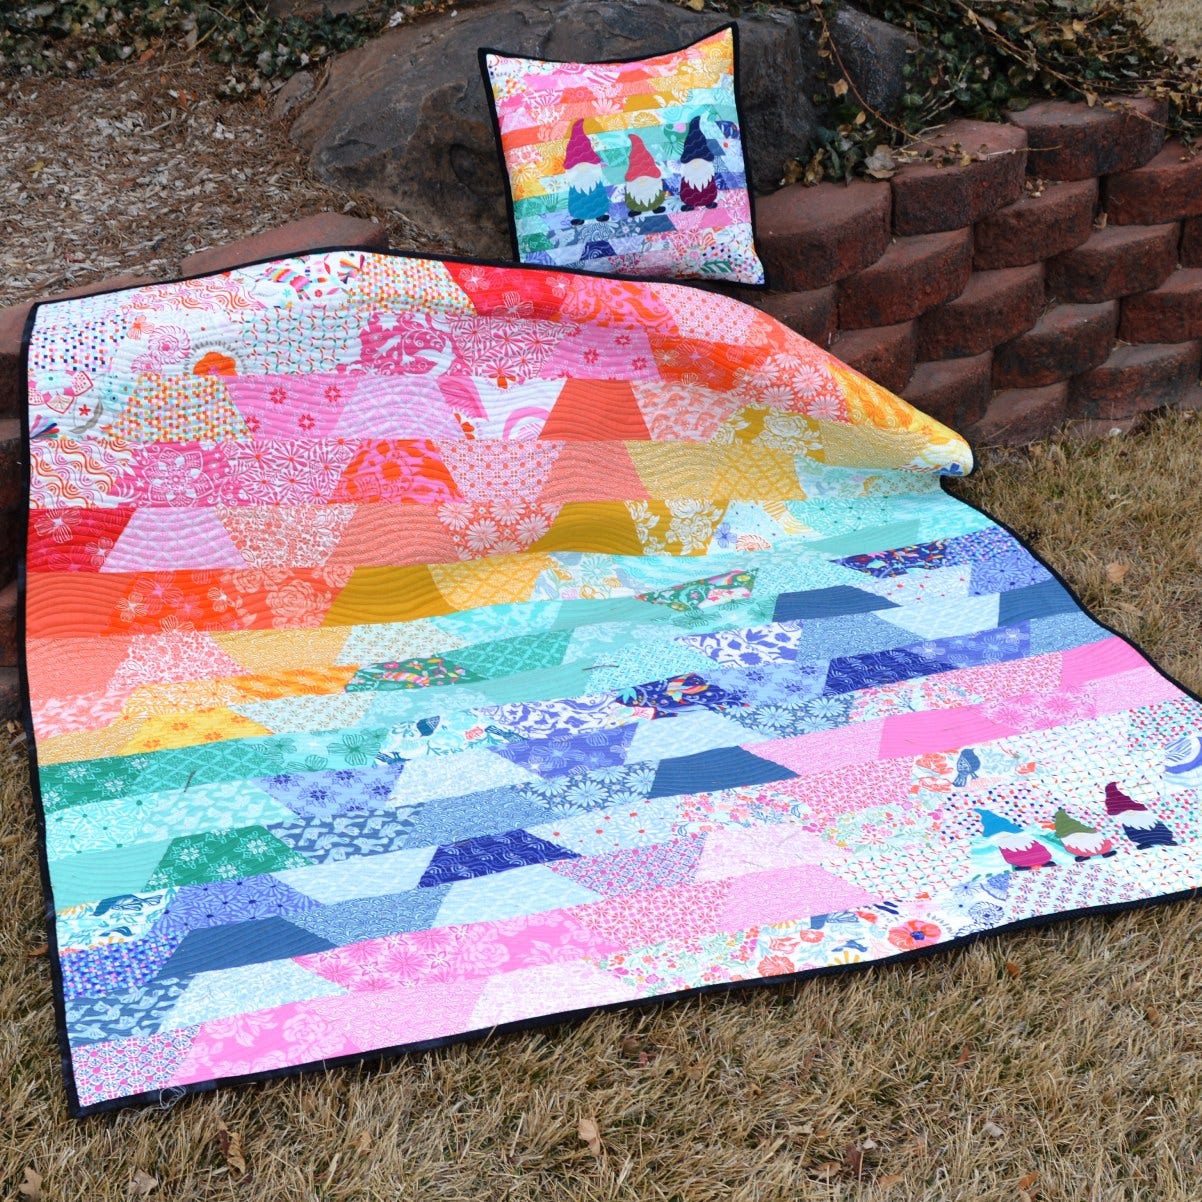
Both the quilt and the pillow are made with 160 Half Hexies, which sounds like a lot, but they sew up so fast. The quilt finishes at 60" x 62" so it is a great lap size quilt, and the pillow squares up at 16" x 16", making it an adorable bonus to go with the quilt😉

So let's get to making your own Over the Rainbow Quilt and Pillow!!!
Materials Needed:
To make your own Over the Rainbow Quilt and Pillow, grab your AccuQuilt GO! Cutter and...
- GO! Half Hexagon - 4 1/2" Sides Die (55437)
- GO! Half Hexagon - 1", 1 1/2" , 2 1/2" Sides Die (55165)
- GO! Gnome Die (55210)
- Heat N Bond Lite
- 2 Layer Cakes (80 10" Fabric Squares)
- Solid Scraps (optional)
- ⅔ yard of print for binding quilt and pillow.
- 4 yards of print for backing quilt - 1/2 yard of print for backing pillow
Over the Rainbow Quilt
Step 1 - Cutting
Gather the 2 Layer Cakes and the GO! Half Hexagon - 4 1/2" Sides Die
You will be using 80 of the 84 Layer Cake Squares.

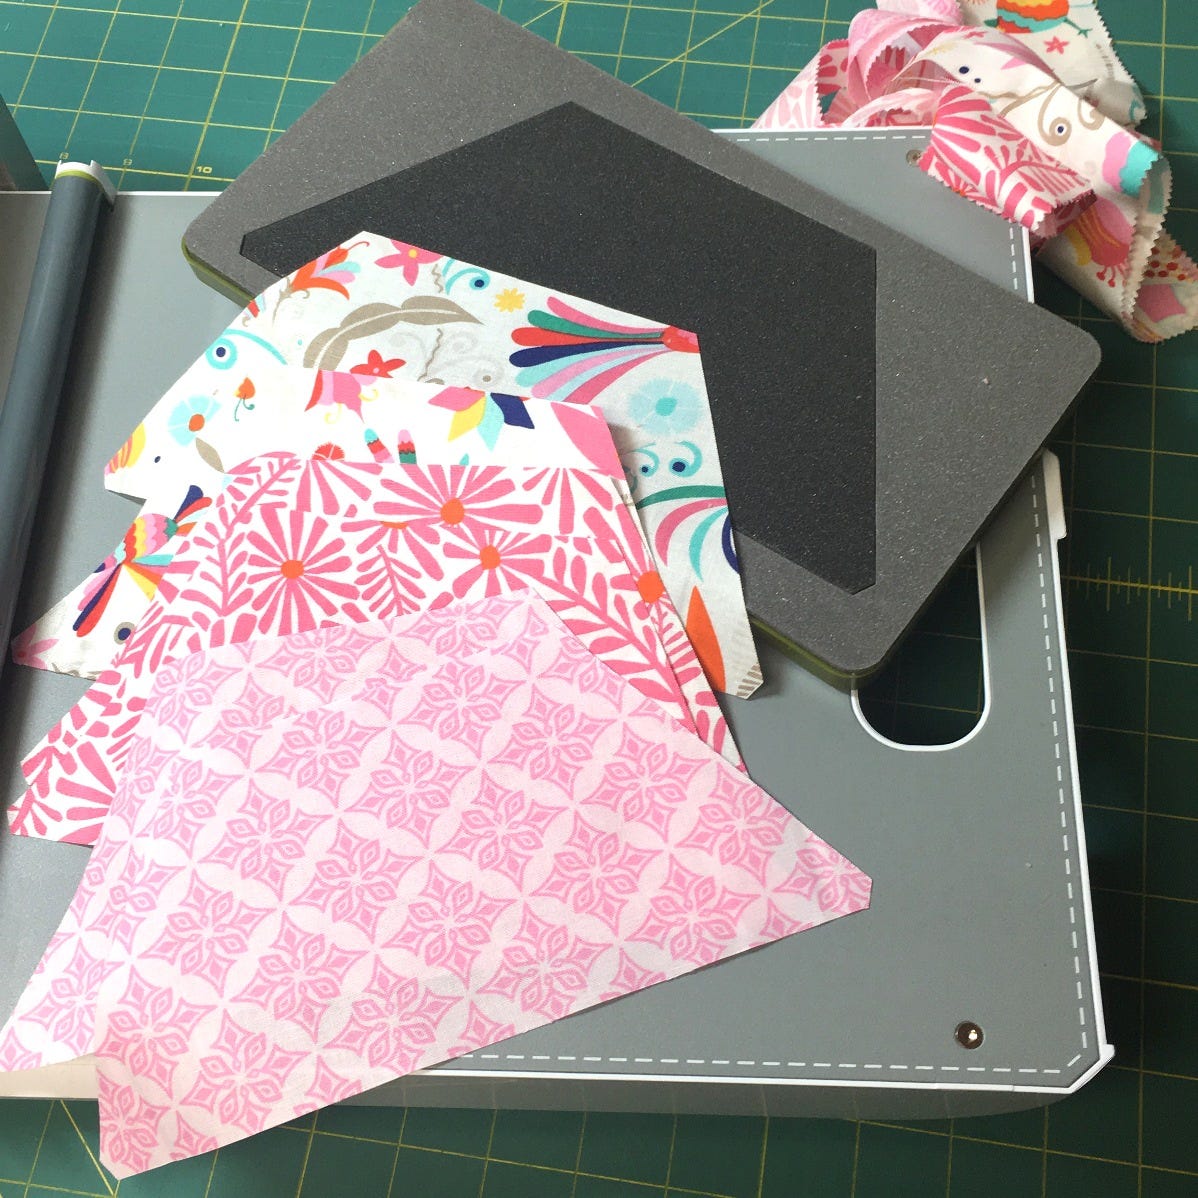
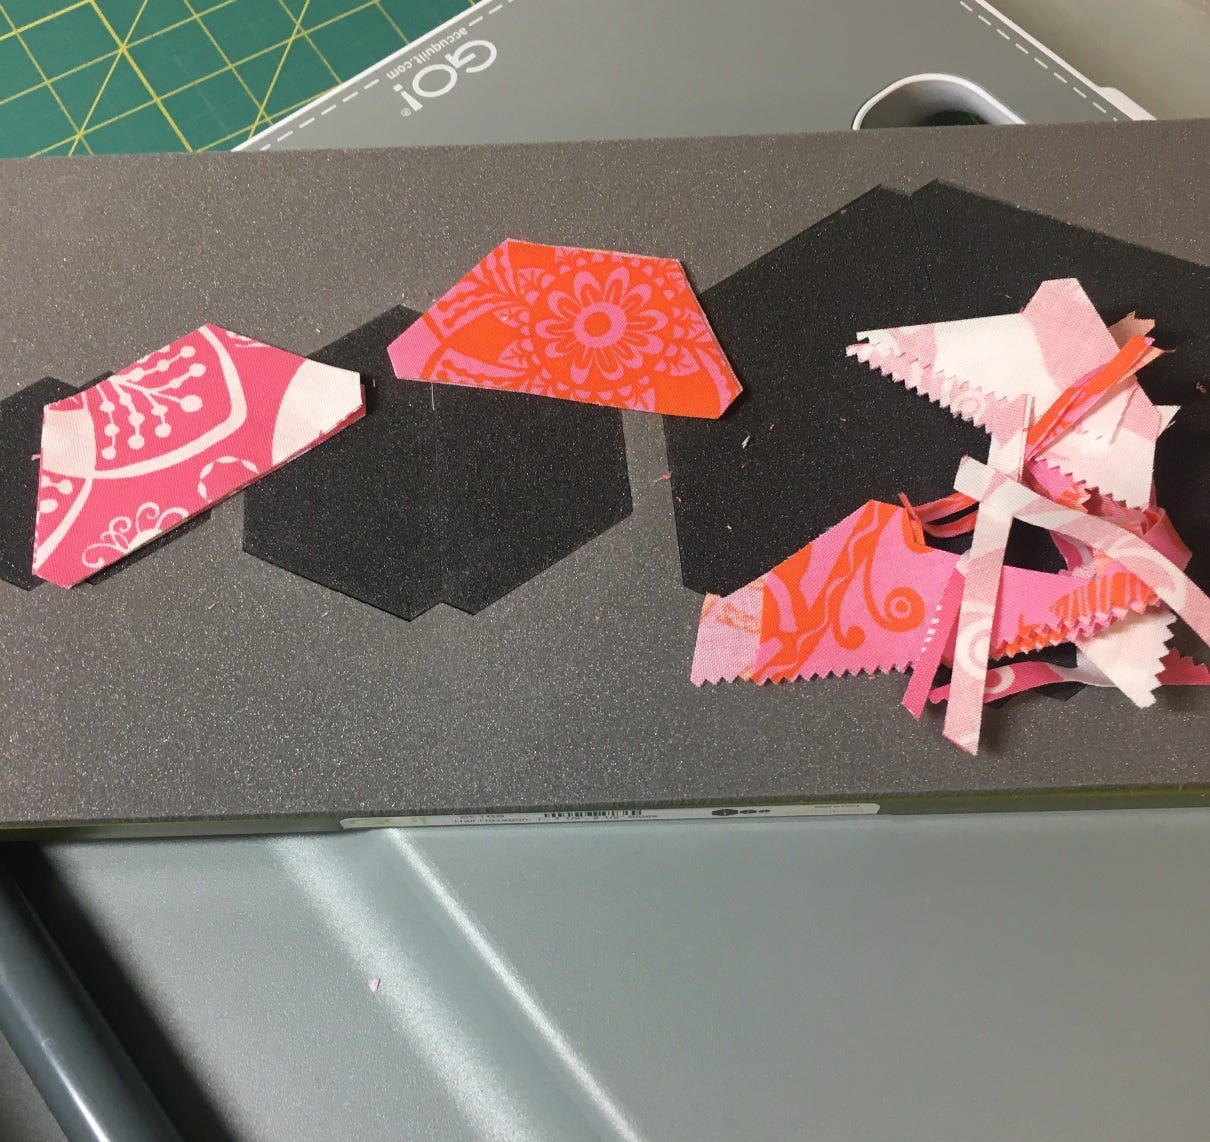
Fold the 10" square in half and place it on the die. You can stack up 3 folded squares, so your layers are 6 deep. Cut the die in your AccuQuilt GO! Cutter.
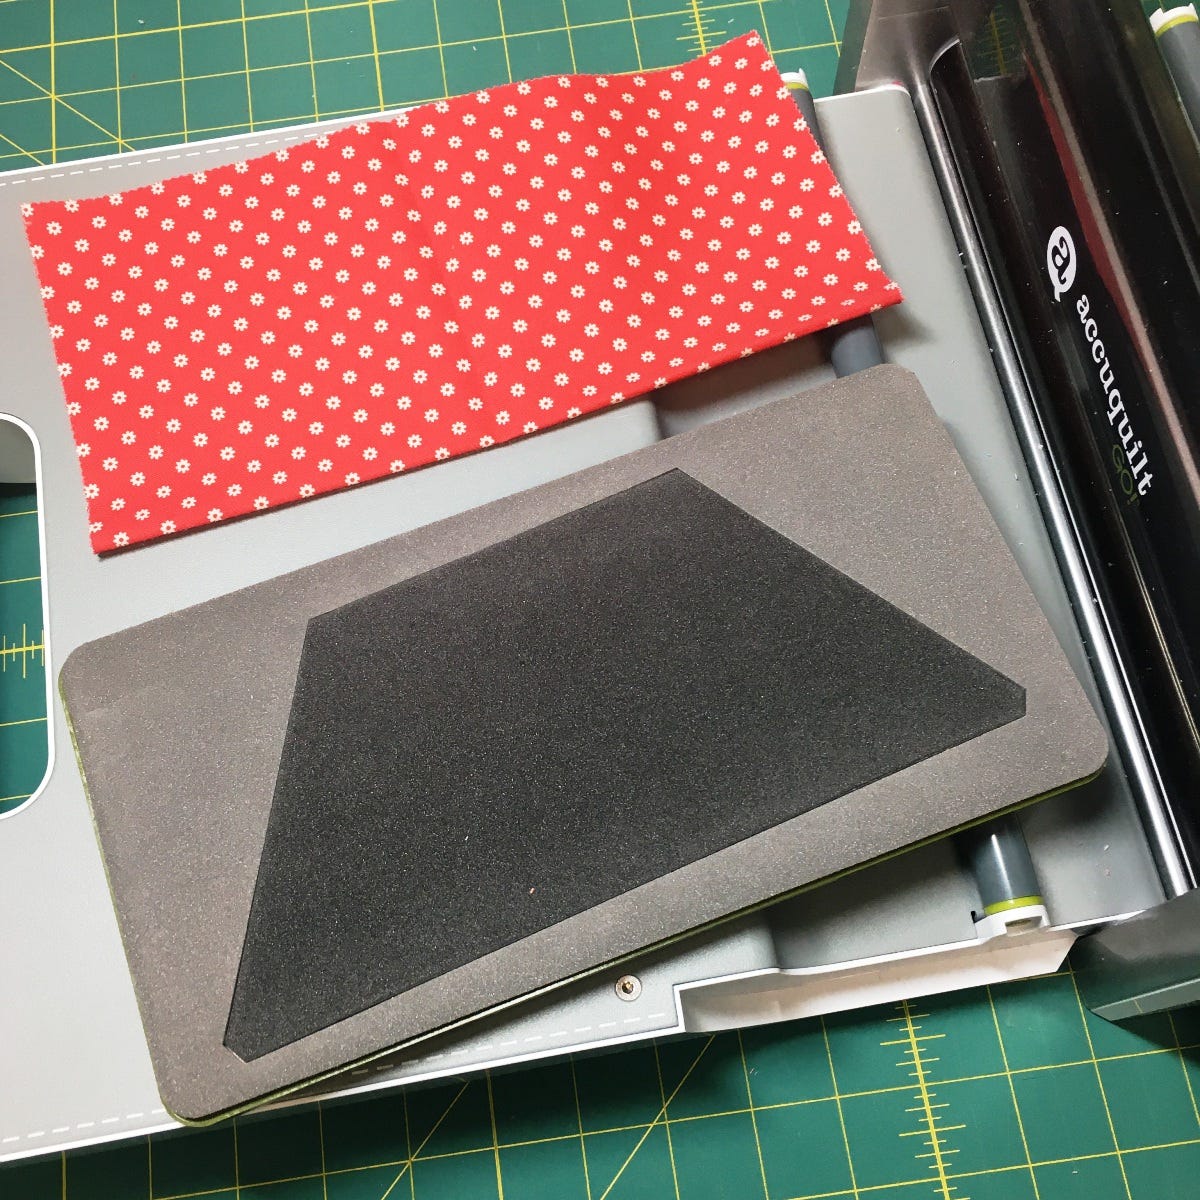
Repeat this process for all 80 of the 10" squares creating 160 Half Hexagons. Set the scraps aside, as we will be using them for the bonus pillow ;)
Step 2 - Sewing the Quilt Top
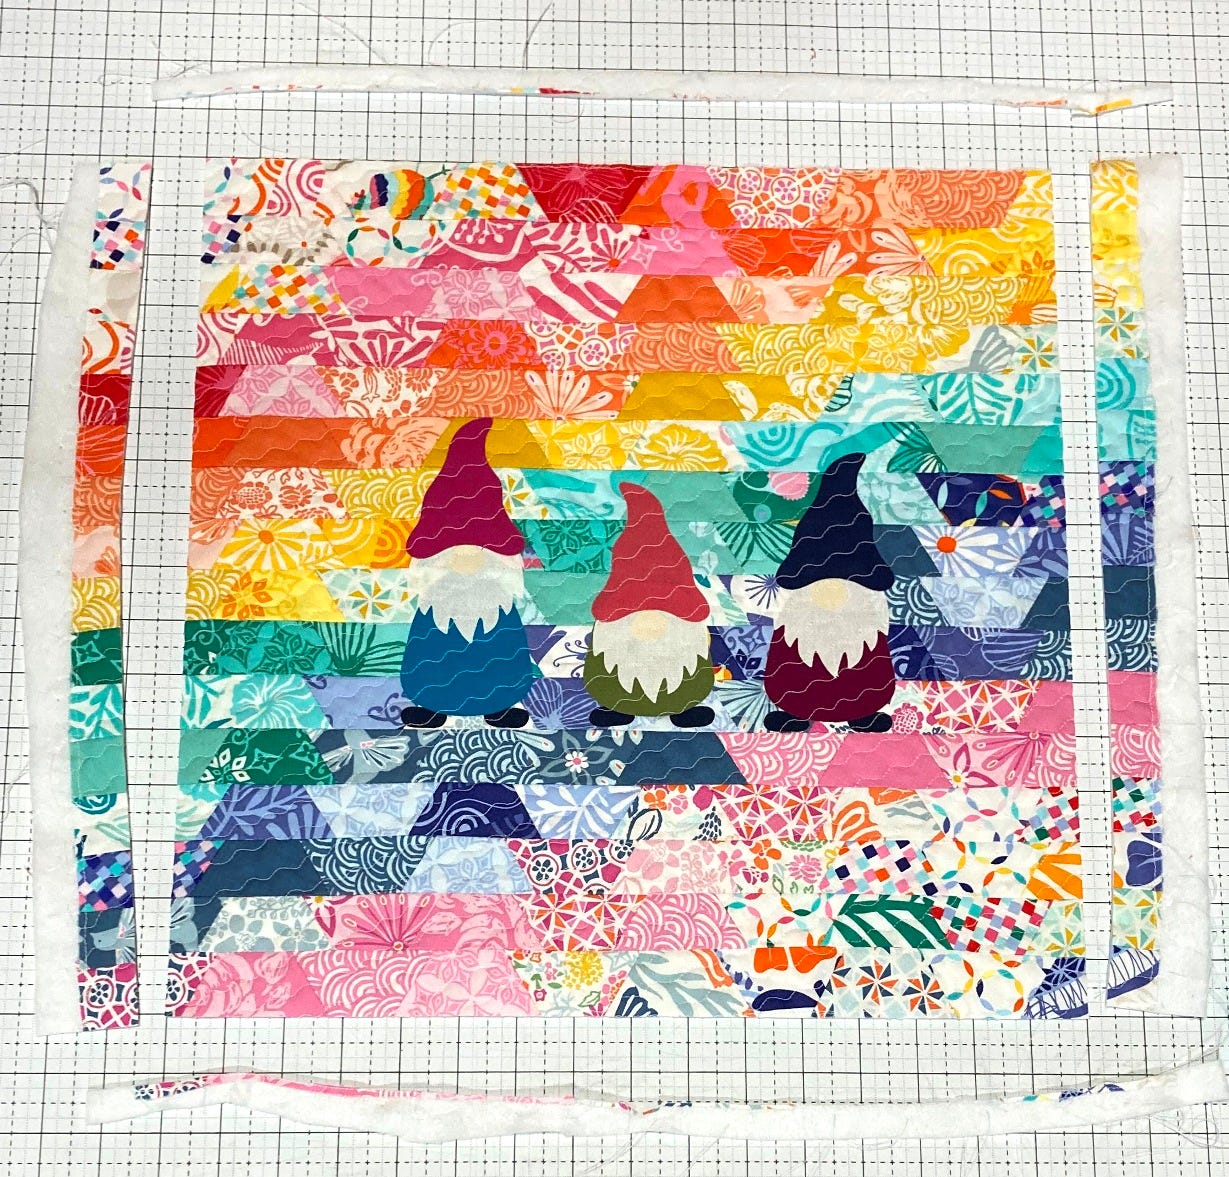
Layout your 160 Half Hexagons in sixteen rows with ten half hexagons per row, alternating them 180 degrees as shown. I laid my rainbow out in a diagonal with low volume Half Hexagons in the top and bottom corner. You can follow my example, or layout your rainbow in any way you like, just so long as there are 16 rows with 10 half hexagons per row.

You will now sew the Half Hexagons into rows. To do this, place the second Half Hexagon in the row onto the first Half Hexagon with right sides together. Align the clipped corners and sew a 1/4" seam along the edge as shown.

Continue in this manner, adding Half Hexagons until the entire row of Half Hexagons is sewn together. You will be alternating placement up and down t align the Half Hexagons.

Repeat this process until you have sewn all 16 of the rows together as shown.

Press the seam allowances in opposite directions from row to row. They won't nest, but I find this just helps the quilt from getting a little warped when sewing it all together.

Now, we are going to trim the rows square. Simple trim the the ends square, using the inner edge of the Half Hexagon as a guide. You can do this with a rotary cutter or a pair of scissors if you cut straight. Trim the beginning and end of each row square.

And now that it is all squared up, you are ready to sew your rows into a quilt top. Place the second row onto the first row with right sides together. Align and pin the edges. Sew a 1/4" seam along the pinned edge.

Continue this process, adding the third row, and then the fourth row and so on until you have sewn all of the rows together.

Press the seams open. And just like that, your quilt top is done and you are ready to add some Gnome's to it!!

Step 3 - Adding the Applique
If you are new to adding applique, you can see my Applique Basics Video Tutorials here (scroll down past the first 3 videos) for extra guidance.
Using the GO! Gnome Die (55210) Cut out all of the pieces for the Gnomes. I choose to use some solid scraps for this part as I wanted my Gnome's to stand out, but you can always use the same print as your fabric. I added Fusible Heat N Bond to the back of my fabrics before cutting to make it easy to attach them to my quilt. I cut out 3 Gnomes for the Quilt and 3 Gnomes for the Pillow. You can add as many Gnomes as you like😉

Remove the Heat N Bond paper backing on each of the Gnome pieces. Align your Gnomes as you like on the quilt until it is pleasing to the eye. You can make your Gnomes shorter or taller by placing the beard and hat higher or lower on the body. Once you have them in place, press them with a hot dry iron to fuse them in place. At this point you would normally stitch around each of the applique pieces to secure them in place, and you can do so if desired. I choose to just keep my fused in place and secured them with my quilting, but you have to be sure to stitch over each applique piece with your quilting. This will give them a scruffy finish when washed😉

Step 4 - Finishing the Quilt
And all that is left is to turn that finished quilt top into a finished quilt.😉 Time to baste it, quilt it, and bind it - which is a whole lot in one little sentence. If you are new to quilting, check out my video tutorial series on finishing your quilt. It will walk you through basting, quilting, and binding, step by step.😉
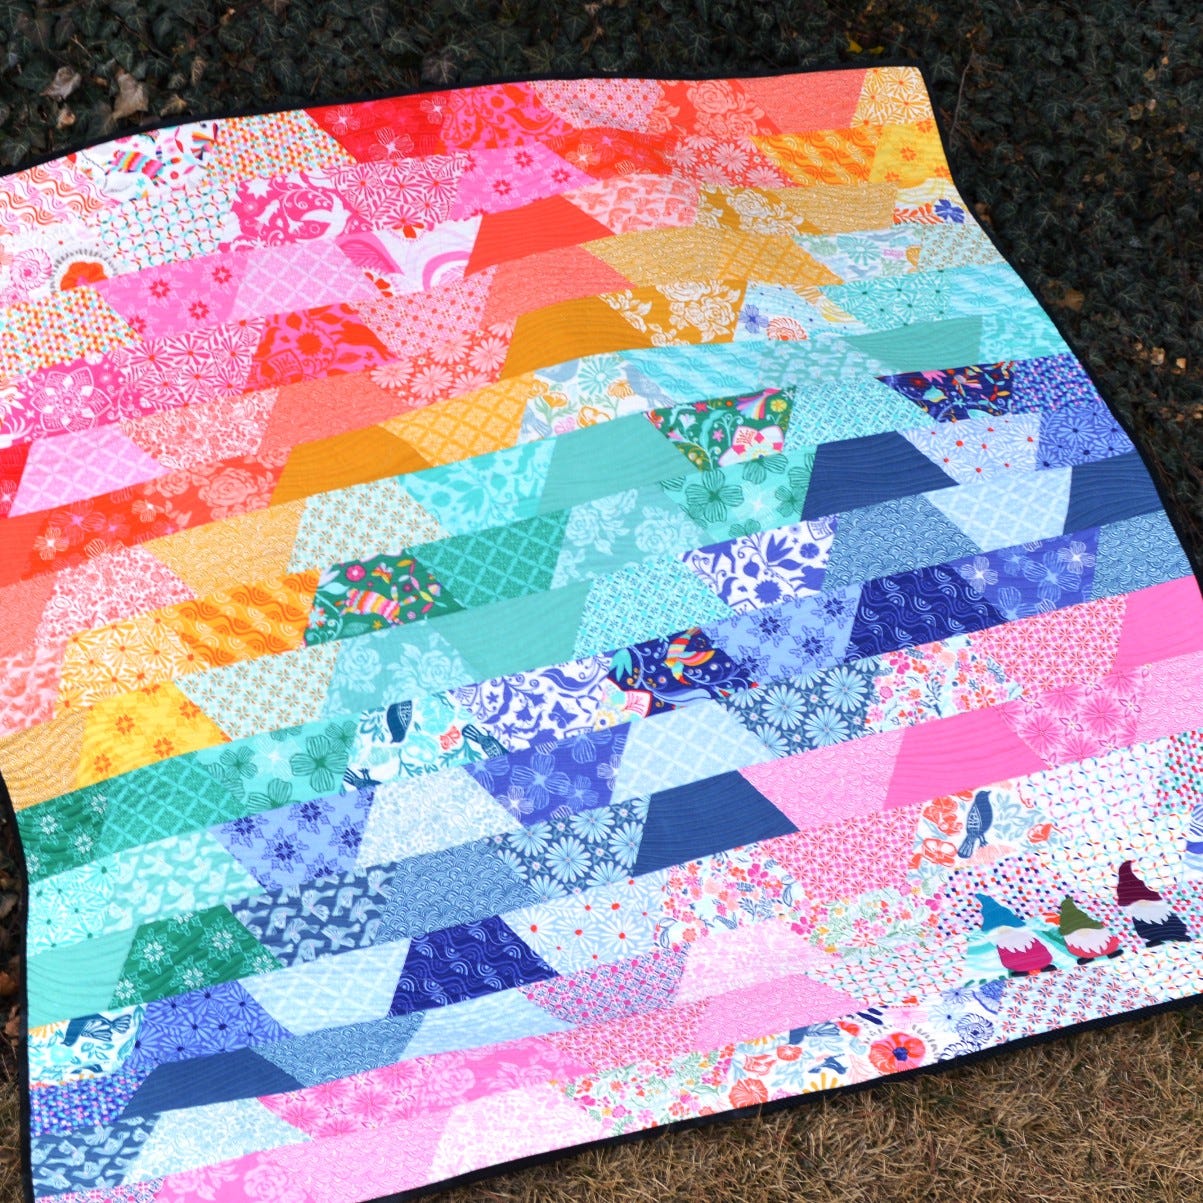
I quilted mine with an all over wavy line and then bound it with texture black. And as you can see, I made sure to quilt densely so that my Gnomes would get super attached. They are going to be so cute when they get washed and wrinkly ;)

Now you can sit back and enjoy your beautiful 60" x 62" End of the Rainbow quilt . . . but don't sit back to long . . . you are going to want to make up the End of the Rainbow pillow as well ;) So let's get to it!!!
Over the Rainbow Pillow
Step 1 - Cutting
Gather the scraps from your GO! Half Hexagon - 4 1/2" Sides Die. Cut 2 of the triangle corners off on each of the squares as shown. You will be using them to cut 160 small Half Hexagons so grab your GO! Half Hexagon - 1", 1 1/2" , 2 1/2" Sides Die and let's get cutting scraps. (And of course, you can always cut 320 Small Half Hexagons using the other 2 scrap triangles and make two pillows, just for fun and to use up all of your scraps)

Place the squares over the center Half Hexagon die as shown. It will be close, but it will fit ;) As the center lines overlapped a little, I found it best to not stack up more than 3 sets of triangles, as that makes 6 layers deep at the center line. Cut the die in your AccuQuilt GO! Cutter.

Repeat this process for all of your scrap triangles creating 160 small Half Hexagons.
Step 2 - Sewing the Pillow Top
Layout your 160 small Half Hexagons in sixteen rows with ten half hexagons per row, alternating them 180 degrees as shown. I laid mine out in the exact same order as my quilt, but you can mix it up if you like.

Sew the small Half Hexagons into rows and press the rows. This is exactly the same process of making the quilt top, just on a smaller scale. Once the rows are pressed, trim the ends square.

Then sew the rows together to make the Pillow Top. Press the seams open.

Step 3 - Adding the Applique
And if you didn't cut them out with the quilt top, using the GO! Gnome Die (55210) Cut out all of the pieces for the Gnomes you want on your pillow, taking care to add Fusible Heat N Bond to the back of my fabrics before cutting. Fuse the Gnomes in place on your pillow top. Again, you can secure stitch the applique or quilt them in place.

Step 4 - Finishing the Pillow
I choose to quilt my on my domestic machine with a simple wavy line on an angle. Again, I made sure to tack down all of the applique pieces on my Pillow Top by quilting densely. Once quilted, I squared my Pillow top to 16" x 16".
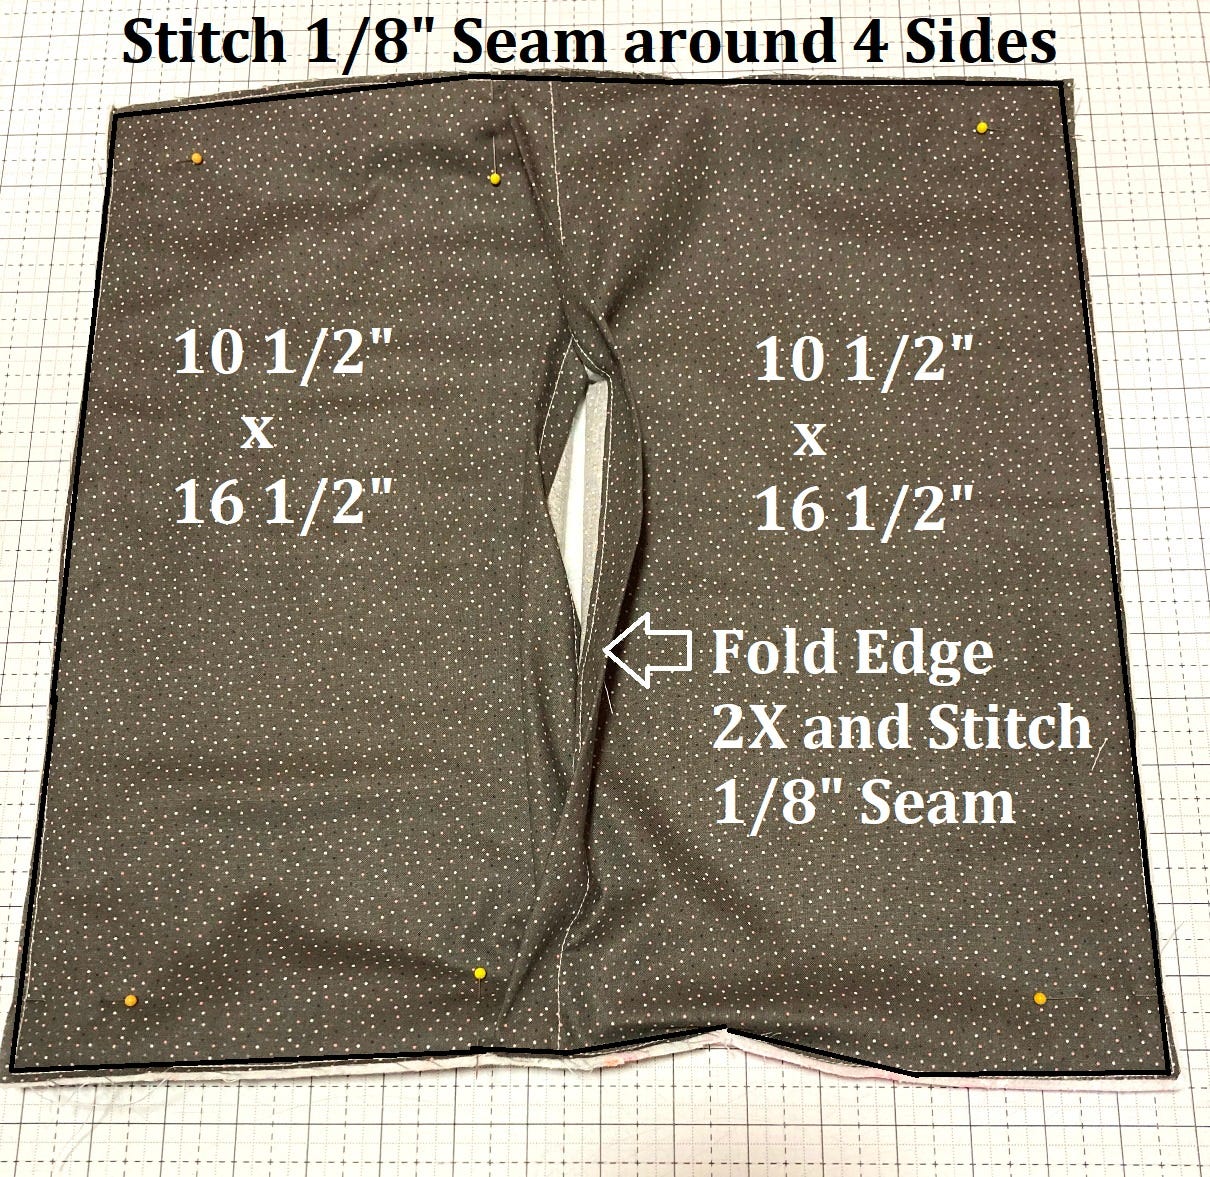
And all that is left is to turn it into a pillow. There are many pillow back options, but I like a simple envelope back. To do this, just cut (2) backing squares 10 1/2" x 16 1/2". On either rectangle, fold one long edge over twice and stitch along the edge as shown. Then place the two rectangles onto the pillow top with wrong sides together, aligning the edges, and overlapping the center where the seams are. Stitch an 1/8" seam around all four sides to secure everything in place.
Then, simply bind the pillow top and back panel pieces like you would a quilt. And just like that, you have an adorable 16" x 16" End of the Rainbow Pillow!!

Isn't that just adorable!!! I just love those tiny half hexagons!!! Everything tiny is always so cute!!!

And that is today's project :) I hope you have enjoyed this tutorial and if you make your own Over the Rainbow Quilt and Pillow, I would love to see it! Share it with us on social media with the hashtags #happyquiltingwithmc and #AccuQuilt. We can't wait to see your Over the Rainbow quilts and Pillows!
Thank you so much to AccuQuilt for having me here on their blog. To see more of my Happy Quilting adventures, stop by Happy Quilting for a visit. I just love being able to share lots of quilting goodness on a daily basis.
I hope you all have a very Happy Quilting Day!!!


