

Hi everyone! This is Marjorie from blue feather quilt studio, and I want to share a machine embroidery project using the GO! Alphabet die set that is fun, easy and one that you can personalize in as many ways as there are words. If you love word quilts, but not paper piecing, then the possibilities using the AccuQuilt GO! Alphabet and an embroidery machine will have you more than a little excited. This is so much fun that I have already made baby name quilts with the alphabet for my new twin grandchildren. And my head is bursting with ideas: what about a quilt that says “Just Quilt It” in the middle surrounded by sampler blocks, or a rag quilt with a name embroidered as one letter in each block. Here's one of the baby quilts I made with the letters and other AccuQuilt GO! shapes.

This project starts with the Perfect Placement Alphabet and Numbers Machine Embroidery Set. Each letter is embroidered separately. Sounds hard and time consuming? Not at all. Once you get started, you will breeze right through those words. This method is similar to my dot to dot instructions for machine embroidery applique placement, but it’s even easier. With these letters, the spacing between letters is always just right and you get paper templates to use for designing. All the letters except the “W” and "M" will fit into a 4 x 4 inch embroidery hoop.
Instructions for my project are below as well as tips to get you started on your own word project.
You will need the supplies listed below. The stabilizer that I used for these letters is the sticky, water soluble type, and it's a real time saver. A very lightweight tearaway stabilizer can also be used. The machine embroidery uses a blanket stitch so a stabilizer that washes out with the first washing works perfectly and your quilt will be as soft as if you had stitched all the letters by hand.
Another product that I have recently started using is Lite Steam-A-Seam2. It is a "repositionable" fusible and the letters stick to the background fabric well enough that it saves a pressing step in the machine embroidery process.
Pin anchors are very helpful for holding the background fabric in place when you are positioning the fabric for the next letter. These are made from foam floor/play mats, but you can also purchase the Pinmoor notion from your local quilt shop.

Templates are used for marking the letter placement. The machine embroidery set includes printable templates in a pdf file that is included with the alphabet and numbers embroidery design set. With scissors or a rotary cutter, cut the templates apart on the square placement line. These templates can be used for designing and marking accurate placement of machine embroidery letters and numbers on the quilt background.

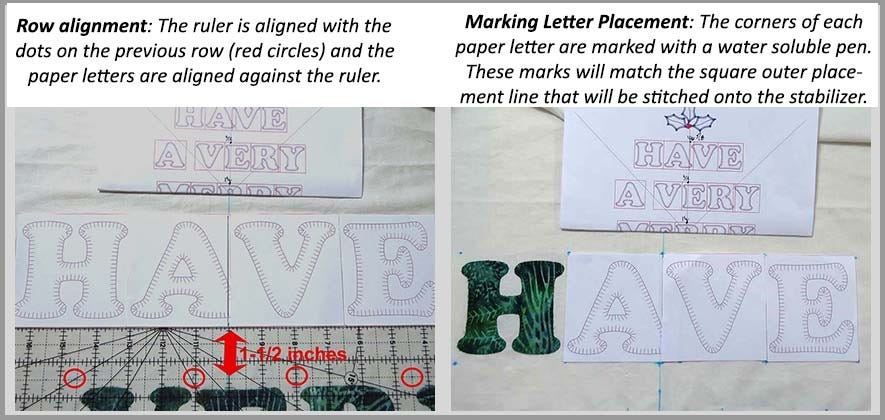
Create and Mark Design: When you have decided on an overall design, use the paper templates to lay the design on the background fabric and mark the letters and any other embroidery designs you choose onto the background fabric. A water soluble marker is used for marking and a dot or a cross is used to mark the corners of each letter. The center of the design is marked with horizontal and vertical lines and the letters are placed starting in the center and working outward. Scotch tape is helpful to hold the letters in place. Short horizontal lines with a ruler are helpful to space the rows evenly.
The following shows a closeup of marking a new row after a whole row of letters has already been stitched.
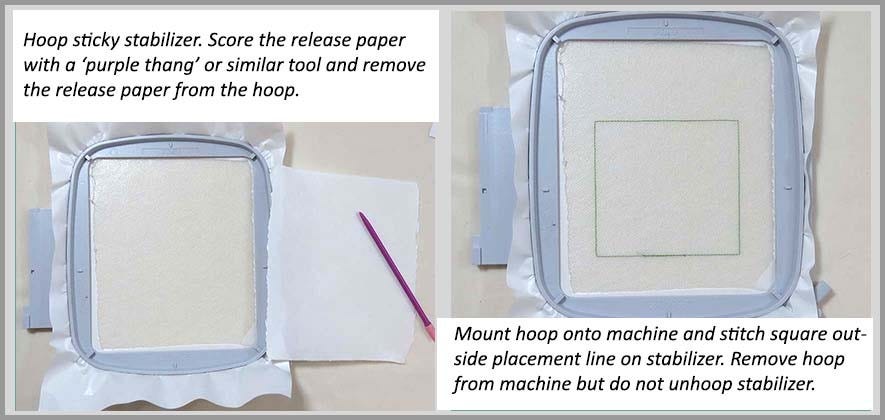
Stitching letters: Hoop the stabilizer and stitch the square outside placement line directly onto the stabilizer as shown below.
Next, prepare the stabilizer for easy placement of the background fabric onto the hoop. Thumb tacks are used to line up the placement marks on the background fabric with the placement stitches on the stabilizer.
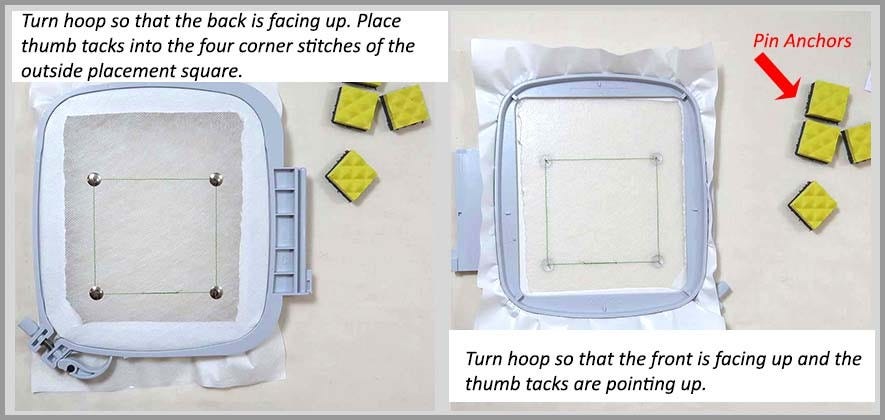
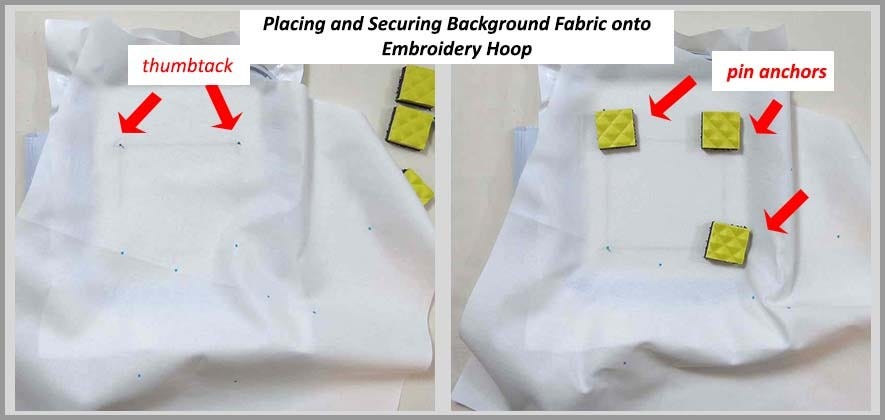
When the thumb tacks are in place, the background fabric is carefully placed over the thumb tacks and the corners marked on the background fabric for the letter to be stitched is matched with the thumb tacks. Gently press the fabric down over the thumb tack and secure with a pin anchor as shown below. It works best for me to secure the top two pins and then hold the fabric gently but firmly while I match the marks with the lower two corner thumb tacks. At first this may seem a bit awkward, but quickly becomes second nature.
Smooth the fabric onto the sticky stabilizer and REMOVE THE THUMB TACKS. Thumb tacks are NOT good for embroidery machines.
When the fabric is secure, take the hoop to the machine and stitch the placement line for the letter shape. Be careful if you are working with a large background fabric so that the fabric is not trapped underneath the hoop. The first letter I stitched had to be unstitched because a corner was under the hoop.
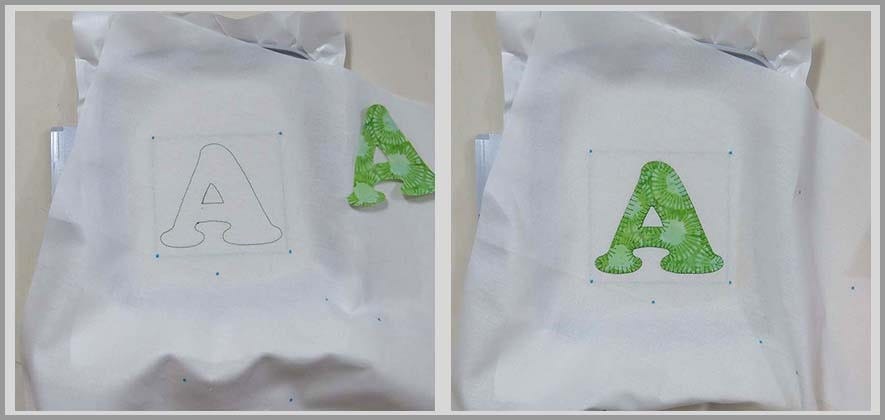
The only thing left to do is to place the fabric shape onto the background just inside or on top of the placement stitches and stitch the blanket cover stitch. Unhoop the stabilizer, trim just inside the square stitching line being careful not to cut the embroidery. And you are ready to begin the process again for the next stitch.

And here's some inspiration for a couple of projects. You can finish "Let It Snow" before Christmas! Or why not try the Alphabet Soup baby quilt from the AccuQuilt.com website. Head on over to my blog and download the free placement diagram and templates for "Let It Snow" or go to the AccuQuilt website and download the free "Alphabet Soup" baby quilt pattern.


