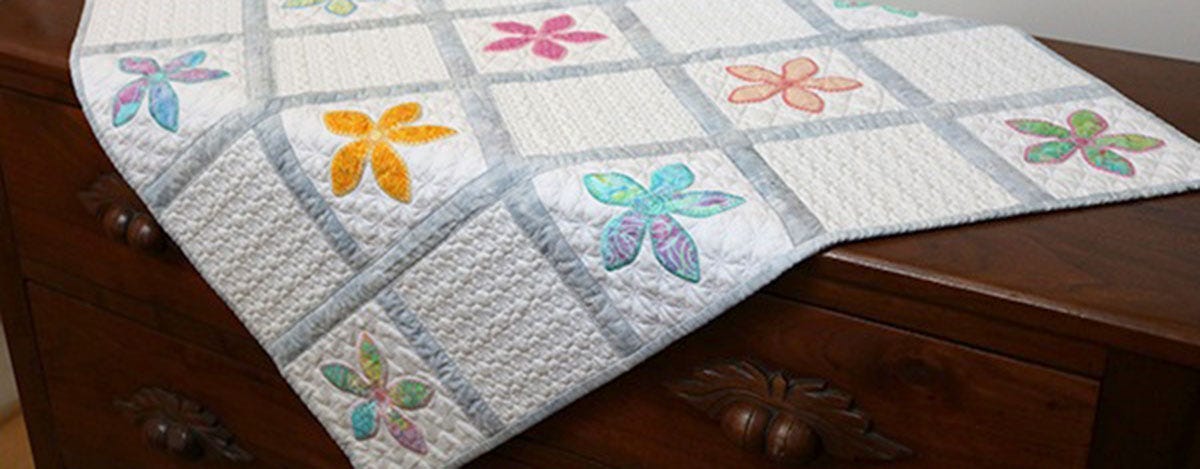
This is a fun tutorial showing you how to use your embroidery machine to “quilt in the hoop”. The quilting is done with your embroidery machine for both appliqué and pieced blocks made with the AccuQuilt GO! Qube Mix and Match 6 inch Block Set. Each block is appliquéd or pieced and then quilted individually. The quilted blocks are joined by sashing strips. The best part is that when the blocks and rows are joined, the quilting is also done and the quilt is finished.
You will need the following supplies:
- GO! QUBE Mix and Match 6 inch Block Set
- GO! Fun Flower Die 55334
- GO! Fun Flower Quilted in the Hoop Machine Embroidery Set
- Pieced blocks (Uneven Nine Patch) made with coordinating fabric and a pattern from the 72 Block Book
- Fabric for Background and Cut Shapes, Pieced Blocks, and Quilt Backing
- Batting (I used Warm and White by the Warm Company)
- Lite Steam-A-Seam2 fusible for shapes
- Lite Steam-A-Seam2 ¼-inch for sashing strips
- Water soluble stabilizer for machine embroidery (I used Sulky Sticky Fabri-Solvy, another option is Sulky Fabri-Solvy and a glue stick)
- Embroidery machine and 6 x 8-inch hoop
- 6-1/2 inch Centering Ruler
- Rotary Cutting mat
- Water soluble marker
- Mini Iron
- Coordinating thread for the machine, coordinating thread for sewing the blocks together

Cut fabric, appliqué shapes, and make uneven 9 patch blocks.
Fuse Lite Steam A Seam2 onto the back of the fabric to be used for the Fun Flower Shapes. Cut the shapes using the die. Leave the paper on the fusible until the shapes are cut. Do not cut more than three shapes (6 layers—3 layers fabric and 3 layers paper) in a single pass.
Tip: Using Lite Steam A Seam2 fusible is very helpful because it can be repositioned and does not require heat to secure it to the background for stitching.

Make uneven 9 patch blocks or the block of your choice using the 72 block pattern booklet from AccuQuilt.
Cut 12 each background 8 inch x 8 inch fabric squares for blocks
Cut 25 squares backing fabric 8 inch x 8 inch for quilt backing for blocks (these can be done in different colors to make a unique design on the back of the quilt too)
Cut 25 squares batting 8 inch x 8 inch
Cut 40 each vertical sashing strips 2 inch x 7-1/2 inch (two strips are needed for each sash between blocks.
Horizontal sashing can be made two different ways. It can be made with cornerstones or with long horizontal sash strips.
Corner stones: Cut 20 each sash strips 6-1/4 inch x 2 inch, and 20 each cornerstones 1-1/2 inch x 2 inch. Cut 4 each 2 inch x 38 inch (trim excess off edges)
Long strips: Cut 8 each 2 inch x 38 inch (trim excess off edges).
Note: Another beautiful option for sashing is to have a ½ inch finished sashing. In that case the vertical front sashing strips would be cut 1 inch x 7-1/2 inches and the vertical back sashing strips would be cut 1-1/4 inch by 7-1/2 inches. The long horizontal strips would be cut 1 inch x 38 inch for the front and 1-1/4 inch x 38 inch for the back. Seam allowances around the outer edges of the blocks would be trimmed to ¼ inch instead of ½ inch.
Make Machine Embroidery Fun Flower Appliqué Quilted Blocks
Hoop the stabilizer and remove the paper liner.

Mark the center of each side of the background block and secure it to the sticky fabric-solvy in the hoop, centering it with the center marks of the hoop.

Stitch placement lines and remove hoop from machine. The design set will also stitch the outline of the quilted block. A darker thread was used for demonstration here, but for the actual blocks for the quilt, a thread that matches the background fabric is better.
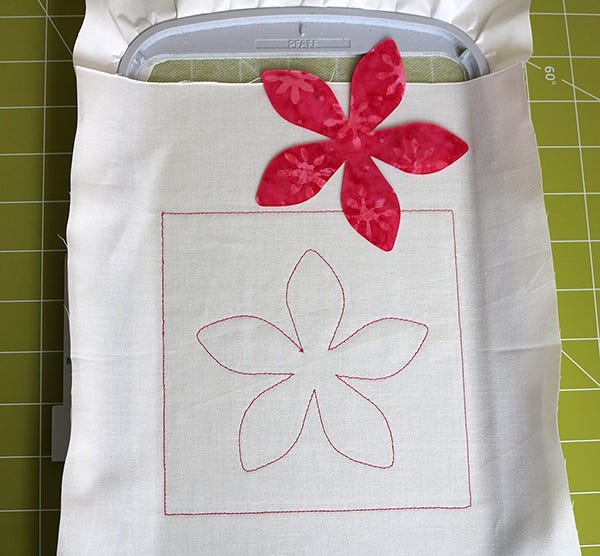
Secure the shape just inside or on top of the placement lines. It is helpful to use tweezers to assist with placement. If you are using Lite Steam A Seam 2 fusible which can be repositioned, you only have to finger press the shape into place before stitching. If you are using other kinds of fusible, you will need to secure the shape with a mini-iron. The shapes may also be secured with water soluble fabric or school glue stick.

When the flower shape is placed and secured, remount the hoop onto the machine and complete the flower.

Remove hoop from machine and turn it to the back side with the embroidery facing the table/mat surface.

Layer the batting and then the quilt backing squares over the back side of the hoop, centering it over the design.


Turn hoop to front carefully holding batting and backing in place. Starting with one corner, secure batting and backing with glass head pins that are placed outside the area to be quilted. The pins should be outside the block outline that was stitched in the first step.

Tip: When re-mounting the hoop back onto the machine, placing a sheet of card stock or light-weight cardboard against the quilt backing is helpful to keep the backing from folding over on itself as you secure the hoop.
Change your machine tension for quilting the block. My machine uses either tension of thread metering. I change the setting to tension and move it to a setting of 4 for quilting. The default tension setting on my machine is 2.8 for machine embroidery. Balancing the tension for the quilting part of the design makes a big difference in the quilting of the block.
When quilting is complete, remove the hoop from the machine and the fabric from the hoop. Trim the stabilizer from underneath the seam allowance. The stabilizer should be removed from the pieced blocks (photo below) and the applique blocks in the same manner.

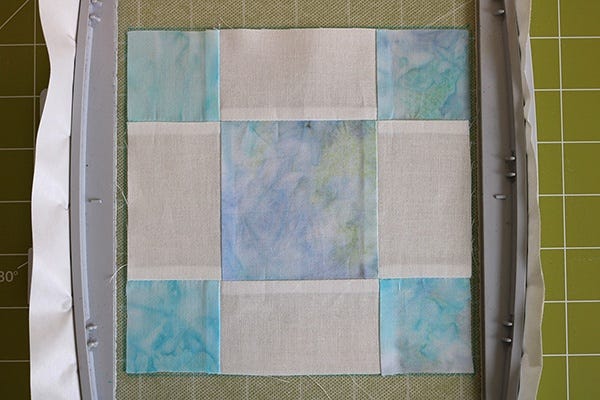
Quilt the pieced blocks that are made using the 6 inch QUBE and the pattern from the 72 Block Book
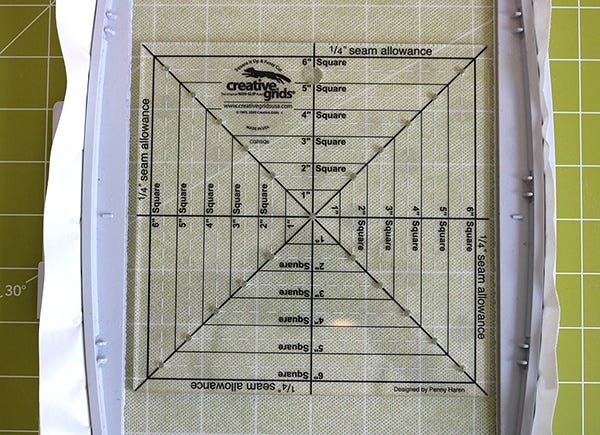
Pieced blocks must be centered carefully in the machine embroidery hoop so that there is an adequate quarter inch seam left on all sides of the quilting stitches. I use tools that are already in my sewing studio for marking the stabilizer so that the blocks are centered.
Because the water soluble stabilizer is transparent, the grid on the rotary cutting mat works well to align the centering marks on the embroidery hoop. Blue painter’s tape can be used to secure the hoop to the rotary cutting mat if the hoop moves while you are working.

A 6-1/2 inch centering square is aligned to the centering marks on the hoop and matching the lines on the rotary cutting mat. Draw a line with a water erasable pen around all sides of the centering square.

Carefully place the pieced block inside the square marked on the stabilizer. Finger press the square to the sticky stabilizer so that it is securely placed.
Place batting and backing onto the back of the embroidery hoop and secure it in place with glass head pins as you did for the applique block. Be sure that pins are placed outside the stitching area.

Stitching Blocks Together to Make the Quilt Top
Trim the blocks:
When the quilting is complete on the applique blocks and the pieced blocks, it is time to trim the blocks so that they can be stitched together into a quilt.
Using a rotary cutter,ruler and mat, trim the quilt blocks on all sides. The quilting stitches are used as a guide for cutting. Align the ruler with the quilting stitches and cut a ½ inch seam allowance on all sides.

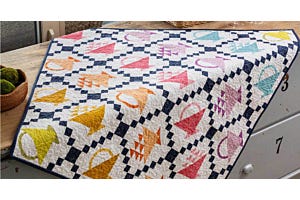
Your blocks will look like this, front and back, when the stitching is complete and the blocks have been trimmed with a ½ inch seam allowance. Note that I also trimmed background (applique blocks) and backing with scissors to an approximate ¼” seam allowance. This reduces bulk when joining blocks together with the sashing.

Lay out the quilt blocks and sashing strips in the order they will be sewn. Use Painter’s tape to mark the upper corners of the blocks to be joined. This will make sure there are no upside down flowers on your quilt.

Add the front sashing:
Layer the sashing strip on top of the block on the left and stitch a 1/2 inch seam. Press sashing strip away from the block using a mini iron.

Layer the second block on top of the first block and the other sashing edge, lining up all edges and stitch a 1/2 inch seam.

NOTE: Pressing the Sticky Fabri-Solvy with a hot iron can cause it to shrink inside the block—this will make it more difficult to sew blocks together. Thus, a mini iron is recommended for pressing the sashing strips open. If the stabilizer shrinks or puckers from heat, remember that the stabilizer is water soluble and will dissolve when soaked in water.
Add the back sashing: The back sashing is added in this step. Open the blocks and examine the batting. The two edges should butt up against each other without overlapping. There may be a little overlap, but you should be able to work the batting into an even layer with your fingers. If there is too much bulk, it can be trimmed by folding the block out of the way and trimming the batting until it fits nicely.

Fold the blocks with right sides together at the sashing and lay a sashing strip on the left block edge. Sew a 1/2 inch seam. Press the sashing toward the right hand block.

Fold the edge of the sashing under along the seam line on the right block. The fold should line up with the seam line.

The back sashing is temporarily secured to the right block with glue or 1/4 inch Steam A Seam 2 or pins. This edge can be finished by stitch in the ditch from the front, top stitch from the front, or hand stitch to complete the sashing.

Continue attaching blocks together with sashing until each row is complete.
Add Horizontal Sashing: When the rows are complete, it is time to join the rows together horizontally. This is done using the same method as stitching the vertical sashing except that it is a longer seam because you are stitching two whole rows together with each sash strip.
In the example that I completed, I stitched sashing and cornerstones together to make a long strip for the front and used a solid strip for the back of each horizontal sash. Horizontal sashing is beautiful as well with long solid color fabric strips for the horizontal sashing as shown in this photo.

Bind and Finish your Quilt:
Your quilt is complete except for the binding. Trim the outer edge and complete the binding with your favorite binding method.
by Marjorie Busby
http://b-quilts.com/blog
GO! Qube Mix & Match 6" Block

The GO! Qube Mix & Match 9" Block includes eight GO! Dies, a 6" x 6" cutting mat, a DVD, PLUS a FREE 20-page pattern booklet which includes 14 Mix & Match block patterns.
The GO! Qube includes eight dies, each labeled with a number. The included patterns tell you which die number to use for each shape. This is the same numbering system in the Eleanor Burns GO! Sampler Pattern Book and the 72 Block Mix & Match System.