
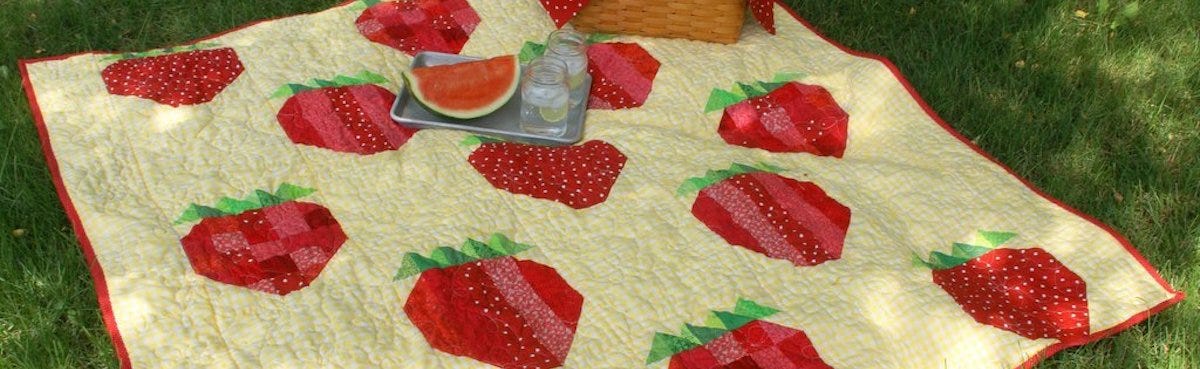
Hey AccuQuilters! Let’s make the most of summer with this fun and cheery picnic quilt! It's Lori from Lori Miller Designs back to share all the details about my Strawberry Fields Picnic Quilt. Made with a GO! Qube 8-inch Mix & Match set, I used juicy strawberries and a vintage yellow gingham in this delightful project. Pack up your picnic basket with goodies and take along this perfect quilt for a great summer afternoon.

This quilt finishes at 60” x 60”.
Dies Used
- GO! Qube Mix & Match 8" Block (55776)
- Shape 2: GO! Square-2 ½” (2” Finished)
- Shape 3: GO! Half Square Triangle-4” Finished
- Shape 5: GO! Half Square Triangle-2" Finished
- GO! Quarter Square Triangle – 2” Finished Square (55393)
- GO! Strip Cutter-2½" (2" Finished) 3 Strips Die (55014 or 55017)
Hint: if you don’t have the GO! Quarter Square Triangle – 2” Finished square, but you do have the GO! Pineapple-10” Finished die (55485), there is a 2" finished square Quarter Triangle included on it.

Fabrics
- Yellow Gingham – 2 ¾ yds
- Large Red and White Dot Print ⅝ Yd
- Assorted Red Prints 6 – ¼ yd by WOF cuts
- Assorted Green Prints to total about ¼ yd, use scraps
- Small Red and White Dot Print - ¾ Yd
- Cut into seven strips with the 2½" strip cutter.
- Use remaining for strawberry squares
- Batting 64” x 64”
- Backing 68” x 68”

I had this lovely Vintage HUGE strawberry print that I used for the backing and my color inspiration. It is a heavier fabric with a twill feel so it is perfect for this quilt.
Cutting
- Yellow Gingham
- For the background blocks, cut 12 – 10 ½” x 12 ½” rectangles
- For the two side border strips, cut 2 - 5 ½” x 60 ½” strips, piecing as needed.
- For Strawberry block background:
- cut 2 – 5 ¼'” x WOF, subcut 26 – 4” HST
- cut 2 – 3 ¾” x WOF strips, subcut 58 - 2” HST
- cut 1- 8” x WOF strip, subcut 39 - 2” QST
- Large Red and White Dot Print ⅝ Yd:
- Cut 5 – 10 ½’ x 10 ½” squares
- Assorted Red Prints 6 – ¼ yd by WOF cuts
- Cut 1 – 3 ½” strip, subcut into 2 ½” strips, subcut into 20 - 2 ½’ x 10 ½” strips of varied fabric
- Use remaining fabric to cut 68 – 2 ½” squares (2" finished) of various fabrics
- Assorted Green Prints
- Cut 65 – 2 ½” (2” finished) HST
- Cut 39 – 2 ½” (2” finished) QST
- Small Red and White Dot Print
- Binding: ¾ yd, cut into seven strips with the 2½" strip cutter.
- Use remaining for strawberry scraps
- Batting: 64” x 64”
- Backing: 68” x 68”
Sewing
We will be making 13 – 10” X 12” finished strawberry blocks for the picnic quilt. There are three variations of the block:
- Five whole strawberries
- Four strip strawberries
- Four squares strawberries
All of the blocks have the same greenery combination top.
For Each Block
Make the greenery top.

Piece together a yellow QST with a green QST with the yellow on the top left.
Add the green HST to make a pieced square. Make three of these units.

Piece two HST units with green and the yellow gingham.
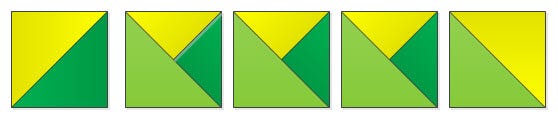
Assemble them into the greenery top as shown.
.jpg)
Make thirteen greenery tops.
Making the Strawberry Units
Take your 10 ½” x 10 ½” square of the large red and white dotted print.
.jpg)
Carefully arrange the 2 ½” HST on the top two corners and pin. Stitch ¼” from the edge of the yellow gingham. Trim and press.
Arrange the four 1-inch HST to the bottom two corners and pin. Stitch ¼” from the edge of the yellow gingham. Trim and Press.
.jpg)
Align the greenery top to the top of the strawberry and stitch. Press seams.
.jpg)
Making the Strip Strawberry Units
.jpg)
Stitch together five of the 2 ½” x 10 ½” assorted red print strips to create a 10 ½” x 10 ½” block.

Carefully arrange the 2 ½” HST on the top two corners and pin. Stitch ¼ ” from the edge of the yellow gingham. Trim and press.
Arrange the four 1” HST to the bottom two corners and pin. Stitch ¼” from the edge of the yellow gingham. Trim and Press.

Align the greenery top to the top of the strawberry and stitch. Press seams.
Making the Squares Strawberry Units
.jpg)
Piece together the squares and half square triangles of the strawberry using the assorted red prints and gingham HST’s.
.
Align the greenery top to the top of the strawberry and stitch. Press seams. All of the blocks have the same greenery combination top.
Assemble the Quilt

Arrange the strawberry blocks with the solid yellow gingham blocks using the diagram as a guide. Stitch together in rows and align seams. Sew the rows together. Add the side borders to make the quilt square in shape.
Make a quilt sandwich of the backing, batting and top. Quilt as desired. Since my vintage print back also has daisies, I quilted this picnic blanket with loops and daisies for an all over design.
Bind using the small red and white dotted print 2 ½” strips to finish.

Grab your fabric and get started on this delightful quilt. When you make your version, please share and tag AccuQuilt and Lori Miller Designs on Facebook and @AccuQuilt and @lorimillerdesigns on Instagram.
What projects are you working on while homebound? We'd love to hear what you're quilting while under quarantine!


