Greetings fellow quilters and sewists! My name is Belinda Karls-Nace and I'm a quilting and needlework designer, creator, finisher, and teacher (and the author of the Samplings from a Blue Ribbon Girl blog). Quilting/needlework is truly my passion, obsession, and career.
When AccuQuilt contacted me to be a guest blogger and share some of my recent projects, I jumped at the chance, as I am truly passionate about my AccuQuilt fabric cutters!
As a designer in the quilting and needlework industry, I get to be creative on a daily basis (how awesome is that?!)...and I get to design and create samples for AccuQuilt (my dream job!). Several weeks ago, I was hard at work on some special projects for Valentine's Day...and today, I am excited to share those projects with you.
" width="370" height="270"> GO! Lovebirds Apron. Download the FREE pattern
here.
First, let's take a look at the
GO! Lovebirds Apron. This quick and easy waist apron uses a premade kitchen towel for the base...the kind you find at quilting/crafting/home stores in a wide assortment of colors and prints. The white kitchen towel I used for the sample was found at my local quilt shop and is made by
Dunroven House (K310-WHI White), but you could use any brand/color/print you like! It measures approximately 20" x 27", but a premade towel that has slightly different measurements could easily be adapted. The premade kitchen towel is folded and pressed...machine appliqué is added...and light sewing is done to make a basic waist apron with pockets. The apron ties were made quickly using the
GO! Strip Cutter 4" (3½" Finished) (55085) - two strips are folded, pressed, and top stitched. This is a perfect afternoon project and minimal supplies are needed. The
AccuQuilt GO! Fabric Cutter makes light work of cutting the appliqué shapes - simply apply paperbacked fusible web to the wrong side of your fabric before cutting the hearts, birds, and scallop borders and you are ready to fuse and appliqué. I chose to fold and press the towel, fuse all the shapes in place...then, I unfolded the towel to machine appliqué. Wouldn't it be fun to make these for a variety of seasons/holidays?...it would be easy to do by simply changing the appliqué shapes. This would also be a fun project for children to assist with...and I can see making these for gift giving...hmmm...lots of possibilities...
" width="370" height="370"> GO! Hugs and Kisses Bed Runner. Download the FREE pattern
here.
The next project I have to share is the
GO! Hugs and Kisses Bed Runner. I can already hear some of you questioning, "what is a bed runner?"...so let's clear that up first. Basically, it is an accent quilt you lay atop the bedcover (horizontally across the foot of the bed). Bed runners mainly serve a decorative purpose, but can provide additional warmth for cold feetsies and provide protection for the foot of the bed (from shoes, pets, packages, etc)...plus it is much easier to clean than a large bedspread. I have wanted to make a bed runner for quite some time (just to add a special quilted touch to the bedroom), so the timing was perfect to design one. This Valentine bed runner may look complicated, but it can be completely cut with
two AccuQuilt dies (well, actually three, if you use a strip cutter for your binding). This quilt uses the
GO! Signature Block (55356) and the
GO! Half Square Triangle-3" Finished Square (55009)...yep, that's it! In a nutshell, you simply sew one triangle on either side of the signature block to form a 5" (4½" finished) square...then those squares are laid out and rotated to form X and O blocks. This bed runner measures 81" x 27", but you could easily add or remove rows/columns to make a larger quilt or longer/shorter runner...and you can change the entire look of this design by changing the fabrics to match your decor. Try making a few of these blocks and I'm pretty sure you'll be addicted...it is a great "chain-piecing on the weekend" kind of project that comes together rather quickly.
Finally, I have to show off the GO! Sweetheart Wall Hanging...oh how I enjoyed designing and creating this piece. Those of you who follow my blog know that I love to combine traditional piecing and appliqué...and if you are new to this combination, then this project is the perfect place to start. If we break it down, it is essentially strip piecing with machine appliqué and added borders. I applied paperbacked fusible web before cutting the hearts, flowers, leafs, and rick rack...then simply fused the shapes to fabric strips and did the machine appliqué before piecing the strips and adding the borders (on a side note, I adore the GO! Rick Rack die - no more searching for large rick rack that will match my fabrics - I simply cut it myself!). My tip for this project would be to use a tear-away stabilizer or light fusible stabilizer when doing the machine appliqué - it will stabilize your fabric when applying the stitches and make your shapes look sharp and crisp. At a finished size of 27" x 36", this is the perfect project to build your appliqué skills...and the shapes are small enough, you may even be able to use up some of the fabric scraps in your sewing room (I can visualize a really cute scrappy version of this wall hanging).
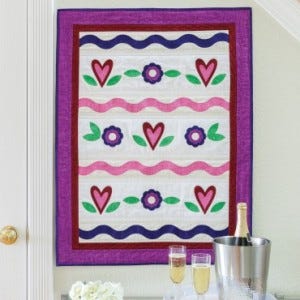
GO! Sweetheart Wall Hanging. Download the FREE pattern
here.
The AccuQuilt GO! Fabric Cutter and corresponding dies make extremely fast work of cutting the appliqué shapes, so you are able to start sewing almost immediately and have a seasonal project completed in no time!...and although this wall hanging was created especially for Valentine's Day, I think it can be on display year round.
Thank you for exploring each of these new AccuQuilt patterns with me. I hope my guest blog post will entice and inspire you to make some Valentine projects of your very own.
I would be thrilled if you visited me via my blog, website, or social media - stop by for a friendly visit - I always enjoy meeting new virtual quilting friends!


