
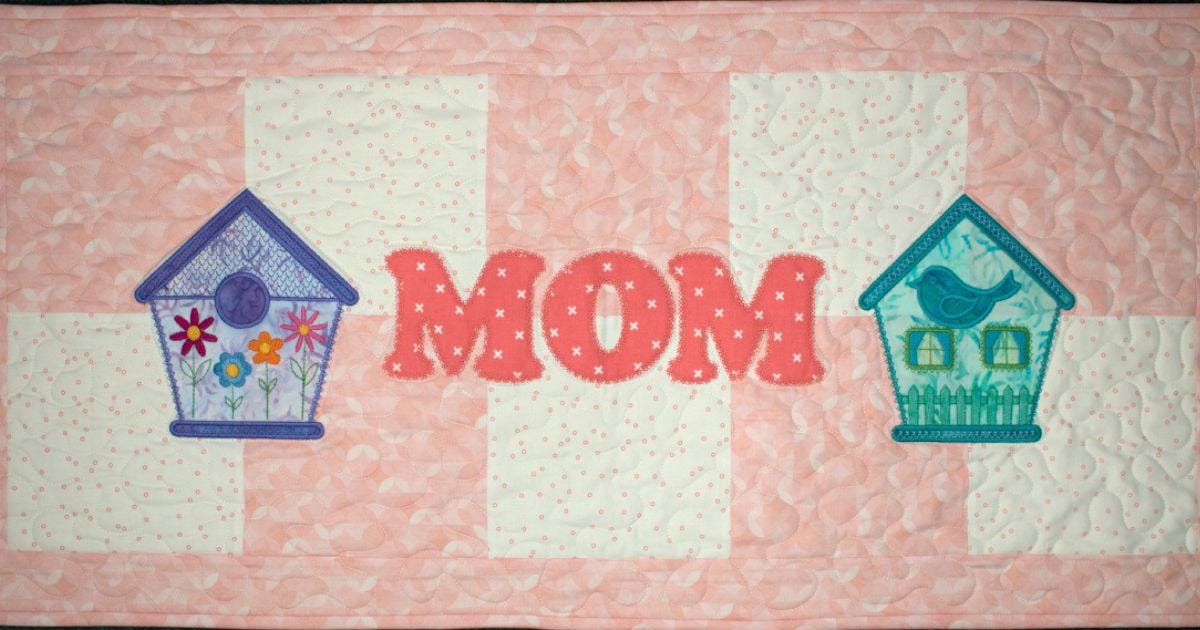
Dresser runners are the perfect way to dress up a room for every season and make for a great gift. For Mother's Day, I created a dresser runner with beautiful machine embroidery designs as well as letters to spell "MOM." Every day is Mother's Day, so celebrate a special mother figure in your life all year long with this cute project!
This design was created using the versatile GO! Bird & Birdhouse Die. This die is a lot of fun to applique, can be used in so many different ways, and the available machine embroidery allows for holiday themes, including Halloween, Valentine's Day, and patriotic holidays.

How To Create A Birdhouse Dresser Runner Yourself
This runner is simple to make and will give you the opportunity to try machine embroidery on pieced quilt blocks. These are simple alternating patchwork blocks that make it easy to align the embroidery on the runner. The birdhouses on this runner are adorable with the flowers and picket fence additions.
Supplies Needed for the Runner:
- GO! Bird & Birdhouse Die
- GO! Strip Cutter 2 1/2” (2" Finished) 3 Strips Die
- GO! Square-6 1/2" (6" Finished) Die
- GO! Carefree Alphabet Uppercase Set (2-Die Set)
- Alternative: GO! Carefree Alphabet Lowercase Set (2-Die Set)
- Alternative: GO! Classic 2” Alphabet Uppercase Set Die
- Fabric for Pieced Top of Runner: 1/2 yard of the main fabric (for blocks, borders, and binding) and 1/4 yard of a coordinating fabric
- Backing fabric: 43" x 25"
- Batting: 43” x 25”
- Assortment of fabric scraps for applique that coordinate and contrast with background fabric


Supplies Needed for Embroidery:
- Embroidery Machine
- Embroidery Hoop that is 6” x 8” or 150mm x 200 mm.
- Medium weight tearaway stabilizer
- Iron-on fusible web
- Coordinating thread
- Bobbin thread
- Water-soluble glue stick (Elmer’s purple glue stick or a fabric glue stick or pen)
- Alternative: Temporary spray adhesive for fabric (Sulky KK2000)
- Water-soluble marker
- GO! Bird & Birdhouse Embroidery Designs
Steps
-
Cut five 6 1/2” (6” finished) squares of the main fabric.
-
Cut five 6-1/2” (6” finished) squares of the coordinating fabric.
-
Piece the squares together in an alternating patchwork as shown below. Press the seams open because you will be stitching embroidery on top of some seams and you want them to be as flat as possible.
4. Apply the fusible web according to the manufacturer's instructions for the applique.
5. Place the fabric on the GO! Bird & Birdhouse Die and cut the shapes for each birdhouse. If you want a bird to be facing in the opposite direction, place the fabric side down/fusible side up on the birdhouse die.
6. Cut the letters needed using a GO! Letters Die. For the letters, be sure to place the fabric side down/fusible side up on the alphabet die.
7. Layout the runner and place the applique shapes on it. Arrange and re-arrange until you are pleased with the configuration.
8. Using your embroidery machine and/or embroidery software, locate the center of each birdhouse and the letters and mark the centers on the runner. A water-soluble marker or light chalk is recommended for marking the centers.

9. Place the embroidery stabilizer in the embroidery hoop. Use your preference of a temporary spray adhesive or a water-soluble glue pen to secure the fabric in the embroidery hoop. The fabric must be centered for the embroidery. To do this, mark the center of the stabilizer and use a large thumbtack or a straight pin placed from the backside through the stabilizer and through the center mark you made on the runner. Align the fabric with the center marks on the top and bottom of the embroidery hoop and smooth it into place. In the photo below, the tiny dot is beneath the thumbtack in the center of the hoop at the intersection of the blocks. Look at how nicely the seamline of the block lines up with the mark at the top of the hoop. Be sure to remove the thumbtack before you start stitching.
10. To complete two birdhouses and the letters, at least three hoopings are required. Depending on the size of your embroidery hoop, you may have to hoop twice to get all three letters in. The alternative alphabet dies I mentioned above are smaller and will allow for a single hooping.

11. To add borders, cut six 2 1/2” width of fabric (WOF) strips, and piece, for borders and binding. Cut 2 1/2” x 12 1/2” strips for vertical borders. Cut 2 1/2” x 34 1/2” strips for horizontal borders.

Creativity Soars with the GO! Bird & Birdhouse Die
"Love this die!!!!!" - Tammy J., AccuQuilt Community Member
The birds and birdhouses shapes are so much fun to use. If you are looking for even more project inspiration for using the GO! Bird & Birdhouse Die, watch the videos below:
Watch GO! Bird & Birdhouse Launch:
Watch GO! Bird & Birdhouse Relaunch:
If you make your own version of this tutorial, please share the photo on social media using the hashtag #AccuQuiltBuilt and don't forget to tag @AccuQuilt so we can see your fun creation!


