
We all start thinking about Christmas projects in July, and this year is no different. The machine embroidery designs on the Holiday Medley Die are so pretty that I decided to design around that and use other dies too. The log cabin die is a favorite of mine and so is the Signature Block from the GO! Qube Mix and Match and Companion Set. Thinking about those shapes, I used Electric Quilt software to design a quilt. This tutorial is for the quilt shown and is 63 x 76 inches when finished.

The center is a medallion of the Holiday Medley die shapes surrounded by the Signature Block from the Qube Companion set and the “frame” is made with the log cabin dies. All the blocks finish at 6 inches. The block size was determined by the Holiday Medley shapes. The Qube 6-inch set was used and the log cabin was modified to finish as a 6-inch block. Did you know that with the log cabin die you can make blocks that finish at any size? The “logs” are 1 inch finished, so blocks can be made to any size to work in combination with other blocks in your quilt.
This quilt is made of three different blocks: a machine embroidery block, a log cabin block, and a pieced block. While it may look complicated, each of the blocks is very easy to construct and the quilt top is easy to construct. The result is a beautiful and sophisticated quilt and gorgeous embroidery designs that you will enjoy for years to come.
The fabrics used in this quilt are the batik Timeless Treasures Happy Hour Collection by Daniela Stout. These fabrics are lovely, happy colors that will work well with any holiday décor.
Supplies Needed:
Machine Embroidery designs Supplies:
- Holiday Medley Die #55043
- Holiday Medley Machine Embroidery CD or Holiday Medley Machine Embroidery Download
- Light weight stabilizer – either tearaway or cutaway works well
- Background fabric cut into 8-inch squares (these will be cut to 6-1/2” after the embroidery is complete. Use the same fabric as for the log cabin and signature blocks
- Applique fabric for trees and snowflakes
- Coordinating machine embroidery thread
- Bobbin thread for the embroidery machine
- Embroidery machine with hoop size at least 150mm x 150mm (6 inches x 6 inches)
- Iron-on paper backed fusible web OR fabric glue for securing applique to the background fabric
Supplies needed for pieced blocks:
- Log Cabin Die by Leslie Main Die #55349
- GO! Qube Mix & Match 6” Block Die #55775
- GO! Qube 6” Companion Set – Classics Die #55779
- General sewing supplies, e.g., scissors, thread, iron.
Fabric Yardage needed for quilt:
- 2-1/4 yards assorted blue and green fabrics
- 1-3/4 yards focus fabric included in log cabin blocks and used for the signature blocks and applique shapes
- 2-3/4 yards light background fabric
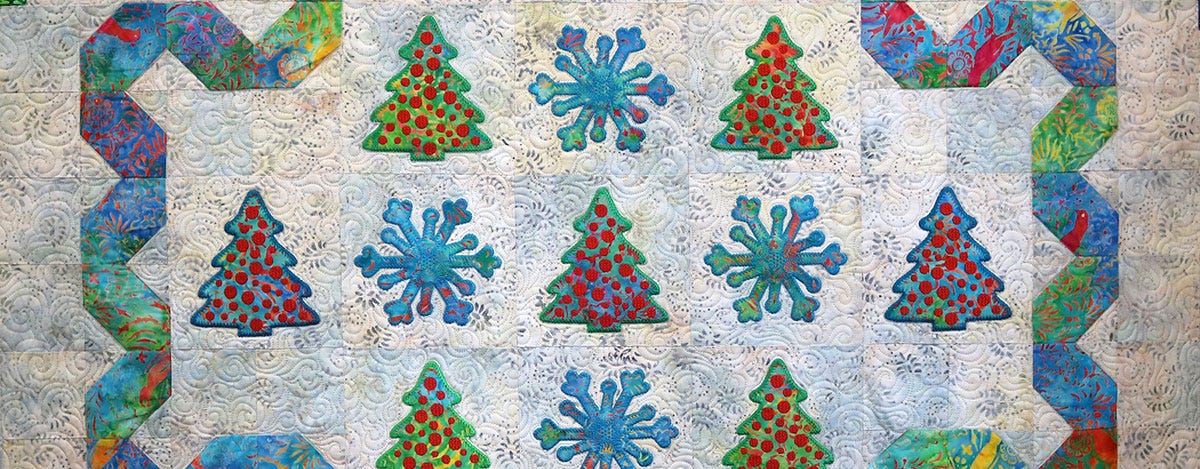
Making the Holiday Medley machine embroidery designs quilt blocks:
You will need to machine embroider 9 each of the Christmas tree blocks and 4 each of the Snowflake blocks. Choose any of the trees or snowflakes from the embroidery designs. NOTE: The tree with the star on top is larger, so you would have to adjust the entire quilt block size if you choose that tree.
This video tutorial explains in detail exactly how to make these machine embroidery quilt designs blocks.


When your blocks are finished, trim them to 6-1/2 inches making sure the embroidery is centered. It is helpful to me to tape a cutout of the embroidery on the back of a 6-1/2 inch square ruler. If the cutout is centered on the ruler, you can place it over the finished embroidery designs and cut the block perfectly every time.
Making the Signature blocks:
The Signature blocks use Shape 1 and Shape 5 from the Qube Mix and Match 6” Block Set and Shape 10 from the Companion classics set. Make 20 Signature blocks. Cut the following:
Shape 1 – Cut 40 each.
Shape 5 – Cut 40 each.
Shape 10 – Cut 20 each.

Two Shape 1 squares are stitched together and signature blocks are made by stitching triangles to the corners. Then the two completed signature blocks are stitched together. See the diagram below for details on how to make these blocks.

Making the log cabin blocks:
The diagram below shows the logs to be cut from the log cabin die. The red rectangle shows the area of the die that is used for these blocks. Fabric can be precut as an 11 inch strip across the width of fabric or in rectangles that are 5” x 11”. Fabric cut across the width of the fabric can be fan folded on the die.

You will see that the 1-1/2” squares for the center of the block are not cut from the die. The longest log which is not used in the 6 inch block can be cut to make those squares as shown below with the blue strip in the diagram.
Make 56 log cabin blocks and 2 center blocks (see diagram and instructions below). You will need to cut 58 dark logs of each size and 58 light logs of each size.
Eleanor Burns and Lynn Gibney have a great video showing exactly how to make the log cabin blocks. Using their instructions and the diagram below, you will be able to make these blocks very quickly. Just be sure to follow the diagram so that the logs are placed correctly. It may be helpful to remember that the logs are added in a counterclockwise pattern. This diagram shows how to lay out the pieces as described in the video and it also shows the block as it will be finished.

There is a center log cabin block which is a Courthouse Steps block. You will make two of these blocks. It is used to join the diagonal of the blocks in the center top and center bottom of the quilt. Use the diagram below to make that block in the same way that you made the log cabin blocks.

Plain Blocks:
Cut 8 plain blocks that are 6-1/2” and will finish at 6”. These blocks will be used to fill in the spaces between the log cabin blocks and the signature block “ribbon”.
Assemble the quilt and embroidery designs as shown:
When the blocks are complete, the quilt is easily assembled in rows and then the rows are stitched together. A 2-1/2” (2” finished) border is added and it is quilted and bound. This is a diagram of the quilt assembly. This also shows the number of each block that is needed for the 63 x 76 inch quilt.

This would be a beautiful bed quilt. All that is needed to make this quilt larger is more log cabin blocks. Just divide the width and length of the quilt by 6 inches and you will have the number of blocks needed.
by Marjorie Busby
http://bluefeatherquiltstudio.com/blog


