

If you’ve been following along with our GO! Row House Runner Sew Along, you’ll know it’s time to build some houses today. If you’re just joining, feel free to jump right in and sew along!

The image above gives you a look at the basic project that AccuQuilt Cutting Expert Pam Heller and I are making along with all of you. We’re using the GO! Qube Mix & Match 12” Block, but you can find pattern instructions for all seven Qube sizes.
We kicked things off with a livestream event and blog post outlining the project and supplies. Last Friday, we started cutting and sewing by making the tree units. This gave us a great way to practice making Flying Geese units and sub-cutting. If you missed those shows, you can check them out on the AccuQuilt Video Gallery, Facebook or YouTube.
This week, we’re building scrappy houses, so let’s get started!

Fun With Fabric
The houses are a great way to have fun with fabric. The pattern is written using nine different fabrics, with one square of each per house, but this would also be a great time to dig through your scraps! Using the GO! Qube Mix & Match 12” Block, you’ll need Shape 2, the 3” finished square. Remember to make sure that your lengthwise grain is following the lengthwise blade on the die when it goes through the cutter, and don’t try cutting more than six layers of cotton at a time!

If you have some fun prints, you might want to try some fussy cutting to really showcase them and bring some extra character to your project. Here’s a video with the one and only Eleanor Burns showing AccuQuilt's Chief Brand and Product Officer, Lynn Gibney, her technique for fussy cutting with AccuQuilt dies!
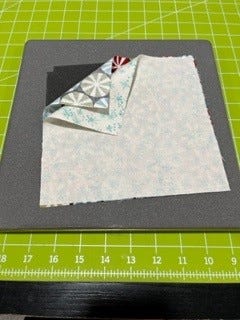
I decided one of my prints was perfect for fussy cutting for my houses. First, I decided on the section that I wanted to use and rough cut around it. Normally, I rough cut 1/2” larger than this shape, but with fussy cutting, I like to leave myself some extra room if possible.
Next, I marked my die corner to corner, as Eleanor did in the video, and pressed the corner to corner lines though the center of my design on the fabric.

Then, I lined it up and cut. I like to use painter’s tape to hold my fabric in place for a little insurance.

I love how it turned out! I think I will center this one in one of my houses!

Every House Needs a Roof
Okay, let’s cut our roof! This couldn’t be easier. Follow the fabric prep directions in your pattern. You will need two background and two roof half square triangles for each house, so here’s my pro tip for cutting: be sure to put right sides of your roof and background fabric together before you cut! Since you will be sewing them together, why not cut them together?
Let’s Build!
Starting with the roof sections you just cut, go ahead and sew each background triangle to a roof triangle and press the seams open. You’ll need a total of eight squares for your runner. If you’re using the GO! Qube Mix & Match 12” Block like we are, the square units will measure 6 1/2” x 6 1/2”. How slick was that – and no dog-eared corners to go back and trim off! I love my dies!

Next, sew two squares together to make each roof, and press the seam open.


Now, with your roof sections complete, you’ll want to finalize the layout of your house blocks. Once you have the layout you love, sew the rows for each house together in threes. Press your seams to opposite sides so that you can nest them together.

Nesting seams is one of my favorite techniques, and it really helps get perfect points and intersections. Once pressed, sew each three row set together and press your seams open.

Next up is sewing the narrow background strip to either side of the 9-patch house blocks. In the pattern, you’ll see this referred to as Shape I. Press this seam to the outside of the block, and you’re ready to top off each house with a roof.

There you GO! Four houses built in record time. At this point, my house units measure 12 1/2” x 15 1/2”. The final step for this section is sewing your houses together to form two groups of two houses with a sashing strip between them. Press these seams toward the sashing and our work for this step is done!
What Now?
Next Friday, I’ll be walking you through the final assembly of your runner both here on the blog and on our live event. We’ll also look at different ways to embellish your quilt with applique and trim, with additional ways to quilt and bind it.
Be sure to visit the Events page to register for the event. We have a very special door prize we’ll be giving away – a gift basket put together and donated by AccuQuilt retailer, Celtic Quilter, here in Omaha. It’s full of goodies any quilter would love to win, and registering is how you qualify for the drawing!
Show and Tell Time!
What makes any sew along special is seeing what all your fellow quilters are making! We love seeing what great ideas our quilters have and promise to share our progress as well. Be sure to use the hashtag #AQSews on Instagram or Facebook when you share publicly, so we can build our sewing community together!
If you've never used or followed a hashtag before, here's how! Post a picture of your project so far on Facebook or Instagram. Then, be sure to put #AQSews in your description of the picture - it's that simple! To find other posts, go to the search box and type in #AQSews to see posts that others have made. Pam and I have been posting pictures of our progress that you can find there, and we can't wait to see how YOUR projects are coming along!


