

Hi, quilters! I’m Vicki from Vicki’s Crafts and Quilting. Today, I will walk you through the steps to make a patriotic wall hanging - just in time for Independence Day!

How To Make the Patriotic Carpenter Star Wall Hanging
Patriotic season is upon us so let’s get sewing! You only need to make one block, add some finishing touches, and you have a great new decoration to hang. This project finishes at a 24” square, making it the perfect size to put up on any interior wall, porch, or use as a table topper.
GO! Dies Needed:
- GO! Carpenter’s Wheel-18” Finished Die
- GO! Star-2”, 3”, 4” Die
- GO! Strip Cutter-1 1/2" (1" Finished) 5 Strips Die
- GO! Strip Cutter-2 1/2" (2" Finished) 3 Strips Die

Other Supplies Needed:
- 3/4 yards of background fabric
- 1/2 yard of solid white fabric
- 5/8 yards of red fabric
- 3/4 yards of blue fabric fabric
- 1/2 yard of striped fabric fabric
- Fusible Web
- Backing fabric
- Batting
- Thread
PRO TIP: When using the GO! Carpenter's Wheel-18" Finished Die, you must use the lengthwise fabric. AccuQuilt has a great tutorial on using this die board. I recommend watching it before beginning.
Cutting for the Carpenter's Wheel Blocks:
Use the GO! Carpenter's Wheel-18" Finished Die to cut for the blocks. By the end of cutting for the blocks, you should have:
- Background Fabric
- Four 4" x 11 1/4" pieces cut into 24 shape B's
- Four 3 1/4" x 6" pieces cut into 16 shape D's
- White Fabric
- Two 4" x 11 1/4" pieces cut into eight shape B's
- Two 5 1/2" x 5 1/2" pieces cut into eight shape C's
1. From the red, blue, striped, and white fabrics, cut two 3” x 16” pieces using your GO! Fabric Cutter. The 16” is lengthwise along the salvage. From these, cut eight shape A’s. Lay the blue, red, and white fabrics right side up and the striped fabric should lay right sides together.
2. For the background fabric, cut an 11 1/4” x Width of Fabric (WOF) piece. Subcut four 4” x 11 1/4” (11 1/4” is lengthwise) pieces to cut 24 shape B’s. Using the remaining background fabric, subcut four 3 1/4” x 6” pieces to cut 16 shape D’s.
3. Using the white fabric, cut one 11 1/4” x WOF piece. Subcut two 4” x 11 1/4” pieces to cut eight shape B’s (11 1/4” is lengthwise). Use the remaining white fabric to subcut two 5 1/2” x 5 1/2” pieces to cut eight shape C’s.
PRO TIP: I recommend keeping the pieces on your die board matching them with their letter to help you stay organized.

Cutting for Borders and Checkerboard:
Use the GO! Strip Cutter-1 1/2” (1" Finished) 5 Strips and GO! Strip Cutter-2 1/2" (2" Finished) 3 Strips Dies to cut the borders and checkerboard pieces. When you are done cutting for the borders and checkerboard, you should have:
- Background Fabric
- Two 1 1/2" x 20 1/2" strips
- Two 1 1/2" x 22 1/2" strips
- Two 1 1/2" x 24 1/2" strips
- Red Fabric
- One 1 1/2" x WOF strip
- Blue Fabric
- One 1 1/2" x WOF strip
- Three 2 1/2" x WOF strips
1. With the GO! Strip Cutter-1 1/2” (1" Finished) 5 Strips Die, cut eight 1 1/2” x WOF strips using the background fabric. From this main strip, subcut two 1 1/2” x 18 1/2” strips, two 1 1/2” x 20 1/2” strips, two 1 1/2” x 22 1/2” strips, and two 1 1/2” x 24 1/2” strips.
2. For the red fabric, use the GO! Strip Cutter-1 1/2” (1" Finished) 5 Strips Die to cut one 1 1/2” x WOF strip.
3. For the blue fabric, cut one 1 1/2” x WOF strip using the GO! Strip Cutter-1 1/2” (1" Finished) 5 Strips Die.
4. Now, with the GO! Strip Cutter-2 1/2" (2" Finished) 3 Strips Die, cut three 2 1/2" x WOF strips using the blue fabric. This will be used for the binding.
Block Sewing Instructions:
1. Take the GO! Carpenter's Wheel Die board with the pieces to your sewing machine and lay out the cut pieces like this:

2. Sew the center two rows following the directions that came with the die board (as seen below).

3. Continue to follow directions that came with die board for each corner section (pictured below).
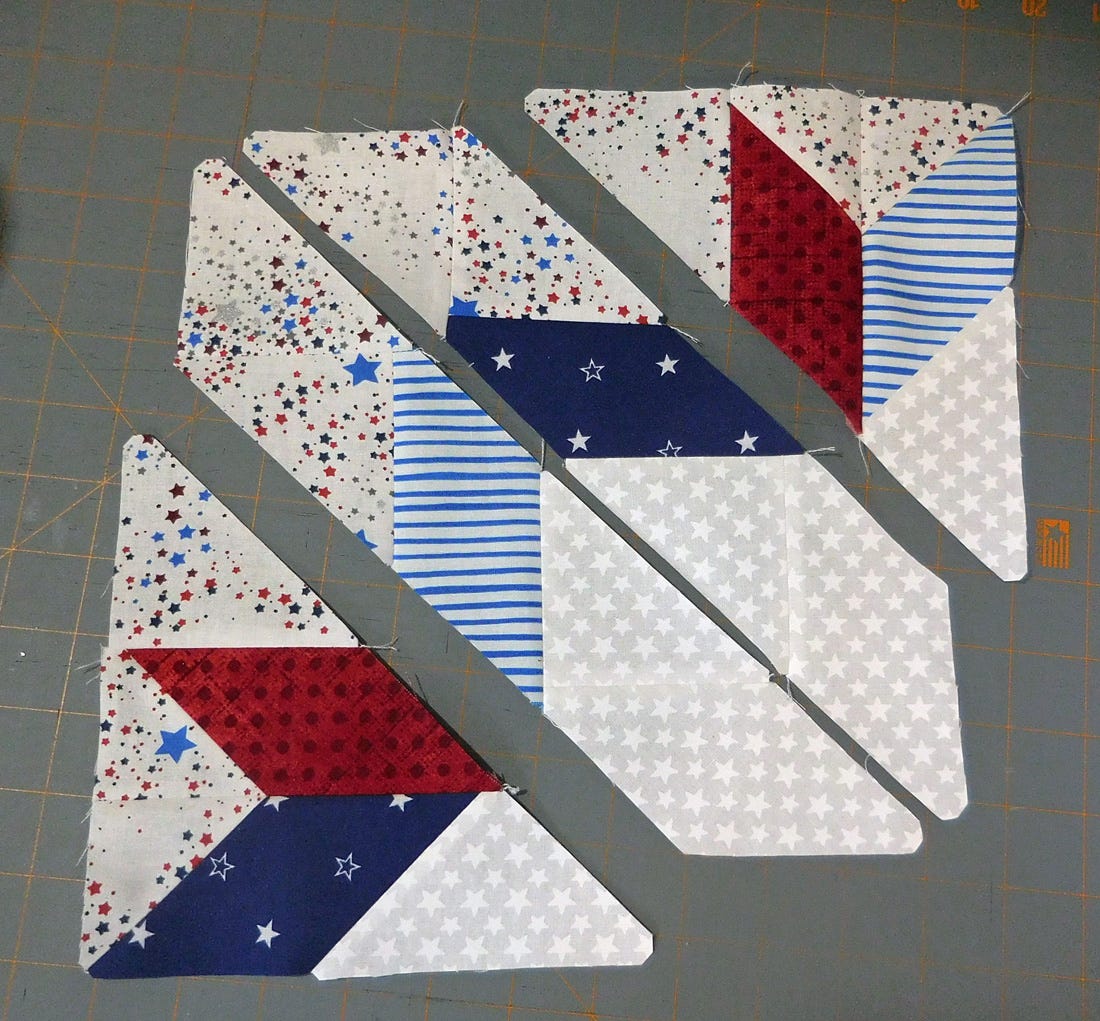
4. Sew one center row to a corner section to look like this:

5. Sew the sections together. You now have one quadrant of the block done, and the finished block looks like this:

6. Make three more quadrants, paying attention to how you lay your striped fabric pieces.
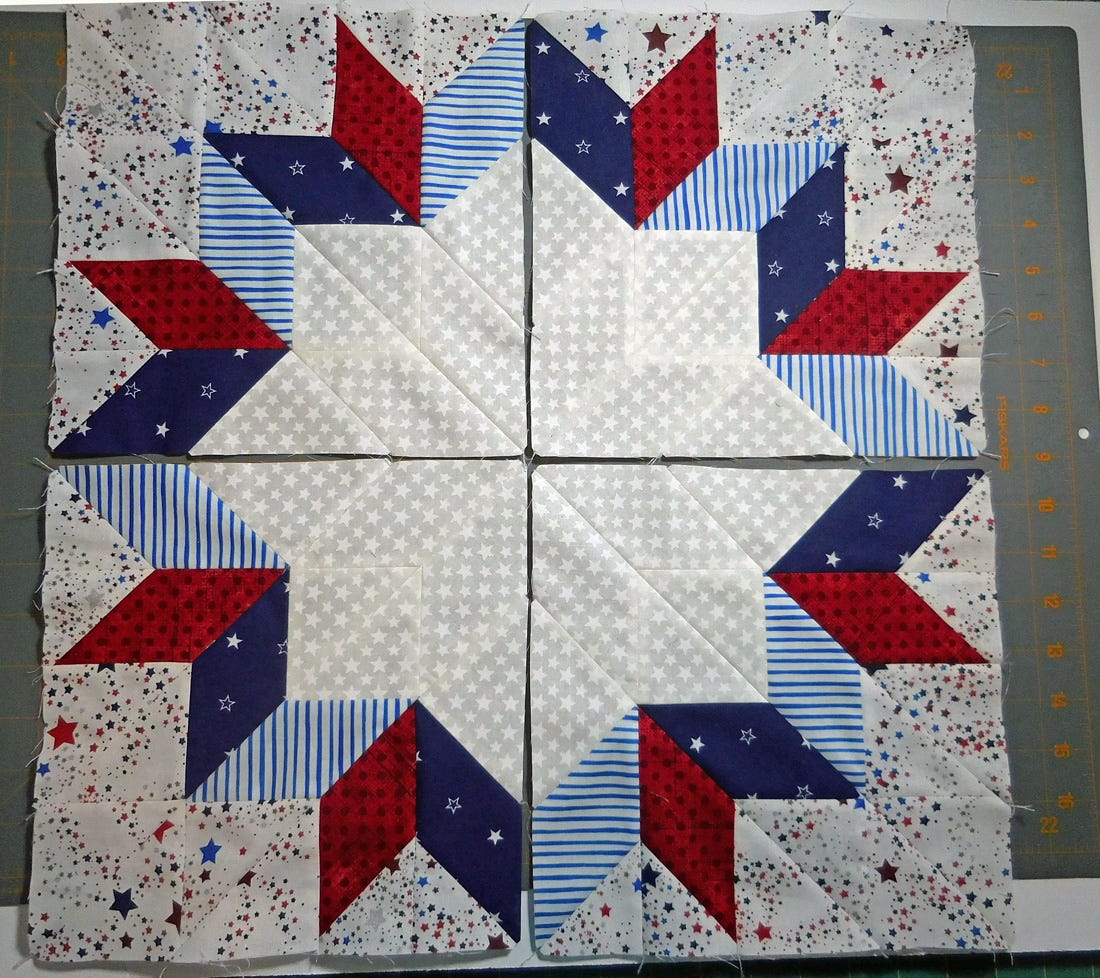
7. Sew the quadrants together. The carpenter's wheel block should now measure 18 1/2”.
8. Sew the 1 1/2” x 18 1/2” background strip to each side edge of the blocks.
9. Sew the 1 1/2” x 20 1/2” background strip to the top and bottom edges of the blocks.
Prepare the Checkerboard:
1. Sew the strips together so that you have a background, blue, background, and red strip set.
2. Cut this in half and sew the two halves together. You now have a set of eight.
3. Using the GO! Strip Cutter-1 1/2” (1" Finished) 5 Strips Die, cut these into segments.

4. Sew the segments together and add to the carpenter's wheel blocks on all four sides like this:

5. Add the last border of background fabric.

Add The Stars
1. Following the included instructions, apply fusible web to the wrong side of two pieces of red fabric and one wrong side of blue fabric. Use your GO! Star-2", 3", 4" Die to cut these out. You may use any of the sizes. I used the largest star for all of mine.
PRO TIP: Remember that when you have fused fabric, you will cut fewer layers at one time.

2. Position the star shapes on the quilt top and fuse in place. Applique them using a zig-zag stitch. If you have an embroidery machine, you can also use the free downloadable GO! Star-2", 3", 4" Embroidery Designs for more embellishment.

3. Quilt as desired and then, bind with the 2 1/2” blue strips.

GO! Produce A Patriotic Quilting Project
I hope you will give this fun patriotic project a try! It was really quick and easy to complete once all the pieces were cut and organized. I love how the Patriotic Carpenter Star project can be hung up anywhere or utilized as a table topper so that it can be displayed for any patriotic holiday.
If you make your own version of this tutorial, please share the photo on social media using the hashtag #AccuQuiltBuilt and don't forget to tag @Vickiscraftsandquilting and @AccuQuilt so we can see your stunning creation!


