


Hey, quilters! It’s Jen Strauser from Dizzy Quilter and I’m here to kick off my new monthly blog tutorials called 12 Months of Holidays. Are you ready for a project each month, culminating in a fantastic holiday gift? I’m ready to coast on that last remaining bit of holiday cheer and get a head start on a handmade holiday in 2023. For this month's idea, the plan is to make a stocking and fill it with little gifts all year long.

Why 12 Months of Holiday Gifts?
I don’t know about you, but several years ago, I realized that I hated the handmade holiday stress game. I started quilting in 1999, and every year as November approached, I would decide that I needed to make quilted gifts for ten to 100 family members, not remembering that November - December is literally the worst time to have any planned activities.
Every year, the period between Thanksgiving and December holidays dishes up some kind of unplanned chaos. It leads to several weeks of late nights, exhaustion, stress and little joy in the giving of the gifts I make. Not to mention, most of my family is not passionate about quilting. So, when I present them with “another quit,” they aren’t all that excited anyway. In 2018, I quit with handmade gifts for the holidays. Now, if I want to make a handmade gift, you get it when I finish it. I’m much happier, and my family hasn’t noticed the lack. It has made holidays easier.
After four years off, I’m ready to do some handmade holiday gifts again, minus the stress. In looking at my AccuQuilt projects over the past few years, I realized I have quite a few GO! Dies that will make fun, easy projects for friends and family. Rather than write it on my to-do list and freak out in November, I’m going to do a little something every month this year.
What Is This Month's Project?
For January, I’m tackling the most complicated project - a scrappy stocking. For my version, I used the GO! Log Cabin-12" Finished Square by Leslie Main Die along with the GO! Santa Stocking Die. Despite planning to make a scrappy stocking, I used just two colors. (I’m in my winter home, and I don’t have a scrappy stash here.) I think this design would be gorgeous scrappy. I personalized it with the GO! Classic 2" Alphabet Uppercase Set Die, but used felted wool fabric so that I could get in a little bit of hand embroidery.
Okay. Enough blather. Let’s get started!
Supplies Needed
- GO! Log Cabin-12" Finished Square by Leslie Main Die
- GO! Santa Stocking Die
- GO! Classic 2” Alphabet Uppercase Set Die
- GO! Fabric Cutter

Fabric Requirements
- 1/2 yard of white fabric
- 1/4 yard of green fabric (or scraps to make all 12 Log Cabin blocks)
- 1/2 yard of lining
- One 3" square of red felt per letter (I had five letters, so I needed five 3" squares)
- 18" x 22" of batting
- OPTIONAL: 9" of ribbon
Cutting Instructions
|
Green |
GO! Log Cabin-12"” Finished Square by Leslie Main Die |
Cut one 6 1/2” x 23” rectangle. Place on the die board and cut one set of Log Cabin pieces. |
|
White |
GO! Log Cabin-12"” Finished Square by Leslie Main Die |
Cut one 6 1/2” x 23” rectangle. Place on the die board and cut one set of Log Cabin pieces. |
|
White |
GO! Santa Stocking Die |
Cut one 10” x 16” rectangle. Place on the die board and cut one stocking piece. If using a print, make sure it will face in the correct direction for the back. |
|
White |
GO! Santa Stocking Die |
Cut four 6” x 8” rectangles. Place on the die board and cut four cuffs. |
|
Lining |
GO! Santa Stocking Die |
Cut two 10” x 16” rectangles. Place on the die board and cut two stocking pieces. If using a print, make sure the right sides face each other when cutting. |
|
Batting or fusible fleece |
|
Cut two 10” x 22” rectangles. |
|
Red wool/felt |
GO! Classic 2” Alphabet Uppercase Set Die |
Cut one 3” square per letter required. Place on required letter shape(s) and cut. |
Assemble the Stocking
PRO TIP: The AccuQuilt website has an excellent pattern called the GO! Penguin Stockings. It has a lots more photos of how I assemble stockings, and it is a free download!
1. Make the hanging loop. Using the longest green Log Cabin strip (#12), fold the edges of the strip in towards the middle lengthwise. Fold it in half again, also lengthwise. Stitch along both edges, about 1/8” from the edge, to secure. Set aside. You can use a length of ribbon here, too.
2. Separate the two sets of Log Cabin strips. Pair them up, shortest to longest, end to end. You will have an extra piece since you used the longest green piece already. Just set this extra aside.
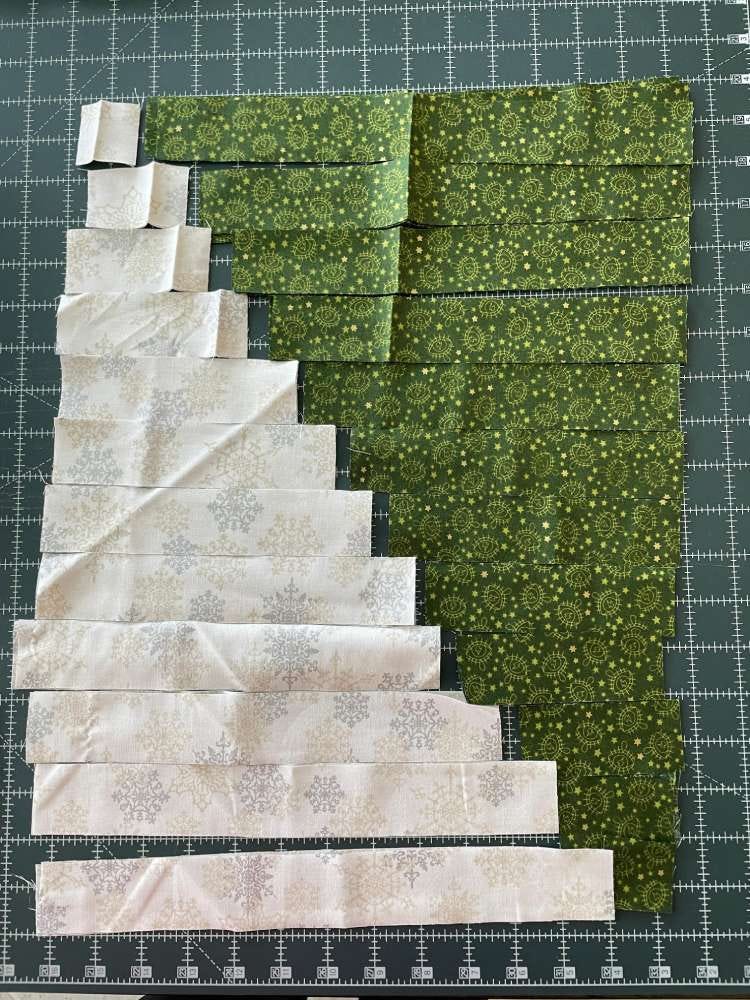
3. Stitch together along the short edges. Press the seams open.
4. Stitch the rows together, creating a block like the one pictured below. Press the seams open.
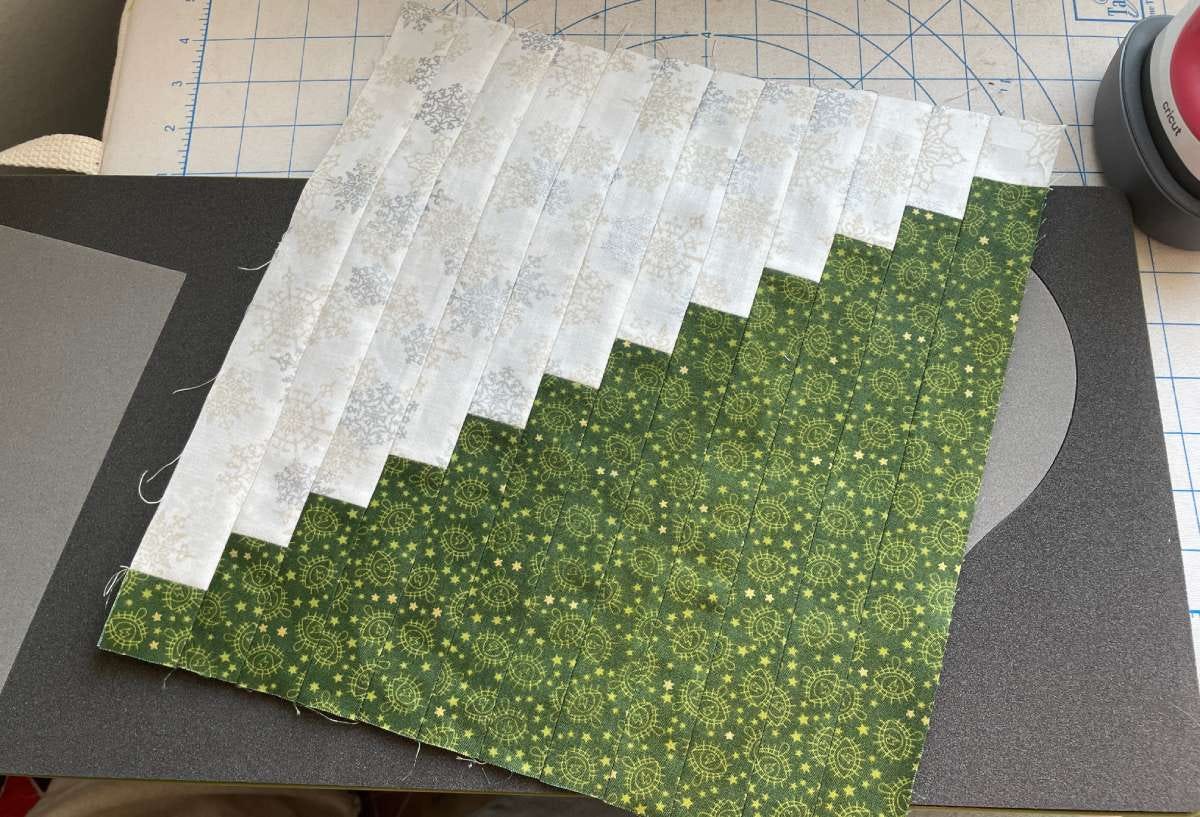
5. Place the Log Cabin block on the GO! Santa stocking Die. I lined mine up with the stair-steps in the stocking, thinking it looked a little bit like the side of a pine tree. Note where you will need extra fabric to cover the die. From your white scraps, find a piece that you can attach to the block to fully cover the die board. Attach and press.

6. Cut out the stocking front. I cut mine so that my stocking toe will point to the right.
PRO TIP: Right side up makes the stocking point right, right side down makes the stocking point left.

7. Attach the cuff pieces to the stocking front, back and lining pieces. Make sure you have them going in the correct directions. Press the seams open.
8. Lay out the letters to personalize your stocking. Be sure not to place them in your seam allowance. I used a Milliners #3 needle threaded with #12 Perle cotton to match my felt and stitched the letters in place using a whip stitch.

9. Whip stitch the letters onto the stocking. A whip stitch comes up into the felt, then down into the fabric below the felt, moves a little bit forward on the back side, then comes up in the felt again. It makes a nice little dashed line you can see on the front.

10. Layer the stocking front and batting. Quilt as desired. Repeat for the stocking back.

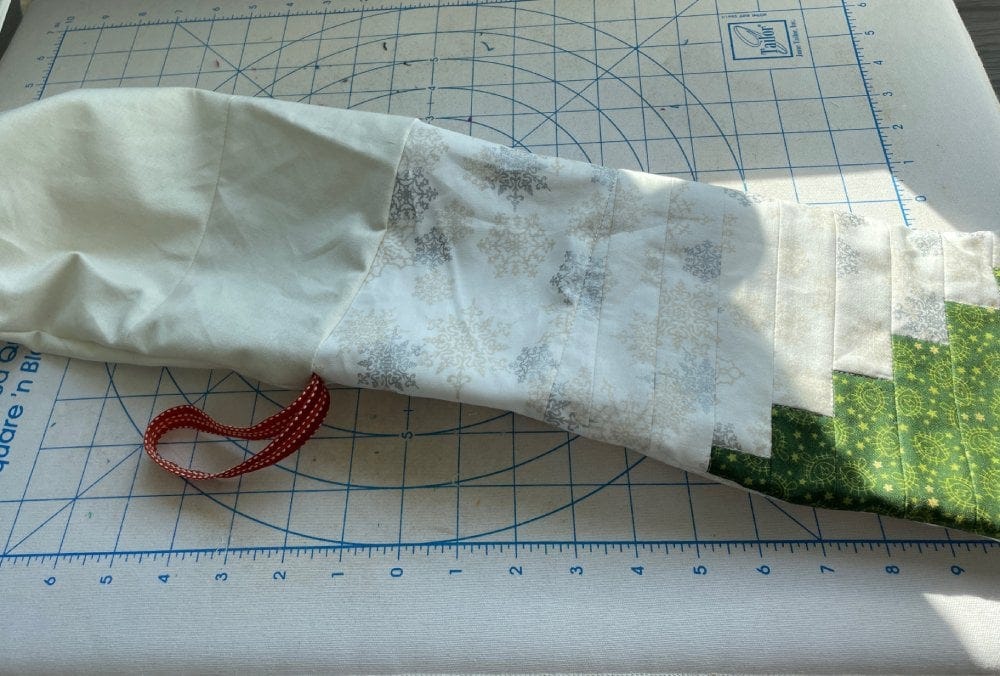
11. Sew the stocking front and back together, right sides together. Clip into the curves, being careful not to cut through the stitching. Repeat with the lining pieces.

12. Turn the lining right side out. Place the hanging loop against the heel side of the stocking, with raw edges matching the stocking, loop towards the heel. Slide the lining into the stocking, right sides together.
13. Mark an opening of 2" to 3" along the top edge of the lining. Stitch along the edge, leaving the marked space open.

14. Pull the stocking through the hole, being careful not to rip out the stitches.
15. Pull the lining through the hole as well.
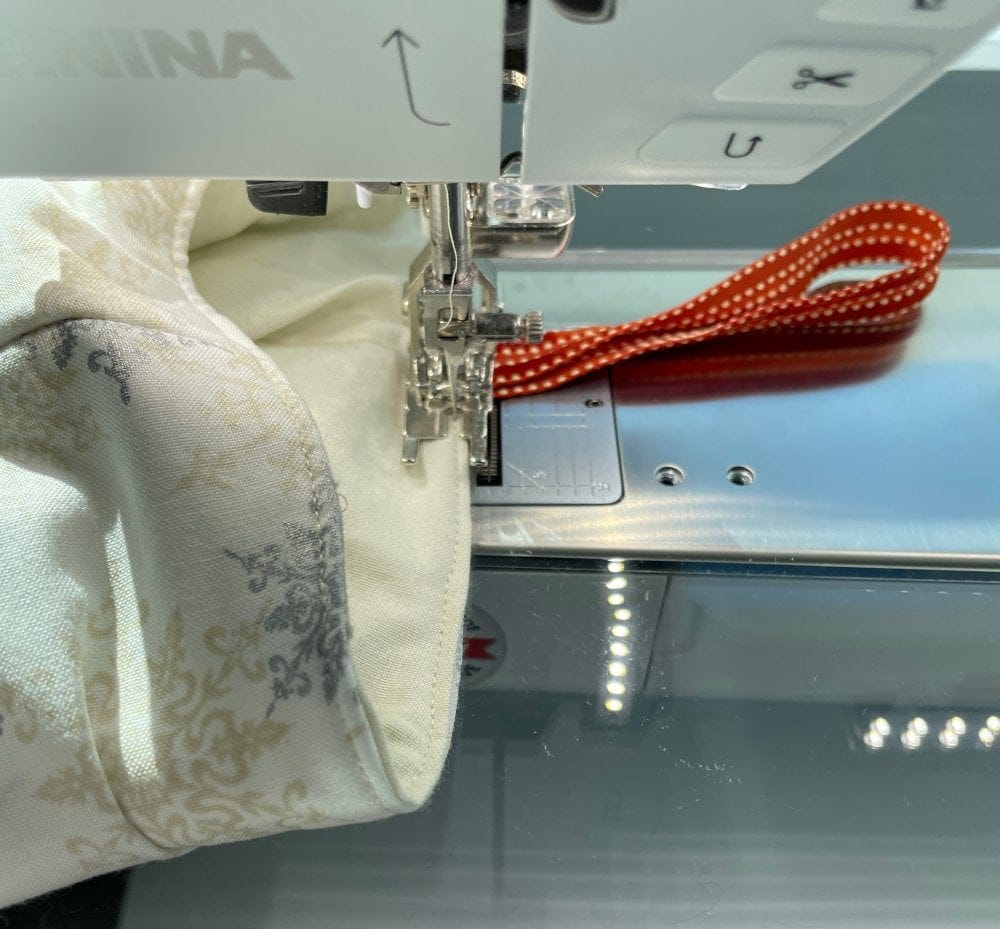
16. Tuck the lining into the stocking, matching up heel and toe. Top stitch around the top edge of the stocking.
Pat Yourself on the Back!
Congratulations! You have made your first holiday gift for 2023. Do a little happy dance, and put it away. We’ll be back in February to make something cute to fill it up.
If you're not a fan of hand appliqué? Check out AccuQuilt's machine embroidery alphabet designs! There are so many options - you are sure to find one that is perfect for you.


