

Hi AccuQuilt friends! I'm Melanie from A Bit of Scrap Stuff and I'm so excited to share a tutorial on how you can build your own witch by combining a few AccuQuilt dies! I love being able to use my AccuQuilt dies for new ideas- they are so versatile! Plus, I think this Witchy Pillow is perfect for just a bit of cute spooky for Halloween!

To make one of your own, you will need TWO of the new dies plus a few favorites!


Let's gather up our supplies and start cutting! Don't worry it won't be spooky or scary as we are using our AccuQuilt for accurate and quick cuts!

Supplies:
- AccuQuilt GO!, GO! Big. GO! Baby or GO! Me fabric cutting machine
- AccuQuilt GO! Halloween Medley Die (#55192)
- AccuQuilt GO! Emojis Limited Edition Die (#55191)
- AccuQuilt GO! Fall Medley Die (#55041)
- AccuQuilt GO! Qube Mix & Match 8" Block Die Bundle (Shape 2) (#55776)
- 8 Fat-eighth (9" x 22") patterned fabrics - I used the Fab-boo-lous Collection by Riley Blake Designs- it's so perfect for this Witchy Pillow
- Solid color fabric scraps for Witch. I used Riley Blake Confetti Cottons: Ballerina, Riley White, Riley Red, and Peacock
- ⅔ yard backing fabric. I used the Fab-boo-lous Collection by Riley Blake Designs
- ¼ yard binding fabric. I used the Fab-boo-lous Collection by Riley Blake Designs
- Fusible Web - I used HeatnBond - LITE (purple package)
- Scrap batting for pillow if quilting pillow top
OPTIONAL: 20" x 20" fabric for inner pillow lining
Prepare Fabric:
Adhere fusible web (per manufacturer instructions) to the wrong side of the fabric that will be used for the Too-cute Witch. Be sure to adhere the fusible web BEFORE cutting the fabric with your AccuQuilt. Peel off the paper backing before or after cutting shapes.
Note: If you peel off paperbacking, you can only cut (1) piece of a fabric at a time or the stacked fabric will "stick" together due to the fusible web. Additionally, fusible counts as half a layer, so only cut four layers of fused fabric at one time.
Cutting Time:
A. Cutting instructions for Too-Cute Witch-

1. AccuQuilt GO! Emojis Limited Edition Die:
- Cut (1) Emoji head (large circle)
- Cut (2) Emoji eyes (medium circle)
- Cut (2) Emoji pupils (small circle)
- Cut (2) Emoji eyebrows
- Cut (1) Emoji smile
2. AccuQuilt GO! Halloween Medley Die:
- Cut (1) Witch hat
- Cut (3) Leaves (this will be her hair)
B. Cutting instructions for pillow front-
Do NOT adhere fusible web to this fabric.
Cut (48) 2½" squares from patterned fabric AccuQuilt GO! Qube Mix & Match 8" Block Die Bundle (Shape 2).
Cut (1) 8½" x 8½" square for center of pillow front - the witch face will be placed on this large center square.

Time for Sewing:

We are going to sew together the pillow front first and then "build" our Too-Cute Witch.

1. Sew 2½" squares into (12) four-patch blocks. Each four-patch block measures 4½" x 4½"

2. Sew (4) four-patch blocks together. Row measures 4½" x 16½". Label Row A

3. Repeat Step 2. You will now have (2) of Row A.
4. Sew (2) four-patch blocks together. Section measures 4½" x 8½". Label B.

5. Repeat Step 4. You will now have (2) B sections.
6. Sew (1) B section to opposite sides of (1) 8½" x 8½" square. Row measures 8½" x 16½". Label Row C.

7. Sew (1) Row A to the top and bottom of Row C. Pillow front measures 16½" x 16½".
Time to build your Too-Cute Witch:
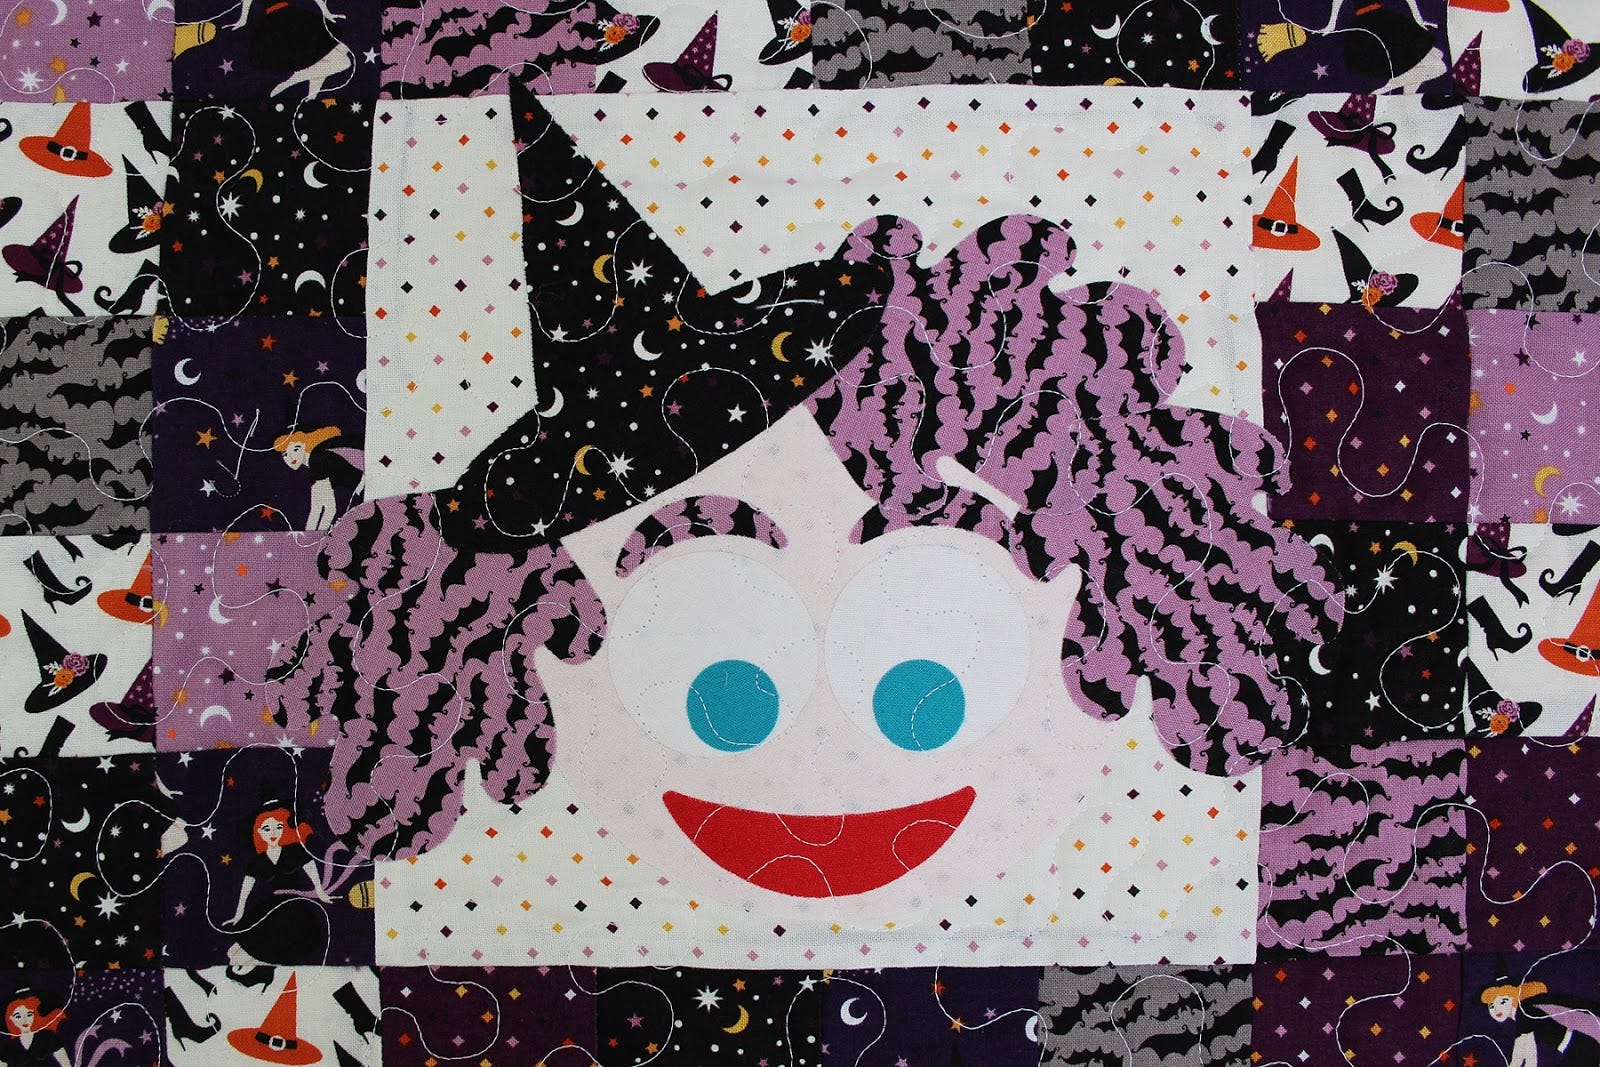
1. Layout the Too-cute Witch pieces over the large 8" center square as desired.
2. Peel off paper backing- if not done yet.
3. Fuse each Too-cute Witch piece over the large 8" center square per manufacturer instructions in the following order
- (1) Emoji head (large circle)
- (2) Emoji eyes (medium circle)
- (2) Emoji pupils (small circle)
- (2) Emoji eyebrows
- (1) Emoji smile
- (3) Leaves (this will be her hair)
- (1) Witch hat
Note: My Too-cute Witch's hat and hair is slightly over the patchwork squares.
4.OPTIONAL: Use your FREE AccuQuilt embroidery file downloads and machine embroider around each shape. OR you can machine appliqué / stitch around each shape free-hand.
5. Make a mini quilt sandwich: With the pillow's front fabric right side up, add batting, then inside pillow fabric right side down. Quilt as desired. I chose to stipple my pillow to adhere my cut fabric pieces instead of embroidering each shape. If you choose to quilt over your shapes, make sure your fusible web is designed for quilting so your needle doesn't become sticky or break (HeatnBond LITE).
6. Make your preferred pillow backing: I prefer to use a zipper-style as I feel it gives a polished look and it makes it easy to remove the pillow cover for washing, but you can create an envelopes style or sew them up completely. This Fab-boo-lous Witches fabric by Riley Blake Designs is just perfect!

7. Layer the finished pillow front (right side up) on top of pillow backing (right side down). Stitch a scant ¼" seam all around pillow - the stitched line should "hide" under your binding once it is attached.
8. Binding Time. Cut two 2½" x 42" strips of fabric and attach the binding to the pillow with your preferred method.

Now it is time to enjoy your Witchy Pillow! I loved being able to combine the newest AccuQuilt GO! dies with some "oldies" to create a fresh new pattern!
Thank you so much for reading my tutorial. I can't wait to see your amazing Witchy Pillow too! Be sure to share your project with us on social media. Tag me @abitofscrapstuff and @AccuQuilt on Instagram and always use hashtag #AccuQuilt so we can see them! Give us a follow while you're there and you'll be the first to know what we're making.
More fabric fun is on my A Bit of Scrap Stuff Blog, so be sure to follow my blog too!
Happy Quilting!
Melanie Call
Want to print or save this tutorial for later? Enter your email below to download and save!


