

Greetings sewing and quilting enthusiasts – Belinda from Blue Ribbon Designs here, and I'm returning today with a brand new quilting tutorial featuring the GO! Qube. In case we haven’t previously met, I'm a quilting and needlework designer, creator, finisher, and teacher (and the author of the Samplings from a Blue Ribbon Girl blog). I enjoy using my AccuQuilt Fabric Cutters on a daily basis and love to share my enthusiasm with others!
Today, I am here to share my latest quilty project with you, a cheerful springtime wall hanging featuring traditional quilt blocks and a center panel of machine appliqué – I call it “Spring Fling.”
This wall hanging uses the GO! Qube Mix & Match 6” Block for the traditional quilt blocks, along with GO! Simple Shapes by Edyta Sitar and GO! Rose of Sharon by Sharon Pederson to create the center floral appliqué.
With spring (finally) arriving, I thought it would be fun to make a floral quilted wall hanging to brighten up my home décor. Using the new GO! Qube Mix & Match 6” Block made this sampler-style project quick and easy! This project was created with 6” quilt blocks, but you could easily adapt this tutorial for the 8”, 9” or 12” GO! Qube (it will just change the finished size of your project). You will also want to have a GO! Qube 6” Block-72 Block Patterns Booklet handy – this FREE downloadable pattern booklet for the GO! Qube 6” will give you detailed instructions for piecing the six quilt blocks used in this project (of course if you have favorite quilt blocks you could use them instead of the blocks I chose). So go pick out some fun, sunshiny fabrics and let’s get started…

Spring Fling Wall Hanging
Finished Size: 24” W x 18” H
GO! Fabric Cutter:
Your favorite GO! Fabric Cutter (the GO! Qube Mix & Match 6” Block is compatible with all three GO! Fabric cutters)
GO! Cutting Dies:
GO! Qube Mix & Match 6” Block (55775)
GO! Simple Shapes by Edyta Sitar
GO! Rose of Sharon by Sharon Pederson
GO! Strip Cutter-2” (1½” Finished) (55025 or 55164) (Binding)
Materials Needed:
Pink Print — Fat Quarter
Orange Print — Fat Quarter
Yellow Print — Fat Quarter
Light Green Print — Fat Quarter
Green Print — Fat Quarter
Teal Print — ½ Yard
Purple Solid — Fat Quarter
White Print — Fat Quarter
White Solid — Fat Quarter
Fusible Web – ½ Yard
Backing fabric—30” x 24”
Batting—30” x 24”
Cutting Instructions:
NOTE: Apply fusible web to the wrong side of the asterisked fabrics following manufacturer’s instructions before cutting appliqué shapes.
Pink Print Fabric:
7 — Shape 5: GO! Half Square Triangle 1½” Finished Square
2 — Shape 8: GO! Rectangle-2” x 3½” (1½” x 3” Finished)
*3 — Small Buds (2¼”) - GO! Simple Shapes by Edyta Sitar
*2 — Bud Base - GO! Simple Shapes by Edyta Sitar
*2 — 2” Roses - GO! Rose of Sharon by Sharon Pederson
*1 — 2½” Rose - GO! Rose of Sharon by Sharon Pederson
*1 — 1” Circle - GO! Rose of Sharon by Sharon Pederson
Orange Print Fabric:
8 — Shape 2: GO! Square-2 (1½” Finished)
*2 — ⅝” Circles - GO! Simple Shapes by Edyta Sitar
*2 — 1” Circles - GO! Simple Shapes by Edyta Sitar
Yellow Print Fabric:
4 — Shape 2: GO! Square-2 (1½” Finished)
8 — Shape 5: GO! Half Square Triangle 1½” Finished Square
*8 — Small Leafs (2½”) - GO! Simple Shapes by Edyta Sitar
*2 — Bud Base - GO! Simple Shapes by Edyta Sitar
Light Green Print Fabric:
4 — Shape 3: GO! Half Square Triangle 3” Finished Square
*3 — Small Buds (2¼”) - GO! Simple Shapes by Edyta Sitar
*2 — Large Buds (3”) - GO! Simple Shapes by Edyta Sitar
Green Print Fabric:
4 — Shape 2: GO! Square-2 (1½” Finished)
4 — Shape 4: GO! Quarter Square Triangle 3” Finished Square
3 — Shape 5: GO! Half Square Triangle 1½” Finished Square
*4 — Stems - GO! Simple Shapes by Edyta Sitar (one sub-cut into two smaller stems)
*4 — Small Buds (2¼”) - GO! Simple Shapes by Edyta Sitar
*3 — Large Buds (3”) - GO! Simple Shapes by Edyta Sitar
Teal Print Fabric:
*1 — Shape 1: GO! Square-3½” (3” Finished) (flower planter)
5 — Shape 3: GO! Half Square Triangle 3” Finished Square
*2 — Shape 3: GO! Half Square Triangle 3” Finished Square (flower planter)
2 — Shape 5: GO! Half Square Triangle 1½” Finished Square
3 — 2” WOF strips for binding
Purple Solid Fabric:
8 — Shape 8: GO! Rectangle-2” x 3½” (1½” x 3” Finished)
*3 — Bud Base - GO! Simple Shapes by Edyta Sitar
*1 — 2” Roses - GO! Rose of Sharon by Sharon Pederson
*2 — 2½” Rose - GO! Rose of Sharon by Sharon Pederson
White Print Fabric:
1 — Shape 1: GO! Square-3½” (3” Finished)
5 — Shape 3: GO! Half Square Triangle 3” Finished Square
8 — Shape 5: GO! Half Square Triangle 1½” Finished Square
1 — Shape 6: GO! Square On Point 2⅝” (2⅛” Finished)
4 — Shape 8: GO! Rectangle-2” x 3½” (1½” x 3” Finished)
*2 — Small Buds (2¼”) - GO! Simple Shapes by Edyta Sitar
*2 — 1” Circles - GO! Simple Shapes by Edyta Sitar
White Print Fabric:
1 — 12½” W x 18½” H
Assembly:
- Lay out one white print shape 3, one teal print shape 3, eight white print shape 5, three pink print shape 5, three green print shape 5, two teal print shape 5, and two white print shape 8 to create a GO! Flower Basket 6” Block (reference the GO! Qube 6” Block-72 Block Patterns Booklet for block sewing instructions). Make one quilt block.

- Lay out four orange print shape 2, four yellow print shape 2, two light green shape 3, and two white print shape 3 to create a GO! Jewel Box 6” Block (reference the GO! Qube 6” Block-72 Block Patterns Booklet for block sewing instructions). Make one quilt block.

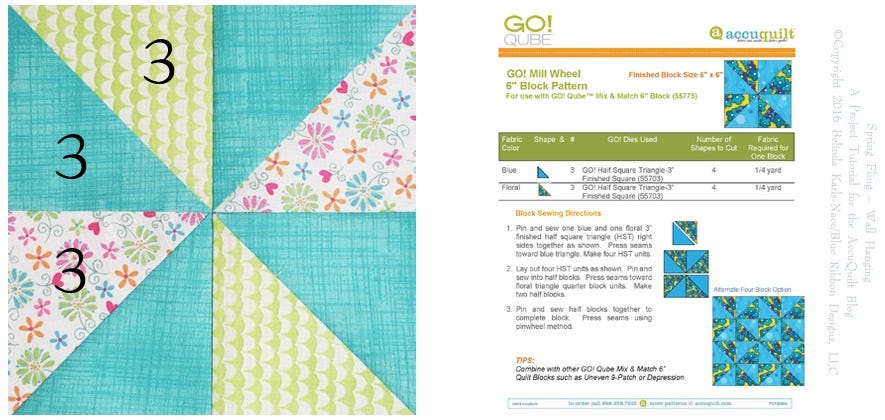
- Lay out four teal print shape 3, two light green print shape 3, and two white print shape 3 to create a GO! Mill Wheel 6” Block (reference the GO! Qube 6” Block-72 Block Patterns Booklet for block sewing instructions). Make one quilt block.
-
- Lay out one white print shape 1, four orange print shape 2, four green print shape 4, and eight yellow print shape 5 to create a GO! Sawtooth Star 6” Block (reference the GO! Qube 6” Block-72 Block Patterns Booklet for block sewing instructions). Make one quilt block.
-

- Lay out four green print shape 2, four pink print shape 5, one white print shape 6, and four purple shape 8 to create a GO! Susannah Variation No. 2 6” Block (reference the GO! Qube 6” Block-72 Block Patterns Booklet for block sewing instructions). Make one quilt block.
-

- Lay out four purple shape 8, two pink print shape 2, and two white print shape 2 to create a GO! Two by Two 6” Block (reference the GO! Qube 6” Block-72 Block Patterns Booklet for block sewing instructions). Make one quilt block.


- Lay out two teal print shape 5, one teal print shape 1, and the flower and stem pieces on the white 12½” W x 18½” rectangle using the diagram below as a guide.

- Once you are happy with your layout, fuse and machine appliqué all pieces in place.
- Lay out the 6 pieced blocks and the machine appliqué block in three columns, using the wall hanging diagram as a reference.

- Pin and sew both end columns.
- Pin and sew three column units together.
- Layer batting between quilt top and backing.
- Pin or baste layers together.
- Quilt as desired.
- Add teal print binding, mitering corners.

Your bright and cheerful “Spring Fling” wall hanging is now complete – be sure to admire your work, then hang and enjoy. I hope you are inspired by this month’s Blue Ribbon tutorial and it gets you excited to spend an afternoon at your sewing machine!
Please feel free to stop by my blog, website, or social media pages and share your completed “Spring Fling” project with me…I always enjoy meeting fellow quilters and sewists…and I am happy to answer any questions regarding my AccuQuilt friendly tutorial!


