
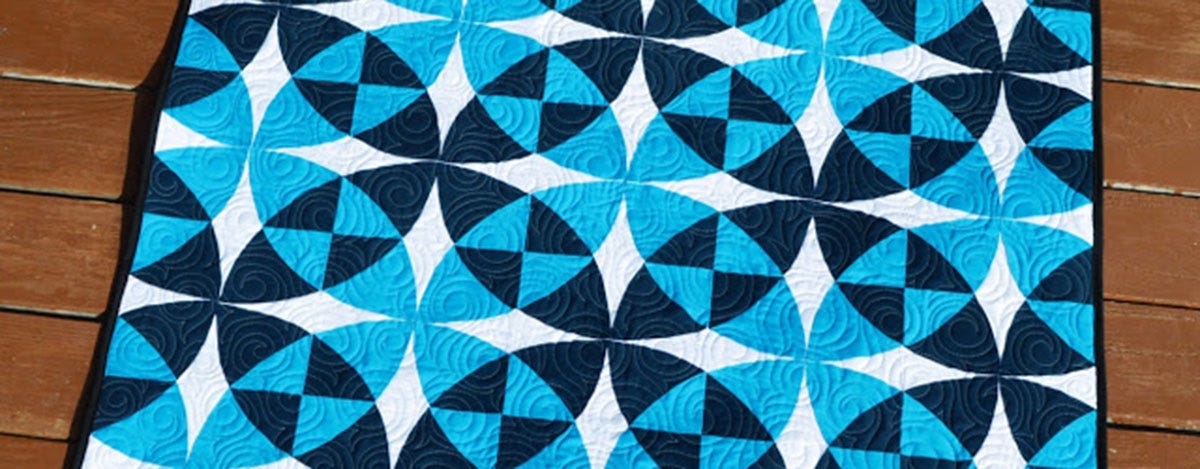
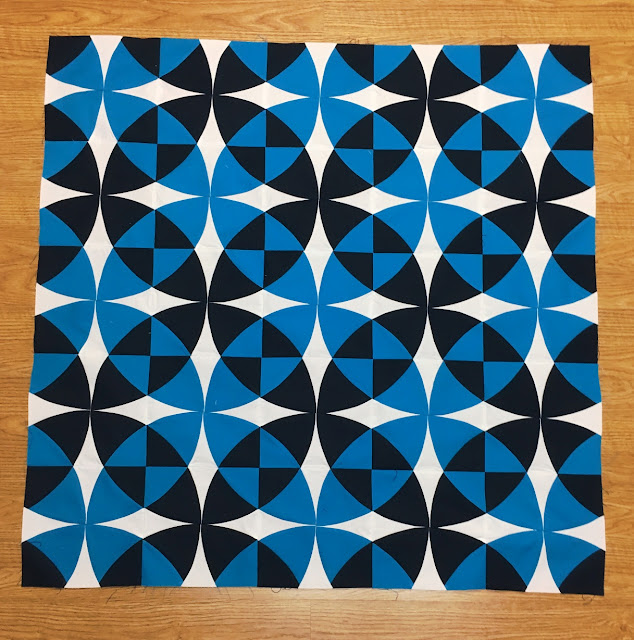
Hello AccuQuilt Readers! It's me, Melissa Corry from Happy Quilting and I am thrilled to be bringing you a fun quilt tutorial today. I love curved piecing, and I think too many quilters easily shy away from them with the assumption that it is difficult. But I hope as we walk through today's project, you will see just how fun curved piecing is, especially when the amazing curved AccuQuilt Dies take care of the cutting! This Winter Ways baby quilt is made using the AccuQuilt GO! Winding Ways-8" Finished and I just love it!

Although you can use prints, I really like the look of a solids in this quilt as it makes the design shine and creates incredible movement. By simply changing the placement of the light and dark blue fabrics in your block, you get secondary designs that truly pop! The white accents reminded me of snow crystals, and combined with the deep blues, it just seemed fitting to call this one Winter Ways. ;) I started with blue because I was making this baby quilt for my sweet new nephew, Joshua-isn't he just so cute?!

But of course, this quilt would look amazing in any color. Here is the Winter Ways mocked up in some pinks, and as you can see, it's super cute! Maybe this should be Spring Ways? :) Truly, whatever three color combo you choose, it will look awesome.


MATERIALS NEEDED:
To make your own Winter Ways Quilt you will need:
- GO! Winding Ways-8" Finished and an AccuQuilt GO! Cutter (Compatible with GO!, GO! Big, and Studio)
- 1¼ yards of blue solid
- 1¼ yards of navy solid
- 1¼ yards of white solid
- ⅜ yard of black solid for binding
- 1¼ yards of backing
And of course, as mentioned, you can use any color combos you like. The tutorial will just refer to these particular colors.

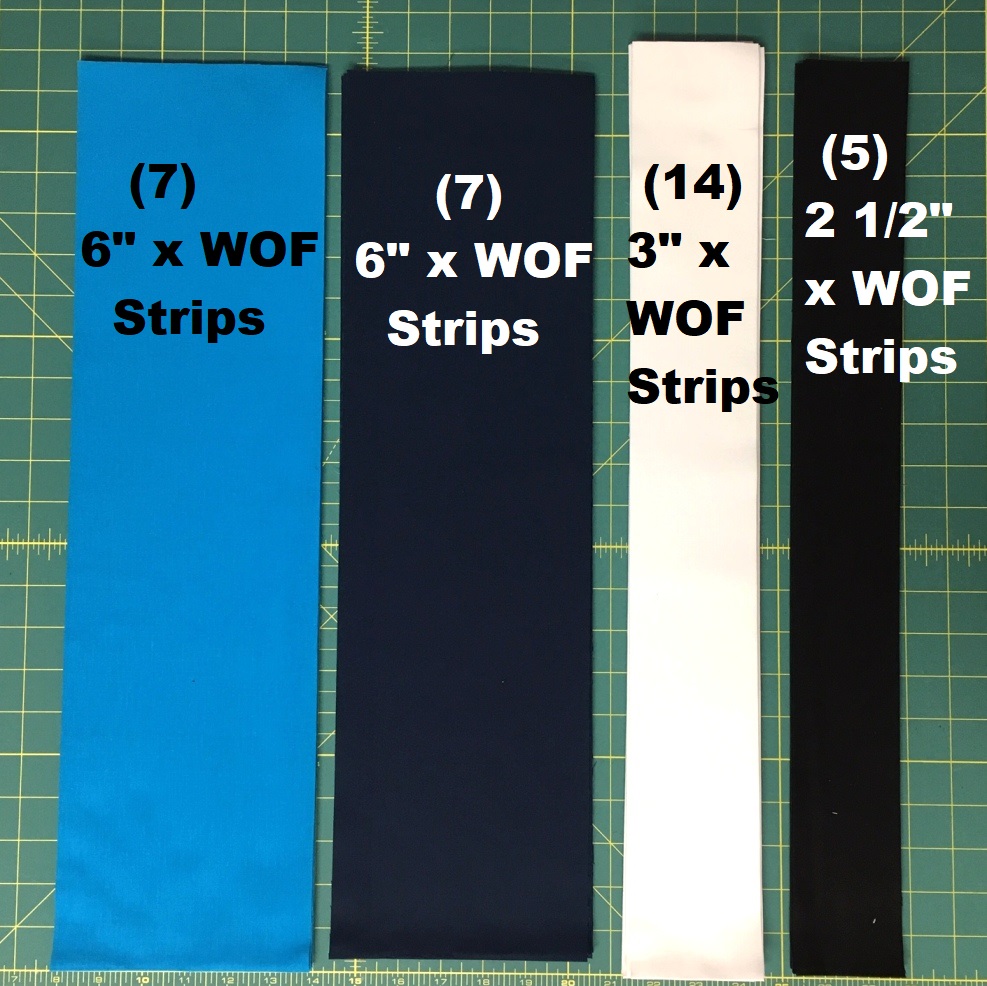
STEP 1 - CUTTING
From your Blue Solid cut: From your White Solid cut:
(7) 6" x Width of Fabric Strips (14) 3" x Width of Fabric Strips
From your Navy Solid cut: From your Black Solid cut:
(7) 6" x Width of Fabric Strips (5) 2½" x Width of Fabric Strips
For the blue and navy strips, you will be placing the strip over the die portion inside the red box shown below.

Fold your width of fabric strip in half again so that you have 4 layers, and center it over the portion indicated above taking care that your edges are over the cutting edges.

Place your cutting mat on the fabric and GO! Winding Ways-8" Finished, and roll it through your GO! fabric cutter. Slide the cutting mat off of the fabric and you will have 8 outer corner units, and 8 inner corner units.

Repeat this process for all 7 blue width of fabric strips as well as for all 7 navy width of fabric strips. You should now have a total of 56 blue inner corner units, 56 blue outer corner units, 56 navy inner corner units, and 56 navy outer corner units. You cut those curves in no time flat!

So now, we will move onto the white yardage. For the white strips, you will be placing the strip over the die portion inside the red box shown below.

Fold your width of fabric strip in half again so that you have 4 layers and center it over the portion indicated above taking care that your edges are over the cutting edges.

Place your cutting mat on the fabric and Winding Ways die, and roll it through your GO! fabric cutter. Slide the cutting mat off of the fabric and you will have 8 side units.

Repeat this process for all 14 white width of fabric strips. You should now have a total of 112 white side units. Easy as that!

CURVED SEWING BASICS -
Now with everything cut, you are ready to start sewing! I thought it might be helpful to go over some basics of curved sewing before we get into how to sew this block together. If you are already proficient at curved sewing, you can skip down to Step 2 - Sewing the Block.
So let's talk curved sewing. Before you start, take a deep breath. :) The more relaxed you are, the easier curves are to sew. If you get frustrated and tense, it just gets harder, so remember this is all about having fun. :) It is easiest to sew curves with your needle in the down position, so if that is an option on your machine, use it. Also, whenever I am curved sewing, I like to chain stitch as it saves time and thread. Chain stitching just means you don't clip the threads between each unit you sew. Just keep feeding your units through the machine until they are all stitched. 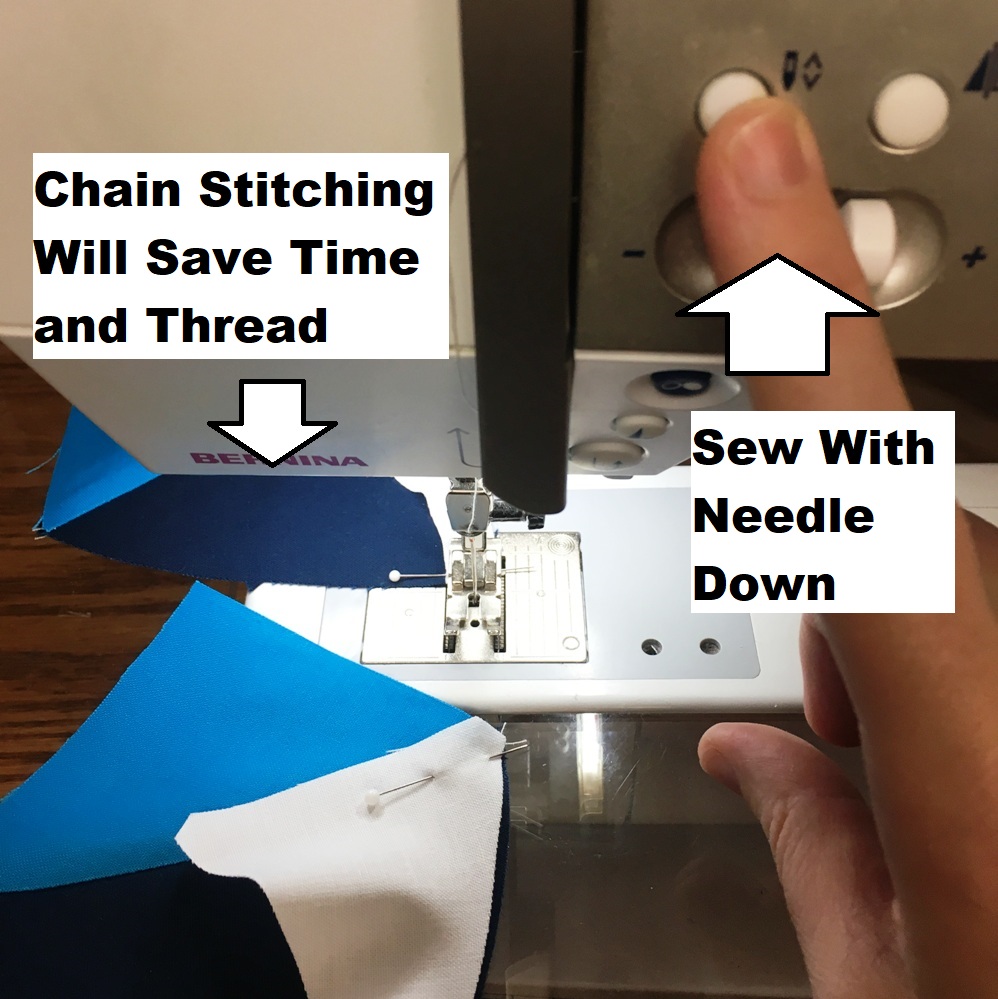
The biggest key when sewing curves is to only worry about what is directly in front of your presser foot. The rest of the block won't line up until it gets there so don't stress about it. Just keep focused on what is about to go under the foot.
Using a ¼" foot on your machine, align your pinned edge with the edge of your ¼" foot and begin a few stitches. I like to backstitch 2 stitches once I have started. This isn't necessary, but I like to as I pull on curved pieces when sewing and pressing a little more than I do with traditional square blocks.

Now just try to imagine that this is just like sewing straight lines only a little more aligning as you go. I like to use the finger on my right hand to keep the two edges of my fabric aligned and the fingers on my left hand to smooth or pull out any bubbles that are in the way. Just smooth those outward and remember you only have to have a ¼" of flat sewing space. And again, just worry about smoothing out your sewing area right before it goes under the presser foot.

Just keep aligning with the right hand and smoothing with the left hand. The fabrics will ease into position right where they should be as long as you be sure to keep the edges aligned. Every once in a while, you might find that you need to lift your presser foot to smooth out a stubborn crease and that is all good, just be sure your needle is in the down position.

When you get close to the edge, I find it helpful to slightly pull down on the bottom right corner. It helps to pull out any last creases, especially when you are dealing with ½" width on the top piece.

And just like starting, I like to backstitch a few stitches on the end. Again, it isn't necessary, I just like the idea of holding that seam in place. ;)
Now, I went through that super fast and I know, it can be hard to tell from the pictures, but just remember, slow and steady and try to relax. Practice, practice, practice and trust me, within a few units you are going to be flying through these. Really, it takes longer to pin them then to sew them.

Once you have them sewn, here are a few pointers on pressing curved piecing. But I will say, this is how I like to press curved sewing and if you find a way you like better, go for it. I like to finger press my seam from the front first, taking care to move the underneath seam in the direction I want to press it.

Then I take my iron and press it from the front, using the point of the iron right in the seam to ensure I don't have any bubbles or creases in my seam and the fabric is lying completely flat.

Then I flip over my piecing and give it a quick steam in the back just to be sure all of the seams are set and that I didn't have any pieces turn or flip.

There are my curved piecing basics! And now you're set to sew all the curves. ;) So, let's get to piecing the Winter Ways block!
STEP 2 - PIECING THE BLOCK
There are two blocks in the Winter Ways quilt that are pieced the same but use an opposite fabric layout. We will start with all the blue outer corner units, all the navy inner corner units, and half (56) of the white side units as shown below.

We will make 4 corner units, so you have 4 blue outer corner units and 4 navy inner corner units.
Note: When you "match" curved units, they won't line up like regular piecing. That's okay, I love that AccuQuilt puts notches in the curved dies to make sewing curves so much easier!

So match the notches in the two pieces as shown in step 1 in the photo below. Pin the center matched notches, align the two ends and pin them in place as well as (shown in step 2 below). Using the basics you learned above, stitch a ¼" seam along the pinned edge of all 4 sets as shown in 3. Then press the seam allowance up toward the blue piece as shown in 4, making a total of 4 corner units.

Now layout the 4 corner units and 2 side units as shown below. You will be making 2 sets that look the same which will be the top row unit and bottom row unit of the block.

Place the side unit onto the left hand corner unit in each set. Align the center notches and pin in place. Then align the top and bottom of the side unit taking the ¼" on the top and the ½" on the bottom align. Pin in place as shown below.

Stitch a ¼" seam along the pinned edge of each of the two sets. Press the seam allowance towards the corner unit.

Now, place the unit you just pieced onto the corner unit in each set with right sides together. Take care to match and pin with the side unit on top so you can see your seam. Then stitch a ¼" seam on both pinned sets. When you begin stitching, note that you are stitching directly on top of the previous seam for about a ¼" before the piece gets wider. This will help make the center point.

Next, press both of the sets seams towards the corner units. You now have a top row unit and a bottom row unit and are ready to make the center row unit. To do this, gather another 2 white side units.

Stitch the 2 white side units together at the base of the unit at shown below and press the seam open to make the center row unit.

Almost done! Now you just have to stitch the 3 units together to make the block. Place the center row unit onto the top row unit with right sides together. Align the notches, center seam, and ends. Pin in place. Stitch a ¼" seam along the pinned edge.

Press the seam allowance toward the top row unit. This can be a little tricky to press toward those seams, but you don't want the bulk in the center row unit as you will be stitching that seam next.

Now, place the unit you just sewed onto the bottom row unit, taking care that the white is on top. I use this pin trick to align the center seam so I can make sure the point comes out perfect in the center. Then align and pin the notches and ends in place.

Sew a ¼" seam along the pinned edge. Just like before, when you get to the center, stitch directly on top of the previous seam. This again will help make the point in the center.

Press the seam allowance toward the bottom row unit and your Block "A" is done. You have just sewn curves! Great job!

Repeat this process to make a total of 14 Block "A" Winter Way blocks. It will save you time and thread to chain stitch each of the above steps. For example, make all your corner units followed by all your top and bottom row units, followed by all your center row units, and finally sew all the blocks together. Beginners should consider making 1 block at a time for practice before chain stitching like crazy. Do what you feel comfortable with. :)

And now you need to make Block "B's", which are done the exact same way as Block "A" but with different placing of the color fabrics. You will want to use the remaining 56 white side units, all the navy outer corner units, and all the blue inner corner units as shown below. Use the same instructions as Block "A" to create Block "B", just change the fabric placement.

Again, you will be making 14 Block "B's" total. You can choose to make the blocks one at a time or chain stitch each step to make all 14 blocks at the same time. Whatever you are comfortable with and find the most enjoyable. ;)

Now that your blocks are made, you are ready to piece together the quilt top!
STEP 3 - PIECING THE QUILT TOP
Start by laying out your blocks in a 5 x 5 layout alternating the Block "A" and Blocks "B's". You can choose if you want Block "A" or Block "B" in the corners. You will have 3 blocks leftover, I decided to set aside my first three blocks and considered them "practice blocks", but you can use them in the back to for a little pieced backing bonus.

Now it's time to sew the blocks into rows. To do this, place the second block onto the first block (shown in row 1 below) with right sides together. Stitch a ¼" seam along the pinned edge. Then place the third block onto the now sewn together first and second block (shown in row 2 below) with right sides together. Align and stitch a ¼" seam along the edge. Repeat this for each row, adding the fourth block (shown in row 3 below) and the fifth block (shown in row 4) until you have stitched all of the blocks into a row.

It is important to note, when you are sewing the blocks together, you will want to align and pin each of your seams. Again, I used the pin trick to align the two seams. I also found it very helpful to "flip" my two center seams so that:
(1) It nests with the underneath seam.
(2) It greatly reduces the bulk.
(3) It makes it so you can see the guide for the pin trick.

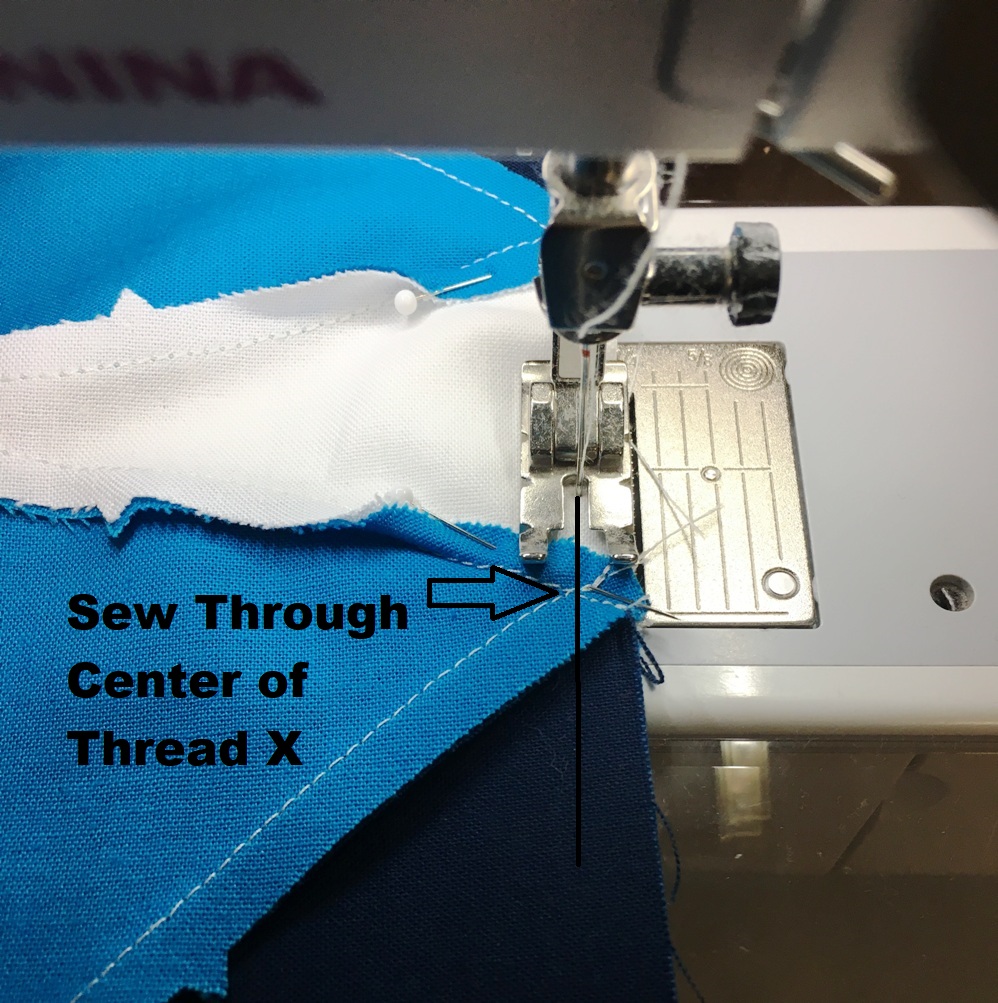
When you are stitching your blocks together, take care to stitch directly through the center of the thread X, so your points where the blocks meet are perfect.
Repeat this process for each row (or you can chain stitch rows) until all 5 rows are sewn together as shown. Press the seam allowances open.

When you press the seam allowance open, also press the "flipped" seam so that it lies flat as shown.

Now, all that is left to do is to sew the rows together. This is just like sewing the blocks into rows only on a larger scale. Place the second row onto the first with right sides together. Align and pin your center seams using the pin trick and flipped seams. Then align and pin the block seams and ends in place. Stitch a ¼" seam along the edge, again remembering to stitch directly through the thread X on your center seams for perfect points.

Next, place the third row onto the now sewn together first and second rows. Align, pin, and stitch a ¼" seam. Repeat this process for each row until all are sewn together. Press the seams open and flatten your flipped seams.

And just like that, you have a beautiful Winding Ways quilt top! Wasn't that so much fun?
STEP 4 - FINISHING
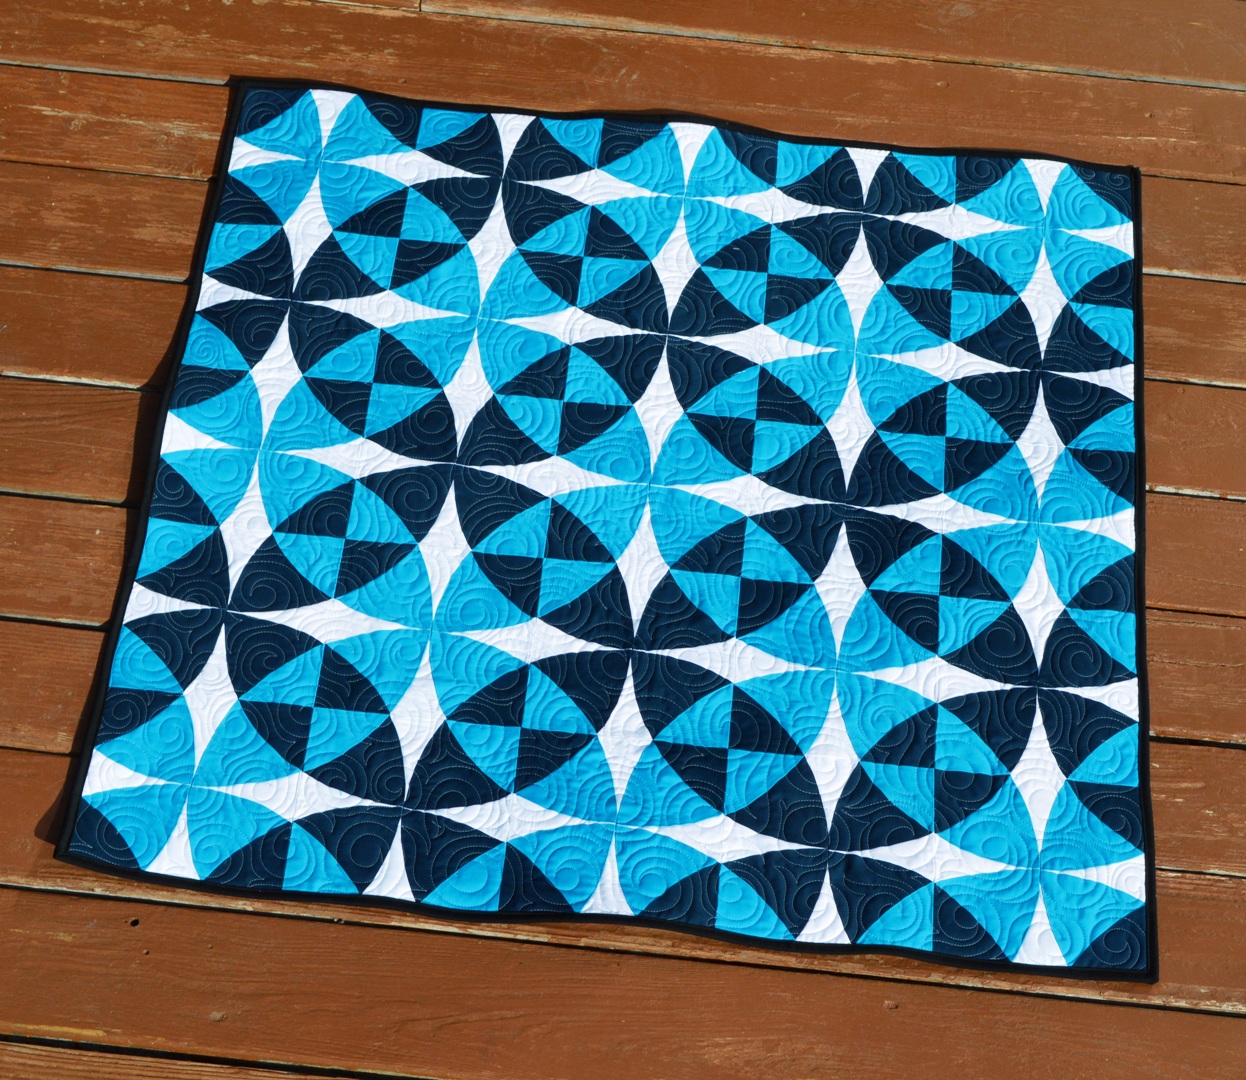
Let's turn that finished quilt top into a finished quilt. ;) Time to baste it, quilt it, and bind it - which is a whole lot in one little sentence. If you are new to quilting, check out my video tutorial series on finishing your quilt. It will walk you through basting, quilting, and binding, step by step. ;) I quilted mine with an over swirl using the 5 black 2½" x WOF strips to bind the quilt.

STEP 5 - ENJOY
Once it's done, all that's left is to sit back and enjoy your adorable 40" x 40" Winter Ways quilt! I was fortunate enough to visit my sister last week and deliver Joshua's new quilt to him. I think he likes it. I hope you have enjoyed this tutorial and if you make your own Winter Ways Quilt, I would love to see it! Share it with us on social media with the hashtags #happyquiltingwithmc and #AccuQuilt. We can't wait to see your Winter Ways quilts!

-Melissa
Want more curved piecing patterns? Check these out:
- GO! Winding Wall Hanging Pattern
- GO! Drunkard's Flower Path Quilt Pattern
- GO! Baby Bubbles Quilt Pattern
Want to print or save this tutorial for later? Fill out the form below to download and save!


