Hello Friends! It's Melissa Corry from Happy Quilting here and I am thrilled to be bringing you a new quilt tutorial.
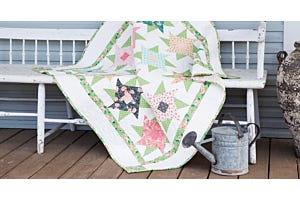
Making a classic prairie star quilt has been on my bucket list for some time, and I am sure it is on many of yours as well.
When I saw the new GO! Prairie Star - 14" BOB Die (55540) die, I knew it was time to make this quilt!! (And what could be more fun than making prairie stars in rainbow scraps?!)
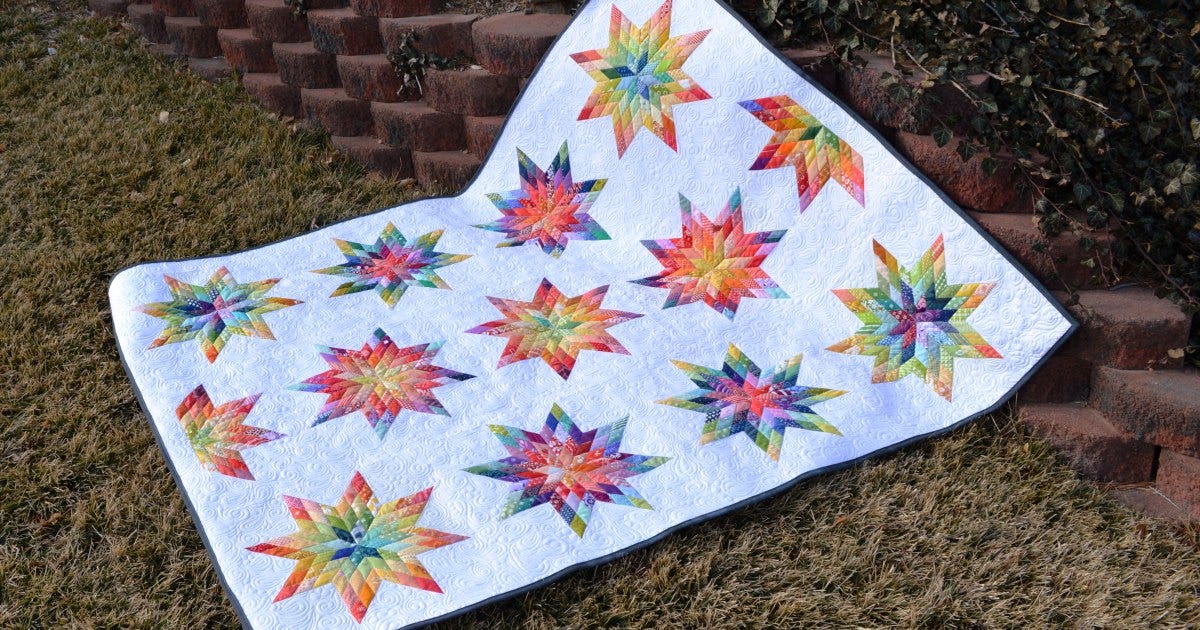
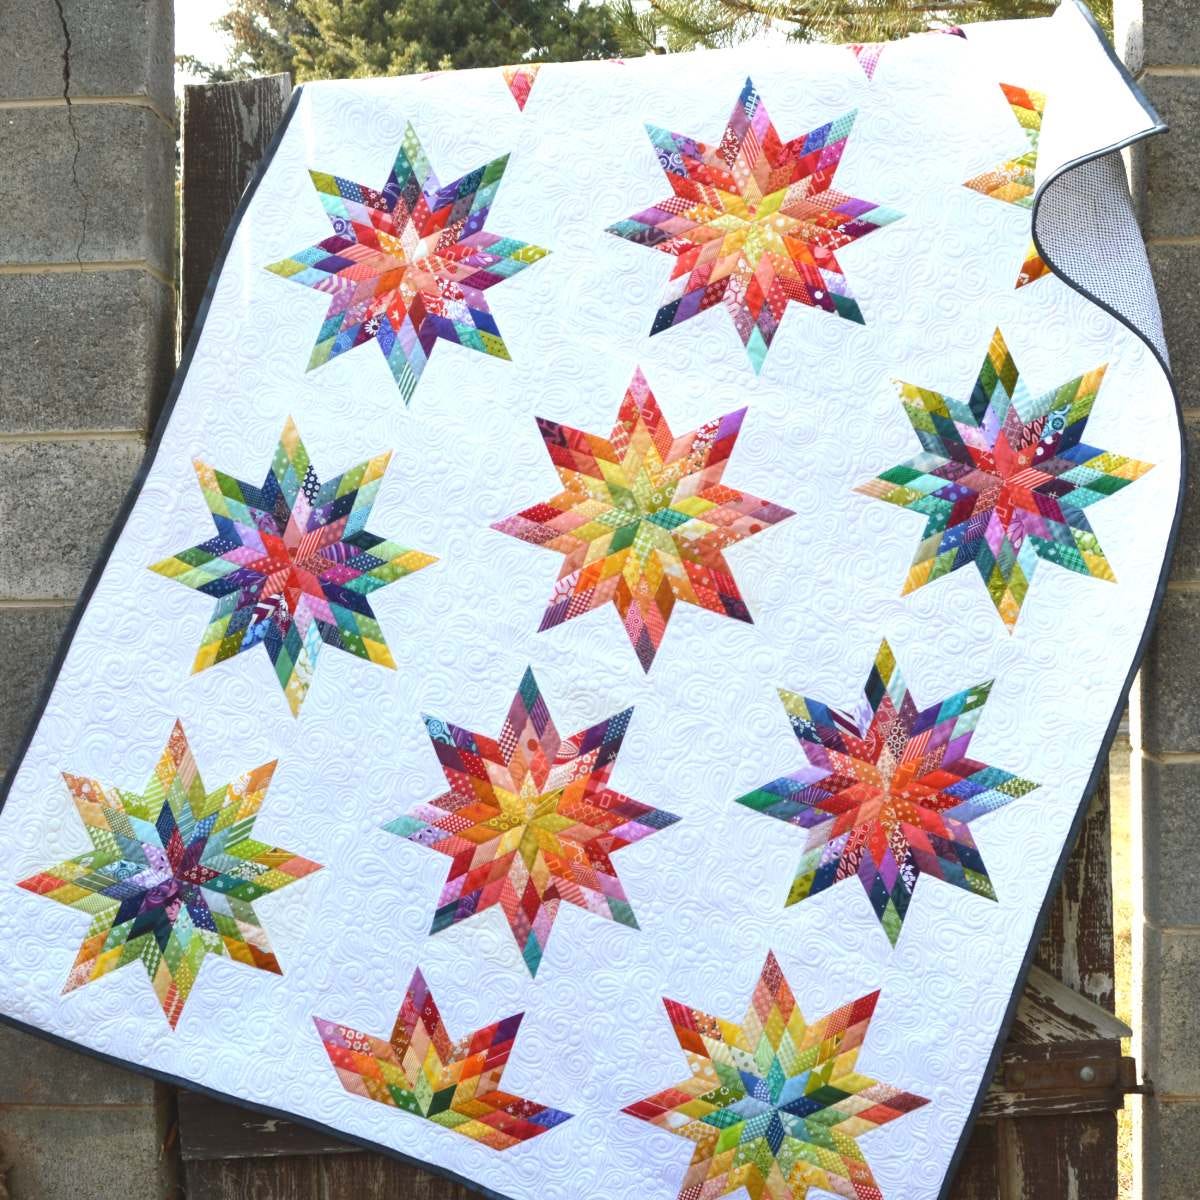
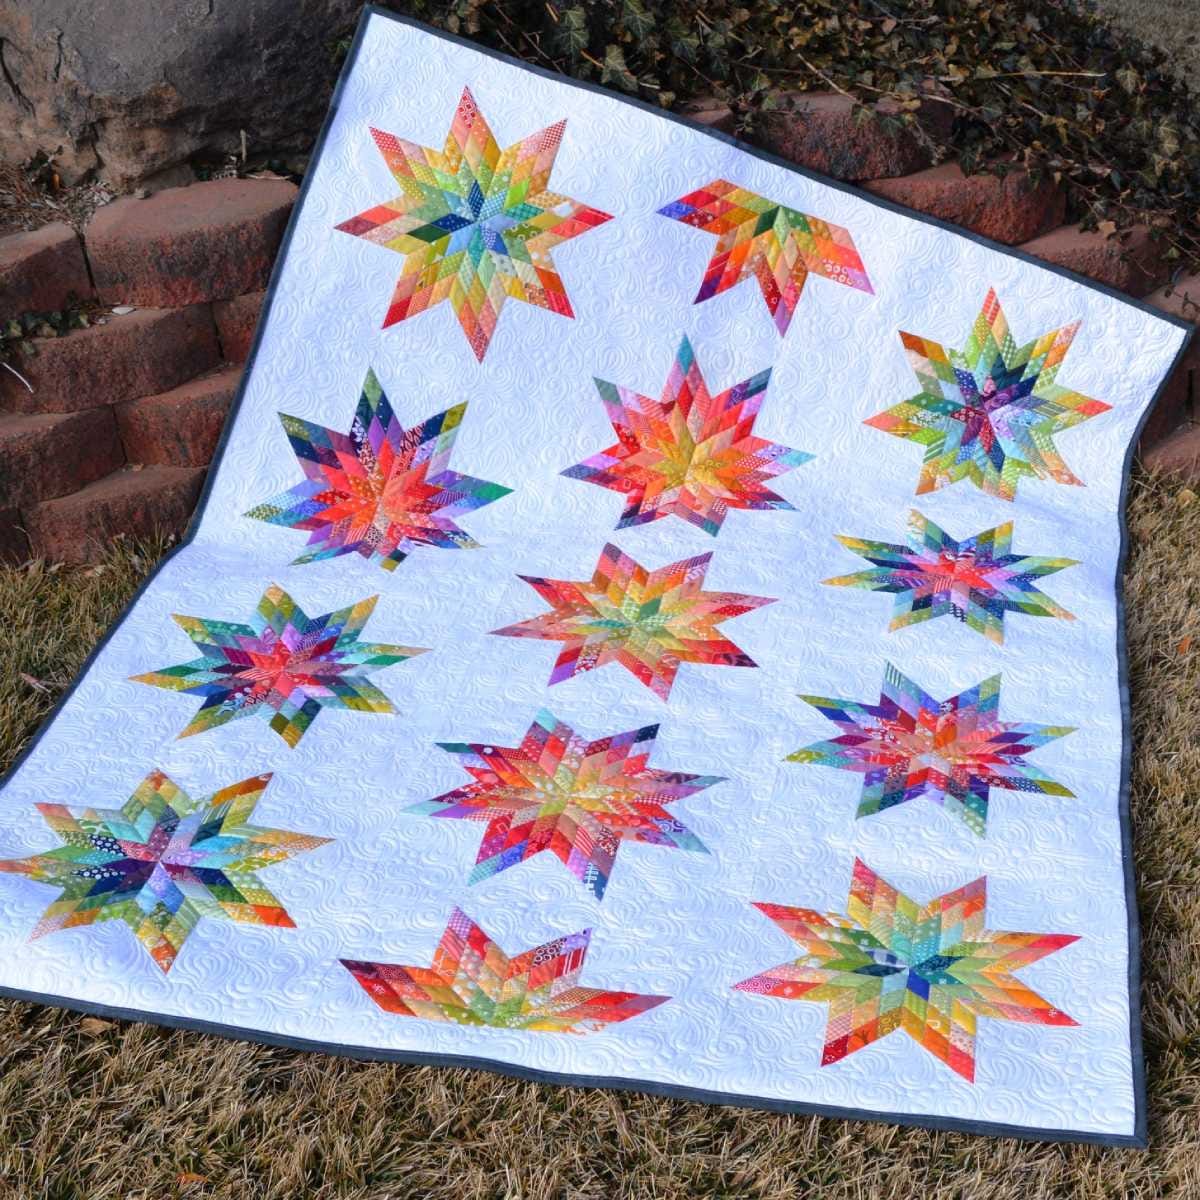
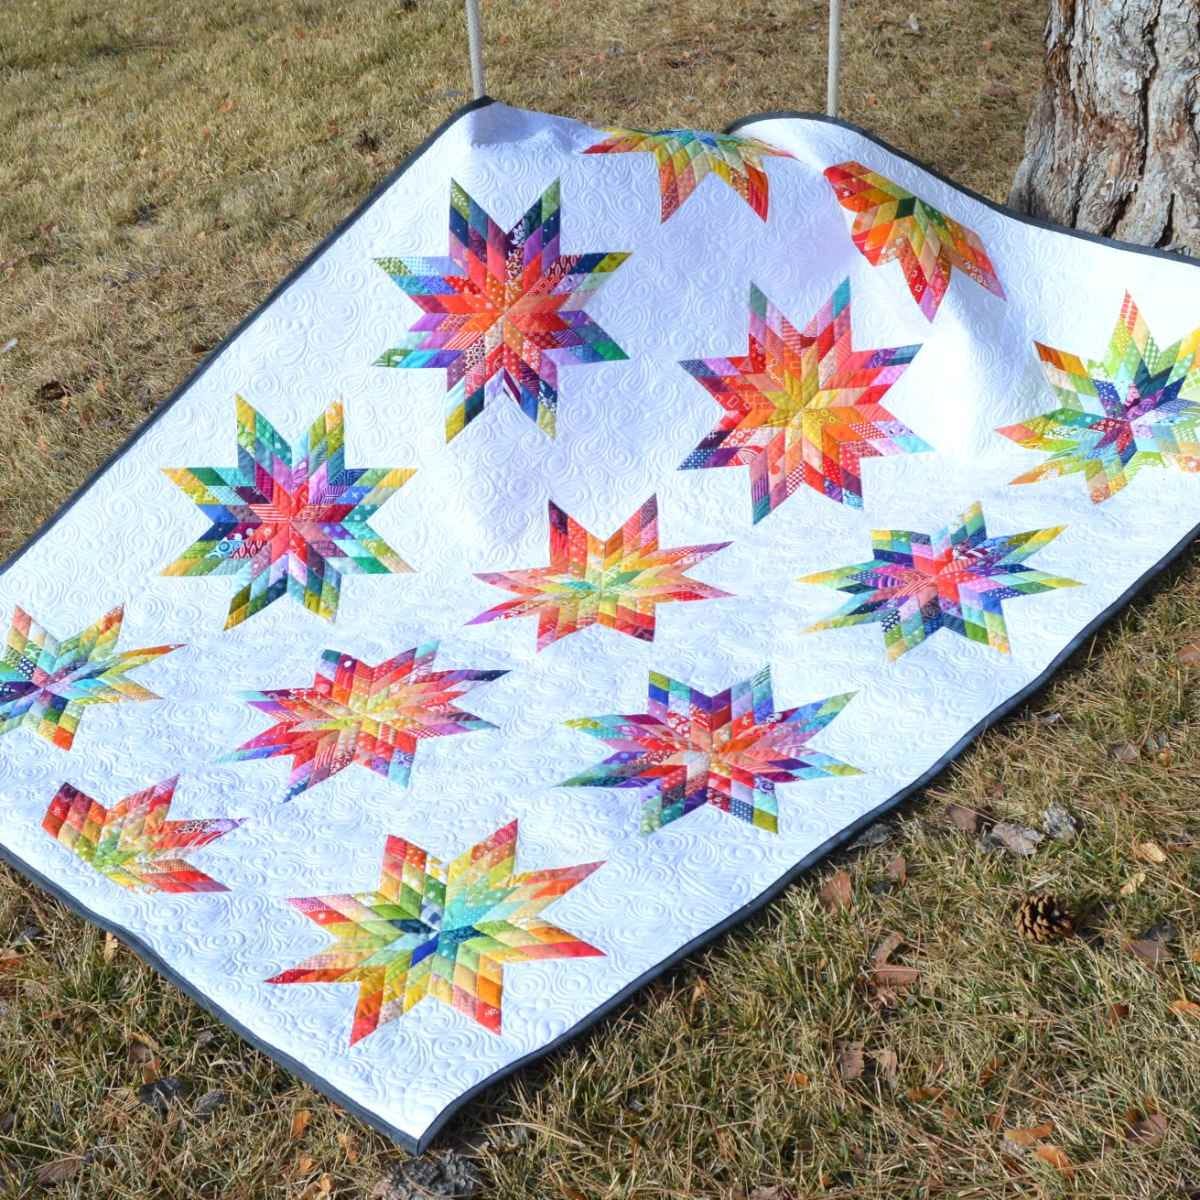
So, here it is, my Starlite Rainbow Quilt!
Classic Prairie Star Quilt
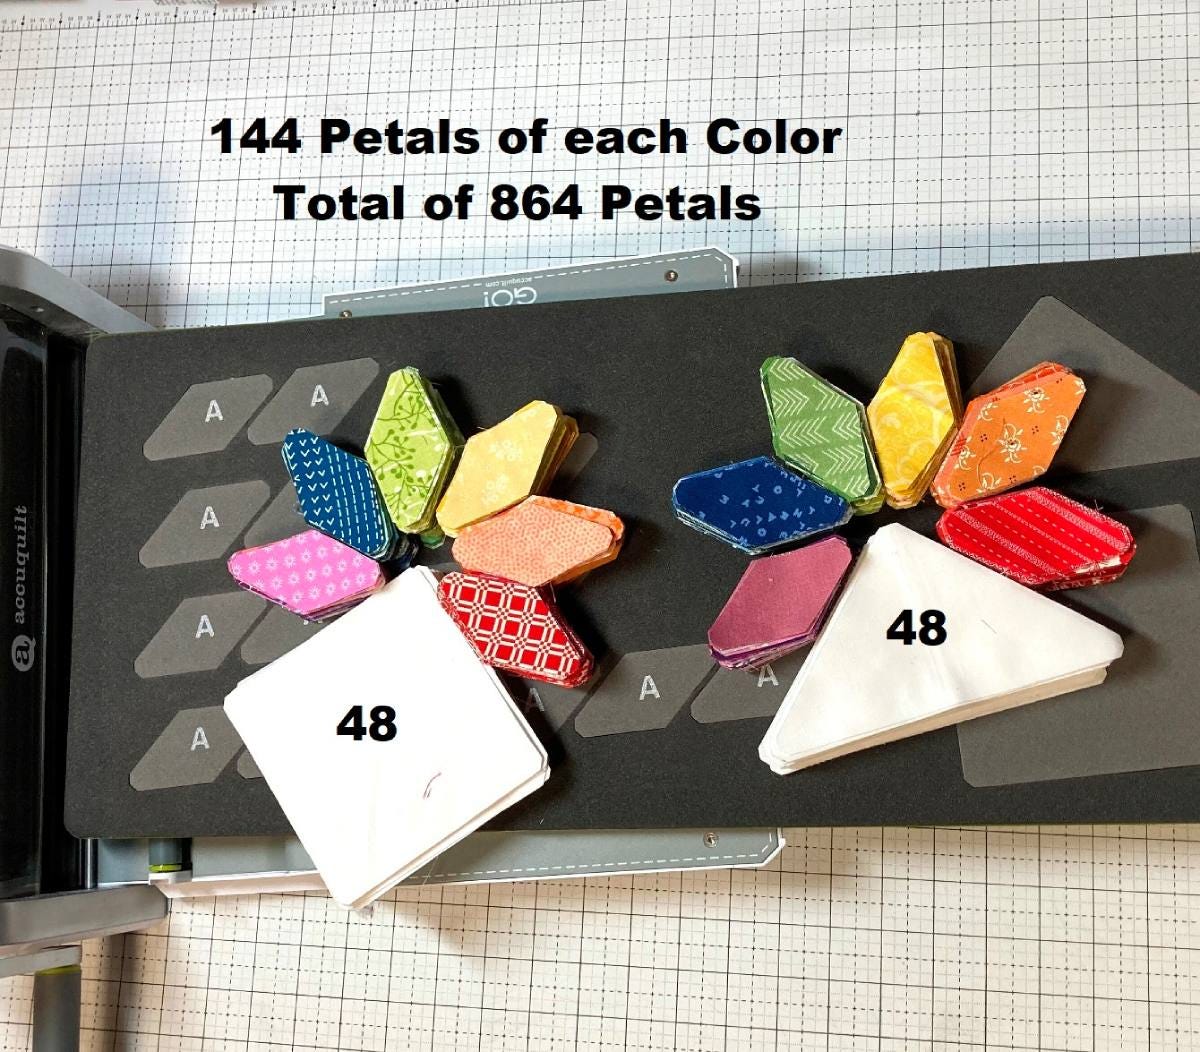
This quilt is made up of nearly 1000 pieces - hence why it has been on the bucket list for so long!
However, with AccuQuilt, cutting out all those pieces is super fast, and piecing them together is made simple with notches for lining everything up.
In the end, you have a gorgeous 50" x 62" lap size Starlite Rainbow Quilt that truly is a show stopper!
Now, let's get to that Tutorial, so you can all make your own Starlite Rainbow Quilt!!
Materials Needed
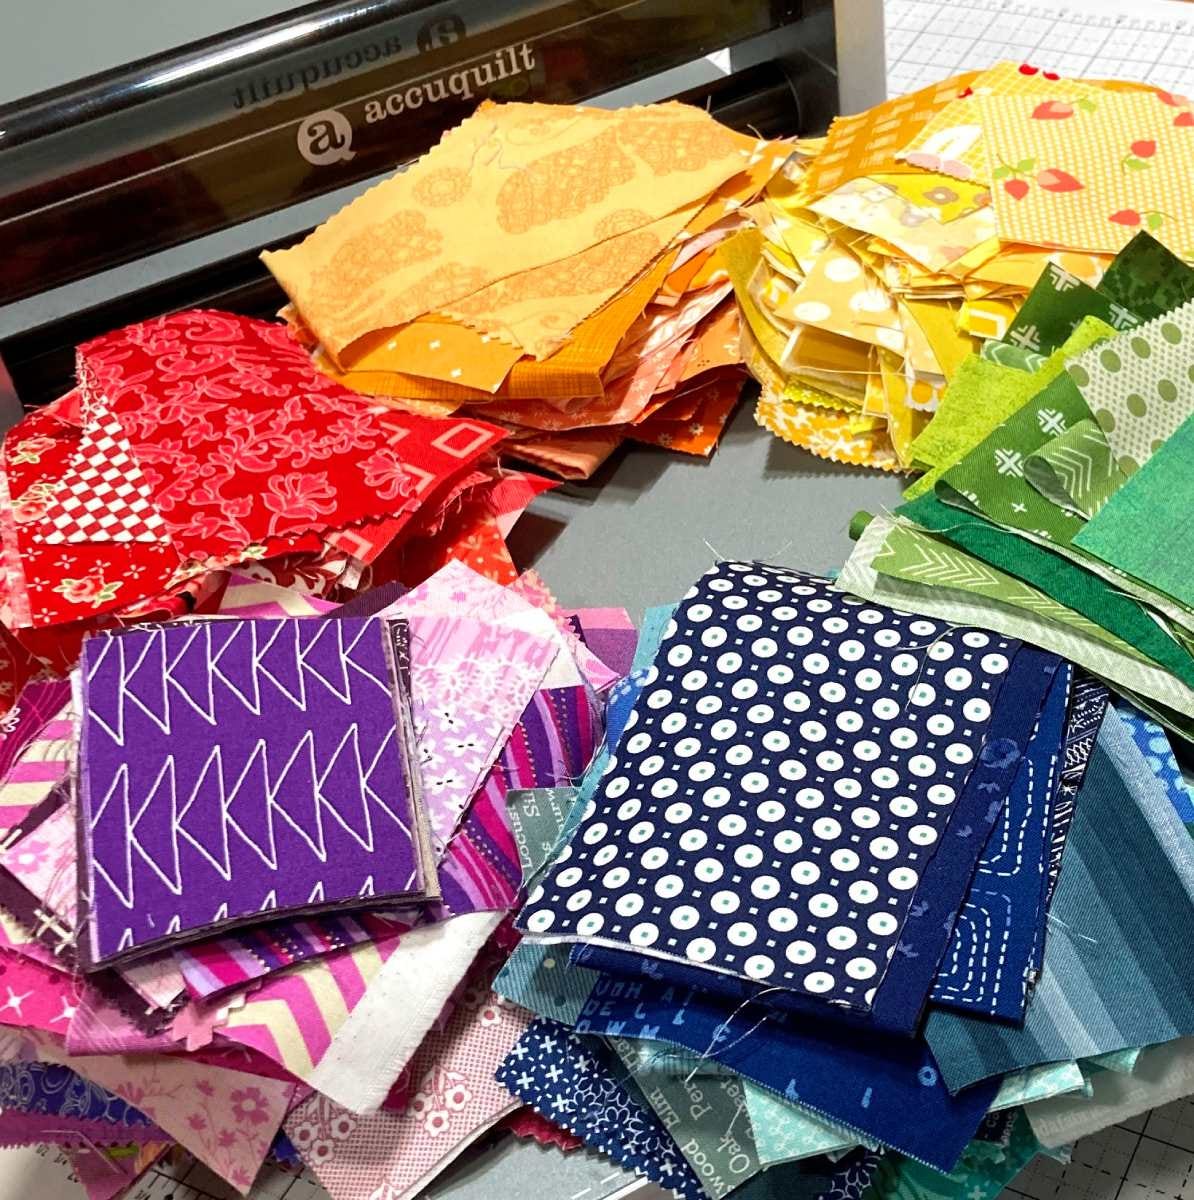
I made my quilt entirely from scraps. Even the background white pieces are all from my scrap drawer.
This quilt is a wonderful scrap buster, and cutting scraps is so much easier and faster with AccuQuilt!
So grab your scrap bins and your AccuQuilt GO! Cutter and the following:
- GO! Prairie Star - 14" BOB Die (55540)
- Appx. 3 yards of White scraps
- Appx. 1 yard each of Red, Orange, Yellow, Green, Blue, and Purple Scraps.
- 1/2 Yard for binding
- 3 1/4 yards of print for backing quilt
Your scraps in each color can be as light, dark, saturated, pastel, etc. as you like. It is good to have a mix of all the shades and hues. Just be sure that the scrap "reads" the chosen color.
I use a lot of tone-on-tone prints, or prints that have added white or black or just a tiny bit of additional color.
You just want to see it and know that it is red, orange, yellow, green, blue or purple.
Cutting Directions
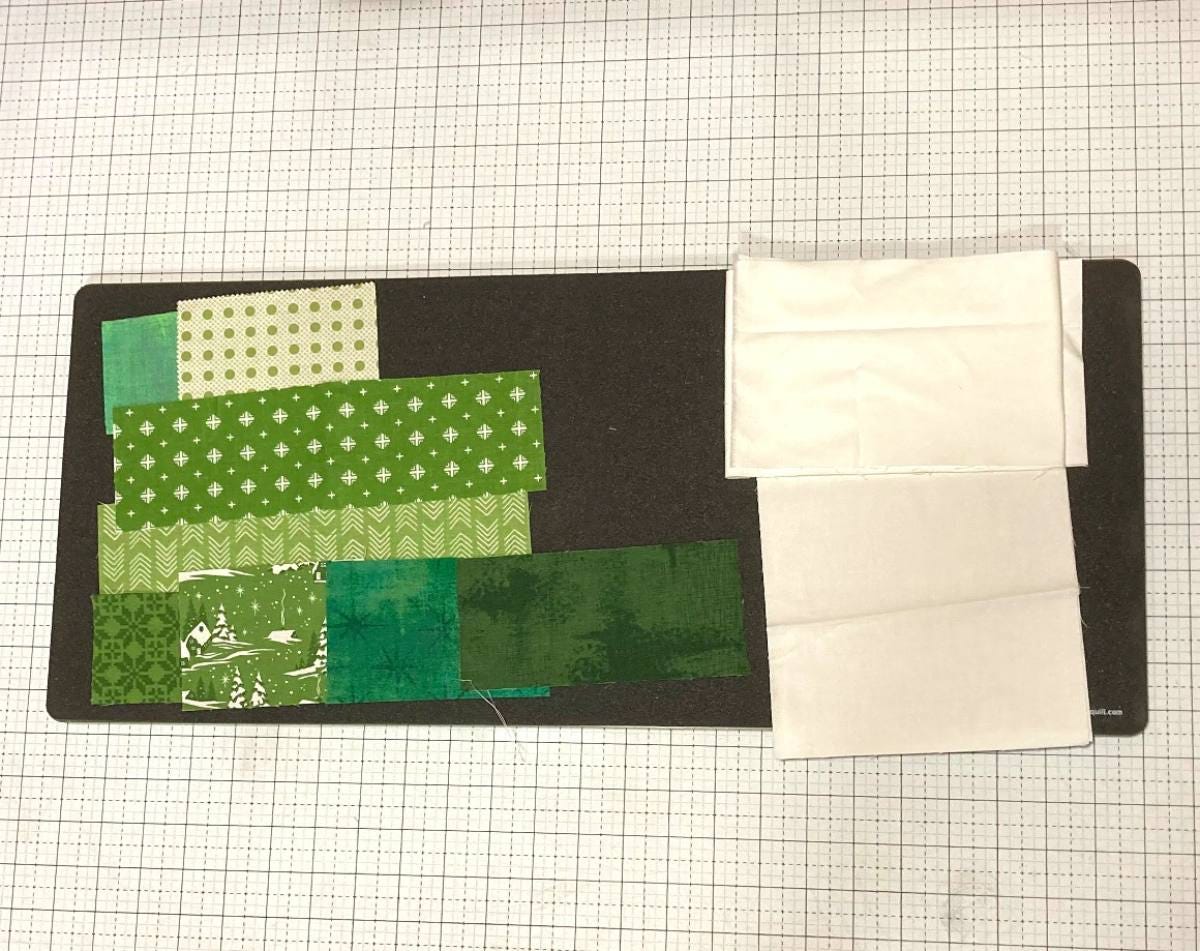
I found the easiest way to cut the pieces for this quilt was one color at a time and cutting out the background pieces while I was at it.
Simply choose a color to start with and lay your color scraps over the A pieces on the die.
Remember, you can stack up to 6 layers, and I just aligned them and overlapped them to get the most out of my fabric.
I also layered my scraps of white on the B and C pieces to save time.
Now, run your die through your AccuQuilt GO! Cutter, and you have lots of lovely little petals (A pieces), and some background (B and C) pieces.
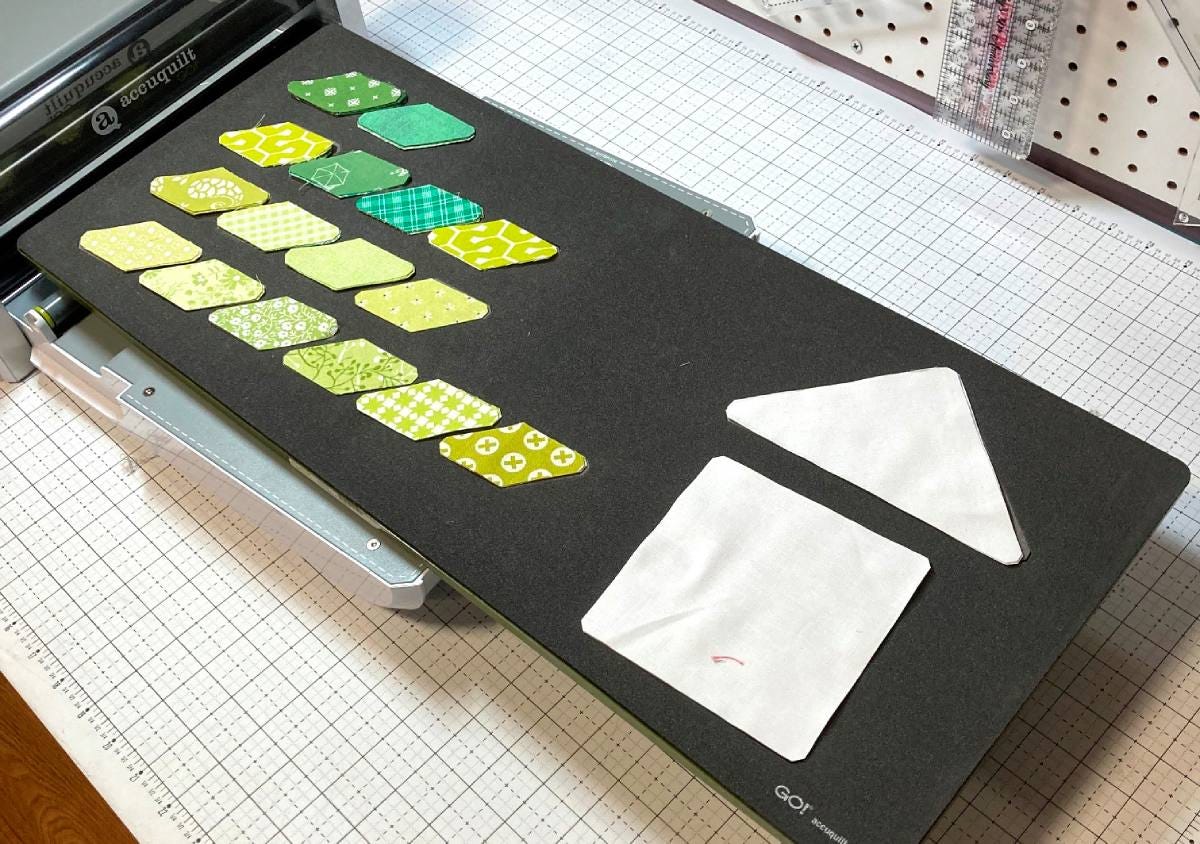
You need to cut 144 Petals of each color.
Once you have cut all of the petals in one color, you can move on to the next color and so on.
I only counted the petals in my first pile, then I just kept cutting additional colors until my pile was about the same height as the first pile. :)
You will have a total of 864 petals when you are done cutting. You'll also have 48 white B squares and 48 white C triangles.
PIECING A STAR POINT UNIT
With the cutting done you are ready to start piecing!
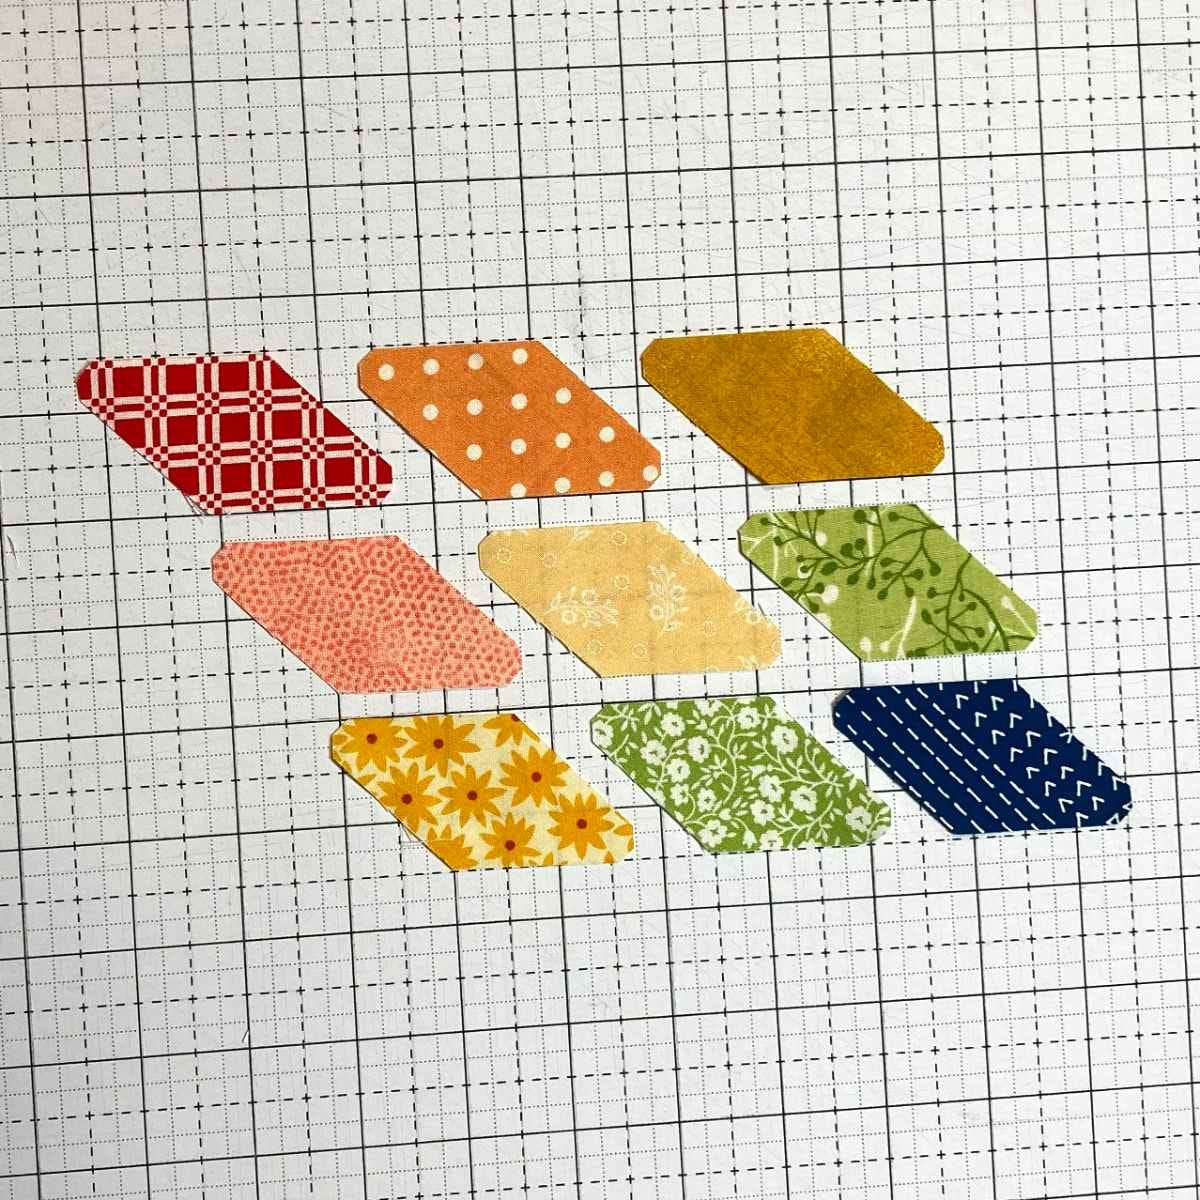
There are six layouts for the multiple star points. I will go over directions on making a star point unit with the red layout, and then share all six layouts that need to be pieced.
Start by laying out your 9 petals in the designated color layout. Each layout will have 5 colors in it: 1 petal each of 2 colors, 2 petals each of 2 colors, and 3 petals each of 1 color.
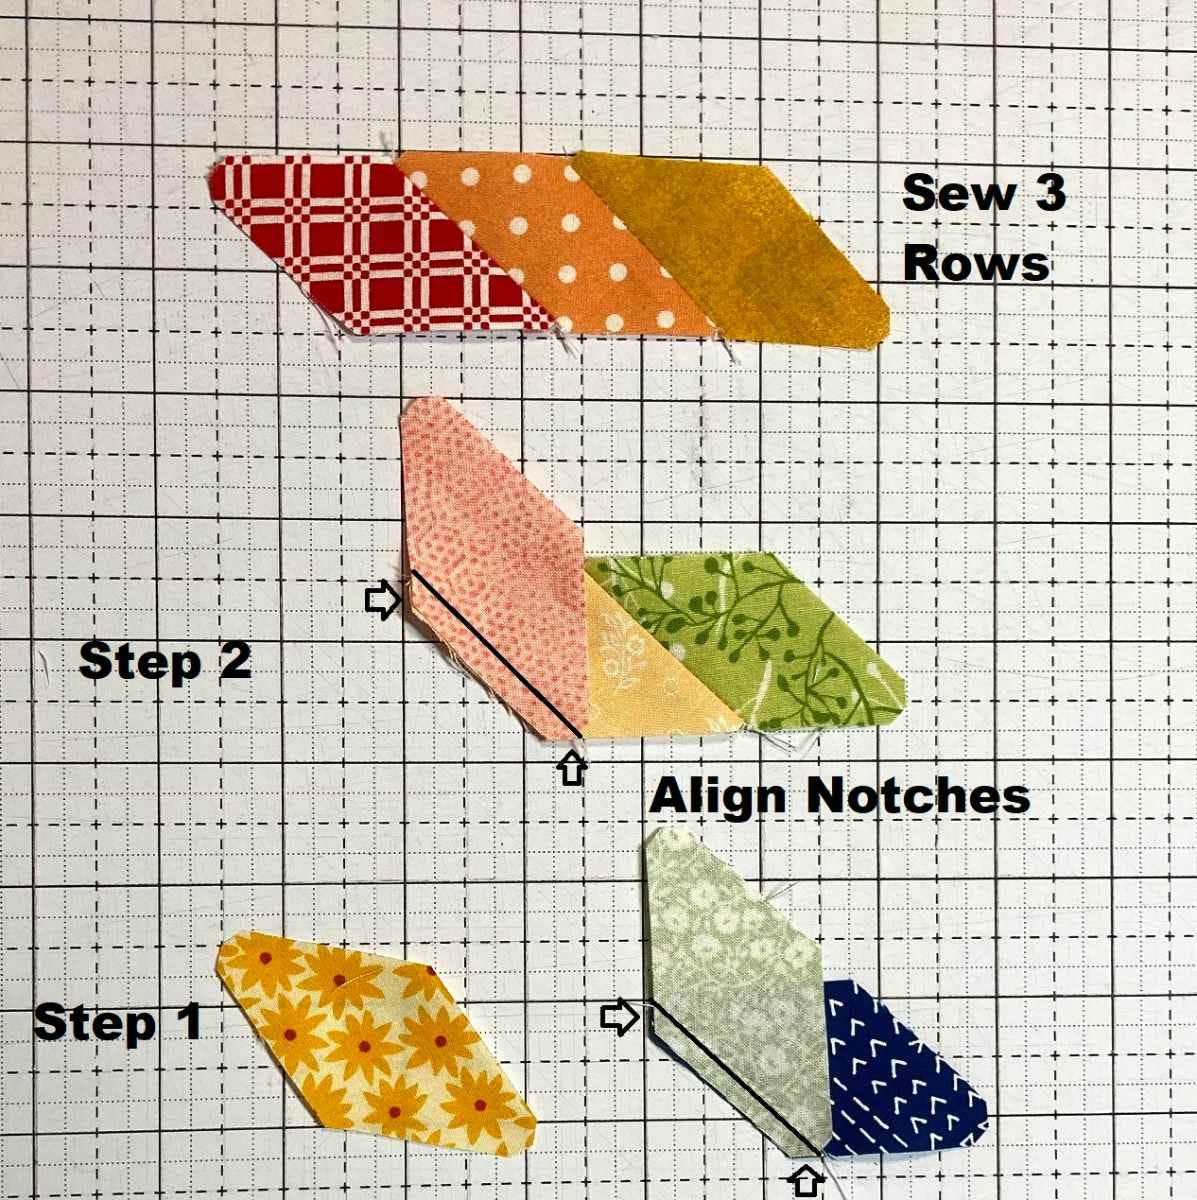
Sew the petals into 3 rows.
I like to place the center piece onto the end piece with right sides together aligning the notches and edges in each row.
Sew a 1/4" along the edges. Then, lay your rows out again and place the first piece in each row onto the center piece with right sides together aligning the edges and notches.
Again, sew a 1/4" along the edges.
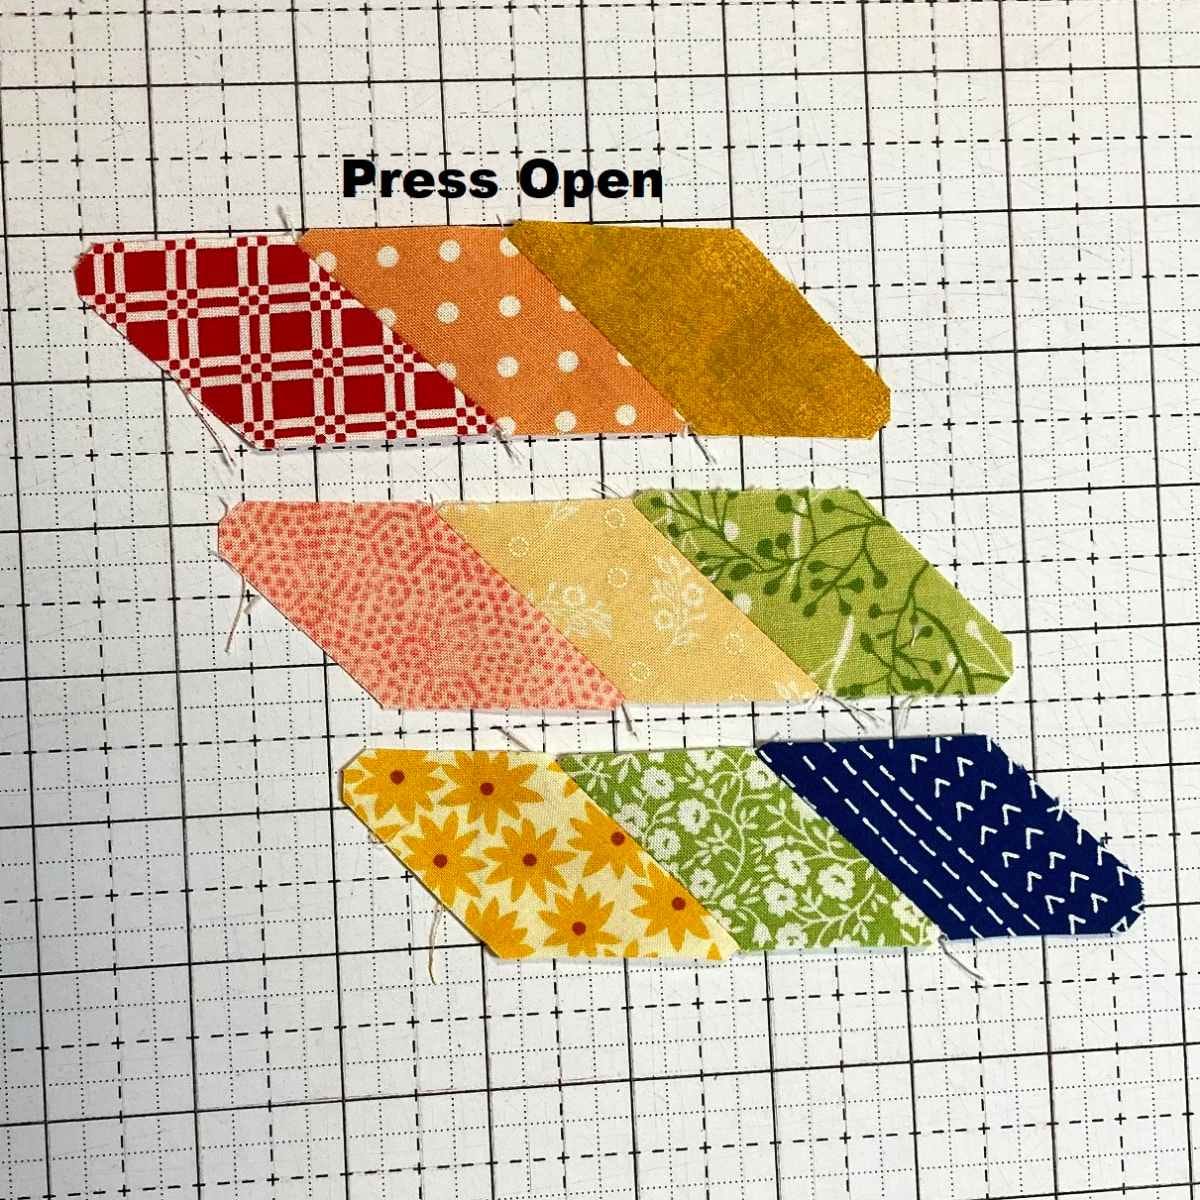
Press the seams open.
There is going to be a lot of bulk in all of the seams of this quilt. So, pressing open helps it to lay nice and flat.
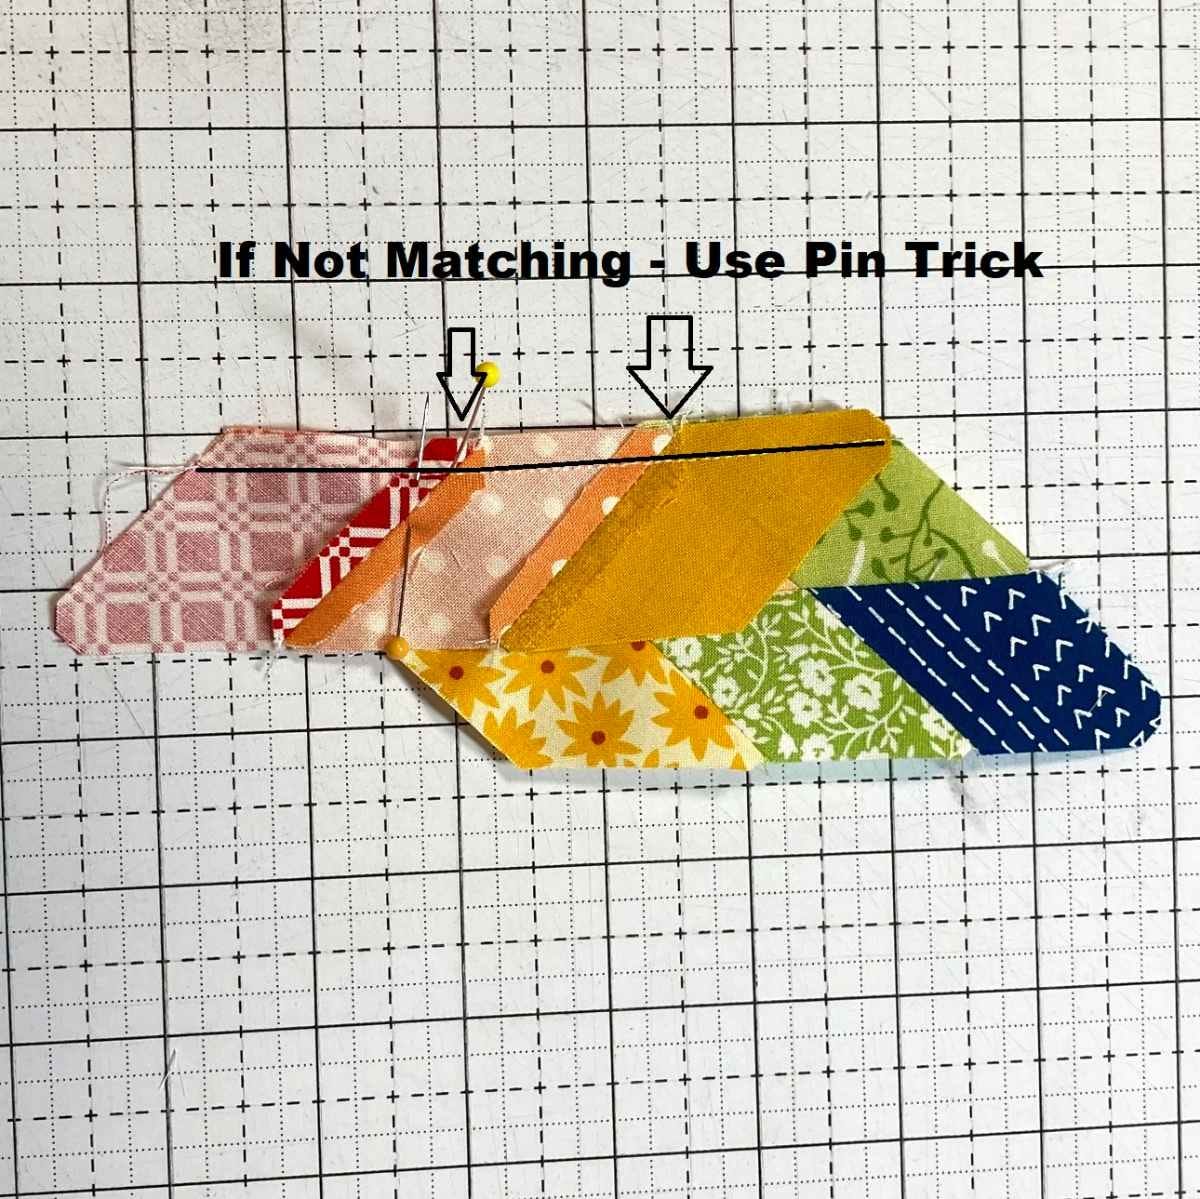
Now, you are ready to sew the rows in the unit together. I like to start at the bottom, as I found it easier to align that way.
Place the bottom row onto the center row with right sides together. The seams will be aligned diagonally, meaning they will cross each other at 1/4" from the edge. Sew a 1/4" seam along the edge.
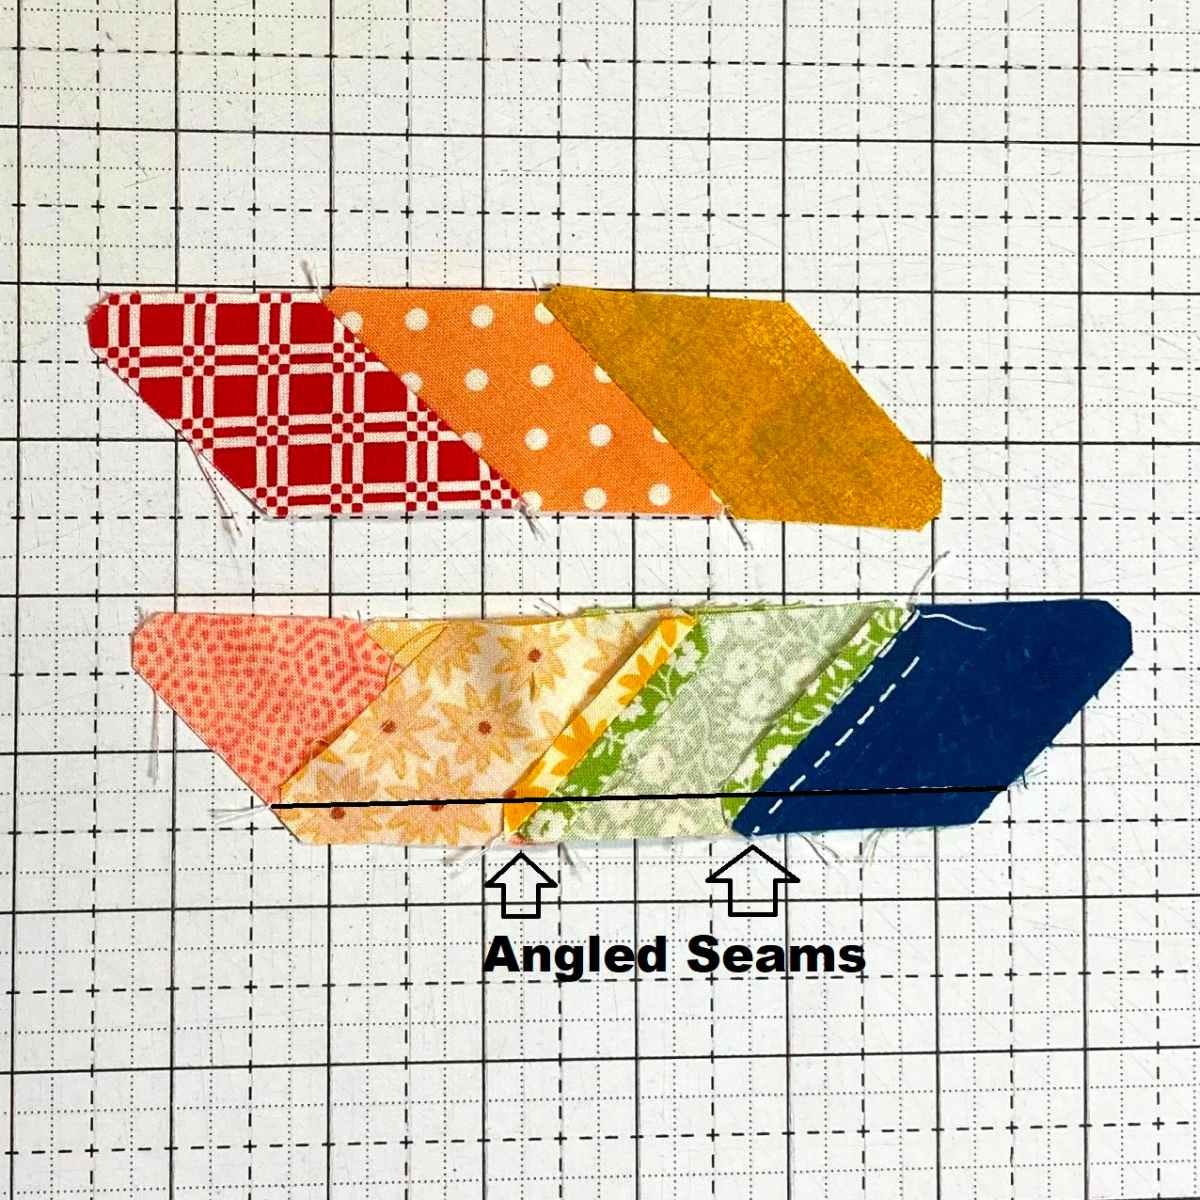
Now place the top row onto the center row with right sides together aligning the diagonal seams.
If you find you are having trouble aligning the seams, you can always use this little pin trick to align your points; however, you either have to eyeball 1/4" down, or use the seam line that you previously ripped because it didn't line up.
Once again, press the seams open as shown.
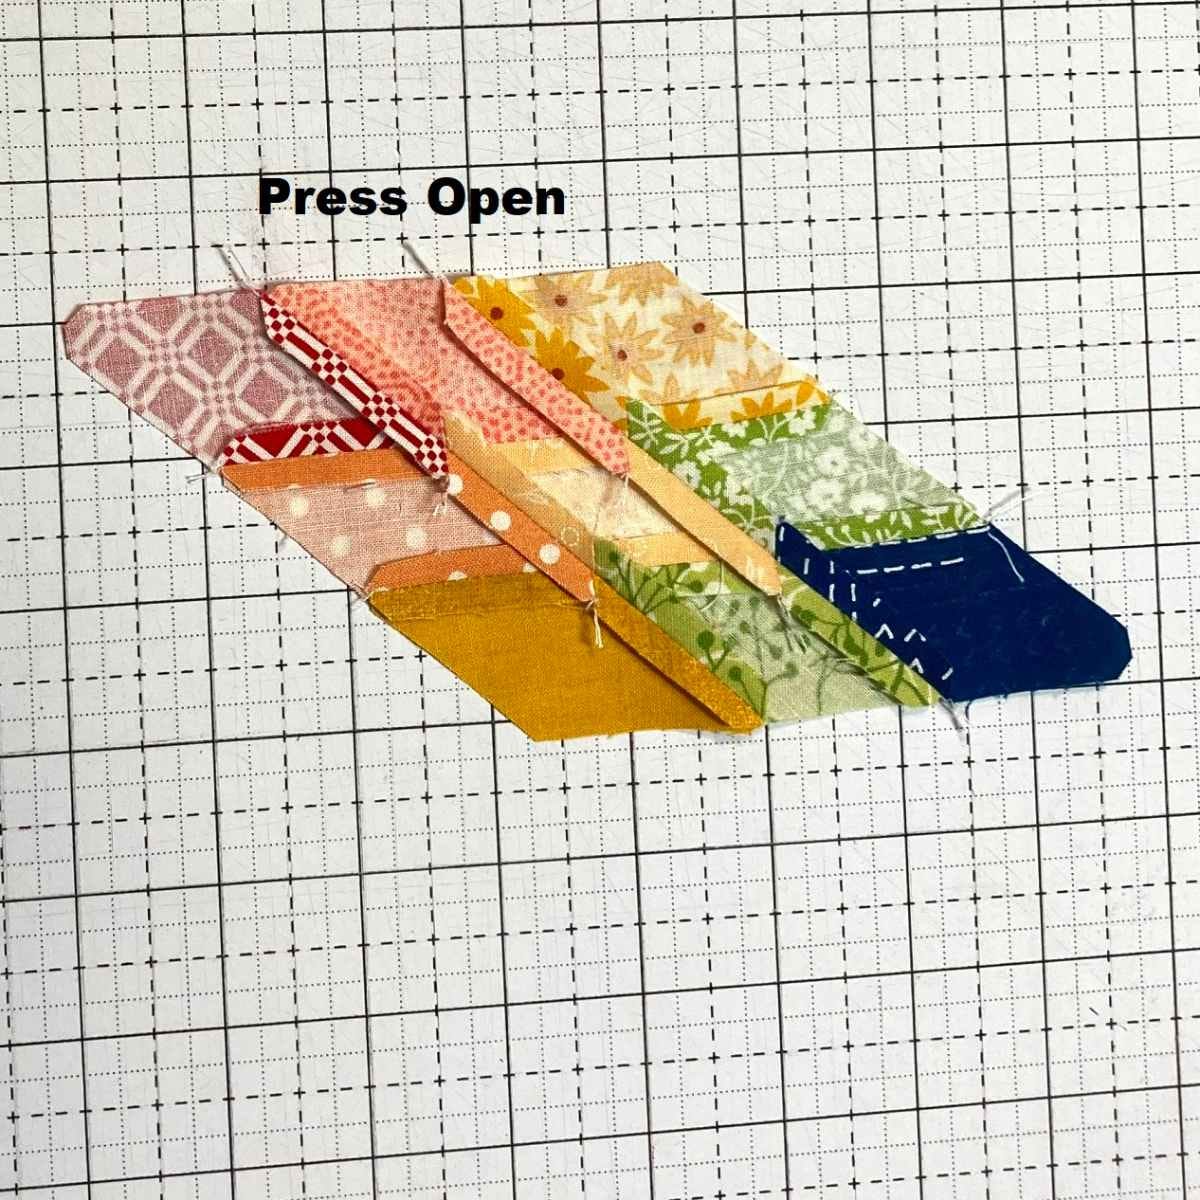
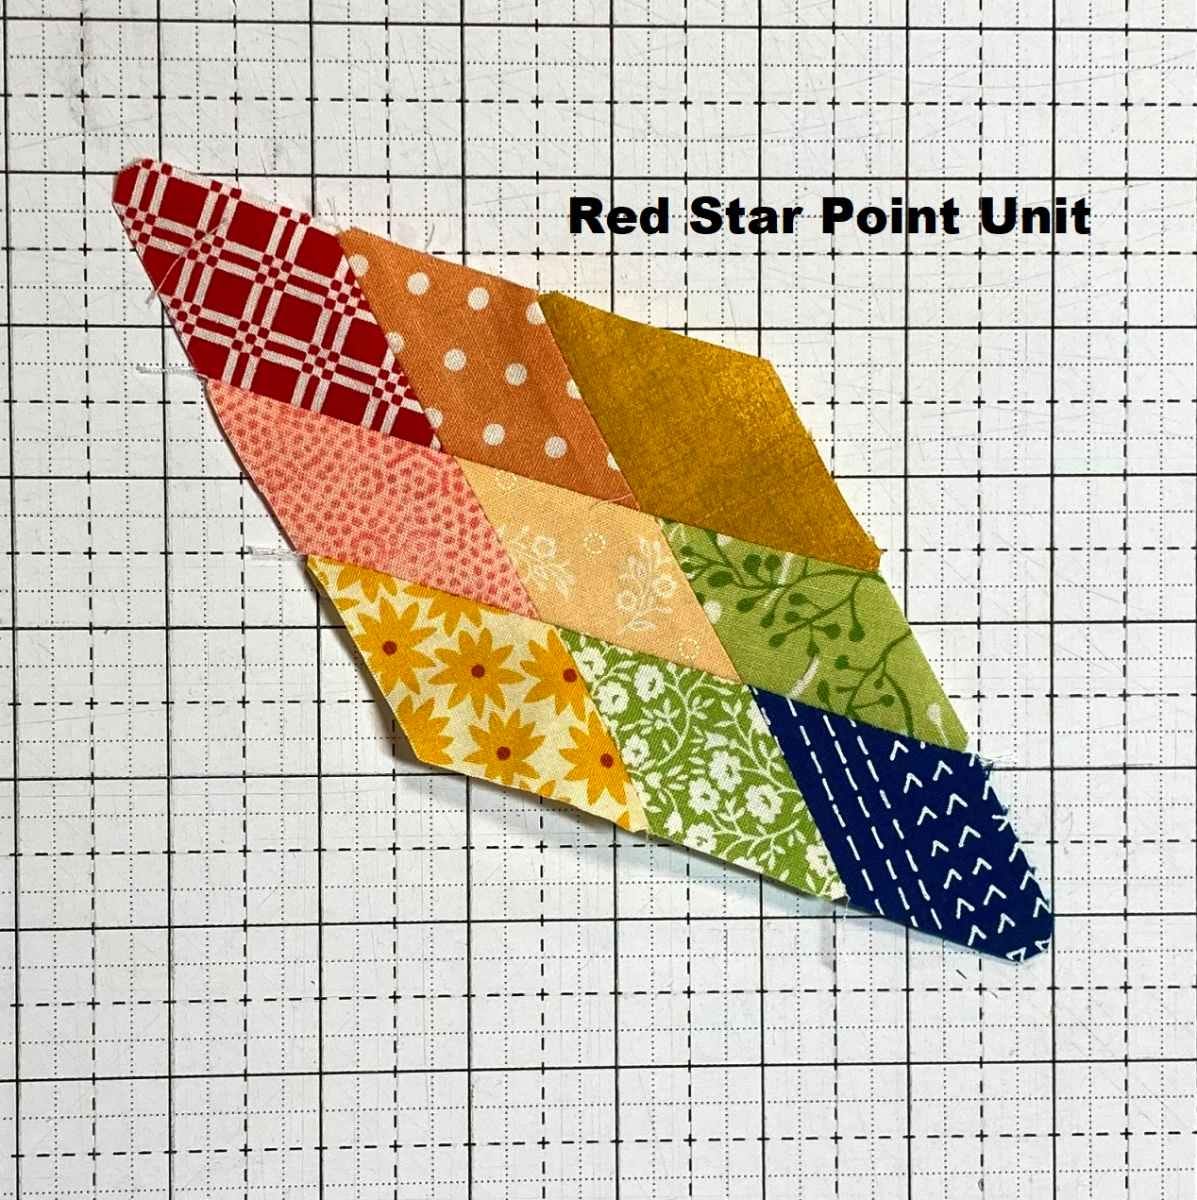
And just like that, you have a star point unit.
I refer to the units by the color that will be the outside points of the star - so this is a red star point unit.
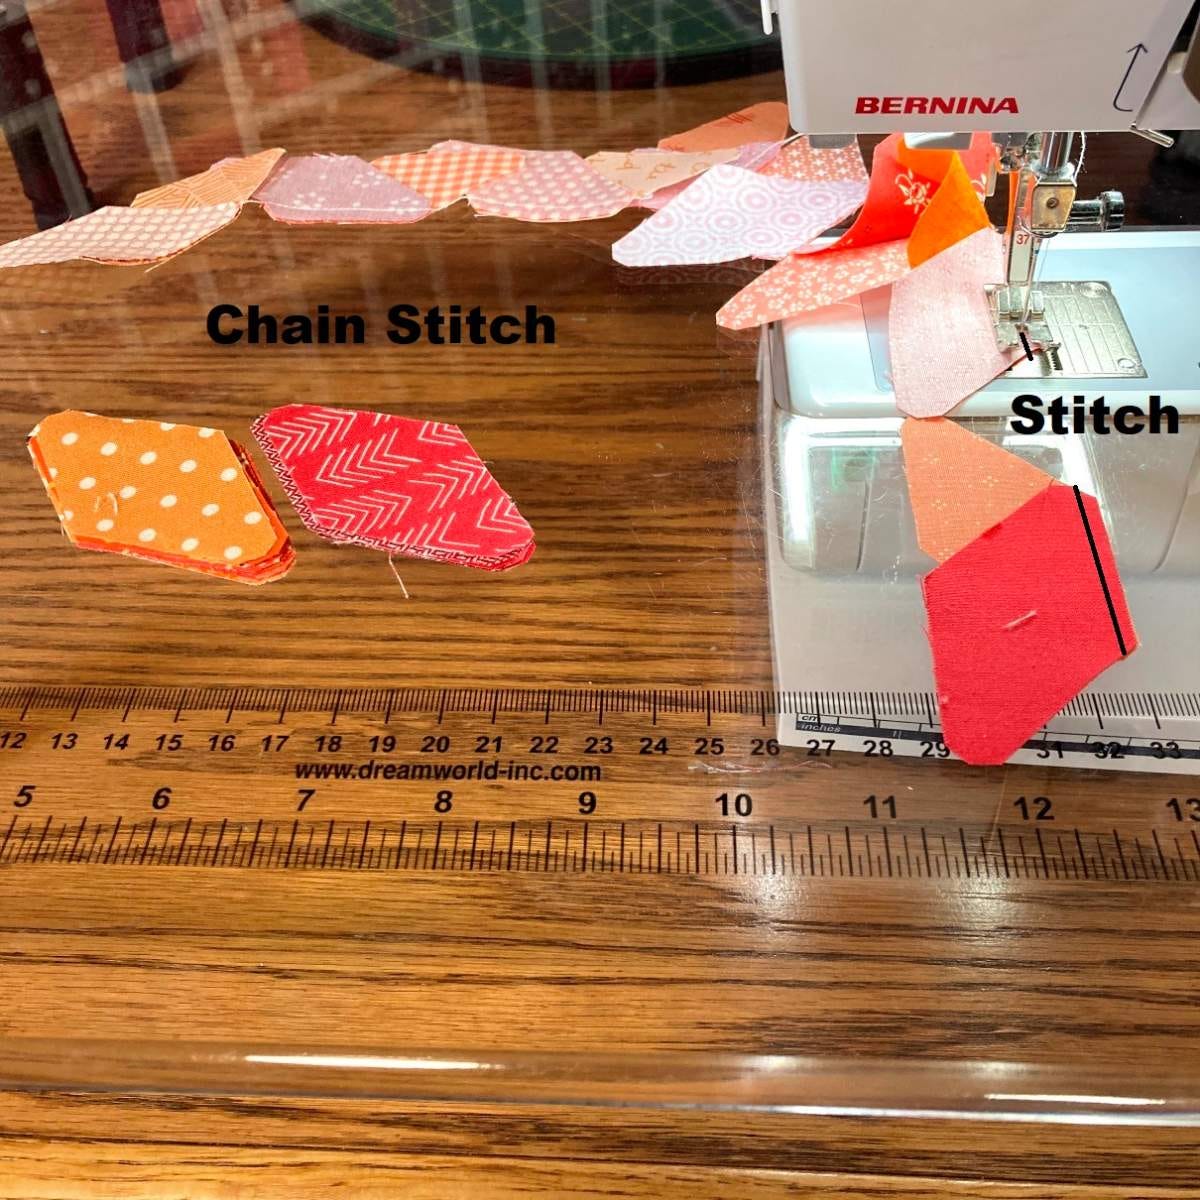
Pro Tip: Before we make lots and lots of units, I want to remind you that you can chain stitch your units and save ample time and thread.
Chain stitching is simply sewing all of the units in one step before clipping your threads as shown below. I found it easiest to do all 16 units of each color this way.
PIECING THE STAR POINT UNITS
So now, let's chain piece all of our star point units for the entire quilt!
Layout 16 red star point units as shown below.
Stacking 16 pieces on top of each other makes them super easy to chain piece.
Use the directions from "Piecing A Star Point Unit" to make 16 red star point units total.
Lay out 16 orange star point units as shown below.
Use the directions from"Piecing A Star Point Unit" and chain piece to make 16 orange star point units total.
Lay out 16 yellow star point units as shown below.
Use the directions from"Piecing A Star Point Unit" and chain piece to make 16 yellow star point units total.
Lay out 16 green star point units as shown below.
Use the directions from "Piecing A Star Point Unit" and chain piece to make 16 green star point units total.
Lay out 16 blue star point units as shown below.
Use the directions from "Piecing A Star Point Unit" and chain piece to make 16 blue star point units total.
Lay out 16 purple star point units as shown below.
Use the directions from "Piecing A Star Point Unit" and chain piece to make 16 purple star point units total.
PIECING A BLOCK
And now, with your units made, you're ready to start piecing the block!
Again, there are 6 layouts for the multiple blocks. I will go over directions on making a block with the red star point layout, and then share all 6 layouts that need to be pieced.
Start by laying out eight star point units of the same color (we are using red) 4 White B squares, and 4 White C triangles as shown below.
Place a star point unit onto the next star point unit in each of the 4 quadrants with right sides together.
Align and pin the edges and the diagonal seams. These diagonal seams are the same kind of seams as putting the rows of the units together.
Stitch a 1/4" seam along each of the pinned edges.
Press the seams open. I like to now call these double star point units.
Y SEAMS - MY TECHNIQUE
And now, we are going to have a little technique tutorial within the making the block tutorial.
This block has Y seams in it, and I know that scares some of us. Truly, though, they are pretty easy once you get the hang of it, and I love that AccuQuilt left in the Y seams - so it is more of a true traditional block.
Here is my technique for piecing a Y seam. (And that is not to say there are not lots of other ways to do them. Just google it if you don't like it this way. :)
Start by drawing a small dot on the wrong side of the corner of the B square 1/4" in from the bottom and the right-hand side.
Lay the B square onto the stitched double star point unit as shown below. The dot should align with the diagonal seam of your Star Point unit.
Begin stitching a 1/4" seam along the edge.
Stitch until you have reached the dot and then stop.
Put your needle down.
Pro Tip: This is great if you have a machine that has it has an option, but if not, simply turn your hand wheel until your needle is in the down position.
At this point, you want to lift your presser foot. This is why we want the needle down, so we don't lose our start/stop point.
Grab the white B square and begin to rotate it counterclockwise towards the edge of the star point unit.
While rotating, the most important place to try and keep flat and aligned is right next to your needle.
I find the easiest tool to help with this is a stiletto or a purple thang or something akin to that. It is just easier than trying to wedge your fingers in there. ;)
Continue to rotate the B square around until it is aligned with the edge of the star point unit - all the while keeping your presser foot up and your needle down.
Ensure that the white B square fabric is laying nice and flat. (Oh, and a big hint I found also is pulling lightly on the back of the block behind the presser foot to help ease out any bulk.)
Once you are all aligned, put your presser foot down and stitch a 1/4" seam along the edge to the end of the double star point unit.
You will end up with a nice 90-degree angle of stitching in the corner.
CONTINUATION OF PIECING A BLOCK
Now that we have Y seams down, let's return to our piecing A block tutorial.
Use a Y seam to stitch in the 4 white B pieces in the 4 corners of the double star point units.
Align as shown below.
Press the seams open.
It might seem like it makes sense to just press the seams towards the white, but opening them allows things to lie flatter - especially the corner where the Y seam is.
Now, we are ready to sew the 4 quadrants into 2 halves.
Place the right-hand side double star point units onto the left-hand side double star point units with right sides together.
Align and pin the diagonal seams.
Stitch a 1/4" seam along the pinned edges.
Press the seams open to create a top and bottom row.
Isn't it fun to see this star coming together?
Now, you are ready to add the top and bottom white C triangles.
Place a dot in the corner on the wrong side of the C triangles and align them as shown below.
Use a Y seam to stitch the top and bottom white C triangles into the top and bottom rows of the block.
This Y seam is the same process as putting in the B piece Y seams - only the angle is a little smaller. This means you will have to do a little more finagling to get it to lay flat as there is more bulk in a smaller space.
The most important thing is to make sure there are no creases or bubbles under your stitches.
If they are to the side that is okay, just don't stitch them in.
Press the seams open on the top and bottom rows.
Now, place the bottom row onto the top row with right sides together.
Align and pin all of the diagonal seams. On the center seam, use the pin trick to align all 8 points perfectly.
Then, stitch a 1/4" along the pinned edge. Take care that, at the center seam, you stitch directly across the point of the fabric "v."
Press the seams open.
Only two little parts left now!
All that is left is to add the side white C triangles.
Place a dot in the corner on the wrong side of the C triangles and align them as shown below.
Use a Y seam to stitch the side white C triangles into the block.
Press the seams open, and just like that, you have made a starlite rainbow block!!
It should measure approximately 14 1/2" x 14 1/2".
Pro Tip: I do not recommend squaring these up, as you don't want to accidentally cut off your 1/4" allowance next to the star points. Just use the points as guides when sewing the blocks into the quilt top.
PIECING THE BLOCKS
Let's make all the blocks you will need for your Starlite Rainbow Quilt now that you know how to make a block.
You can choose to again chain stitch these or just make them one block at a time.
Use 16 red star point units to make two red star blocks.
Use 16 orange star point units to make 2 orange star blocks.
Use 16 yellow star point units to make 2 yellow star blocks.
Use 16 green star point units to make 16 green star blocks.
Use 16 blue star point units to make 2 blue star blocks.
Use 8 purple star point units to make 1 purple star block.
Piecing the Two Half Blocks
We're left with 8 purple star point units leftover . . . and they go in the half blocks that we use to offset our layout!
So let's make those.
Make a purple star block using the same block directions but stop when you get to the point below a top and a bottom row.
From your white scraps, cut two 3 3/4" x 3 3/4" squares.
Cut each in half diagonally once to yield 4 triangles.
Place the 4 triangles onto the outer edges of the top and bottom row as shown.
Align the triangles and ensure they are centered, there should be 1/4" overhang on each edge.
Stitch a 1/4" seam along the edges.
Press the seams open and then trim the tails from the edges of the 2 blocks.
And just like that, you have two half Starlite Rainbow Blocks!! They will measure approximately 7 1/2" x 14 1/2". Remember, I do not recommend squaring them up.
SEWING THE QUILT TOP
Now, with all your blocks made, you are ready to sew them into a quilt top!
This goes super fast because there aren't a whole lot of blocks that need to be sewed together. ;)
Start by laying out your 11 blocks and 2 half blocks. You can use the same layout as I did, or play with the placement of your blocks until you get a layout that is pleasing to your eye.
I find it helpful to take a picture of the blocks in your layout so you can refer to it when piecing the top.
Now, we need to add some sashing, so it's back to a bit of cutting.
I once again used scraps for my sashing. From your white scraps (or yardage) cut the following:
- Six 2 1/2" x 14 1/2" rectangles
- Four 2" x 14 1/2" rectangles
- Nine 2 1/2" x WOF strips sewn together end to end and subcut into four 2 1/2" x 62 1/2" strips and Two 2 1/2" x 50 1/2" strips
- Note, your 2 1/2" strip die will work great for this as well!
Layout the sashing as shown below.
Pro tip: I like to make my long sashing strips a little longer - especially since I made them from scraps - and then trim them to the exact size of my rows once sewn together. This is what I will show; however, below are listed the exact measurements needed.
And yes, please ensure your center row horizontal sashings are only 2" wide, that is the way the math works.
Now, back to sewing. Place the horizontal sashing rectangles onto the bottom of the blocks as shown below.
Sew a 1/4" seam along the edges.
With the white fabric, you can pretty much see through to ensure you are sewing right at the edge of the star point.
Press the seams towards sashing rectangles and then lay your blocks out again.
Sew the blocks in each column together.
To do this, simply place the second block in each row onto the first block with right sides together.
Align, pin, and stitch a 1/4" seam along the edge, taking care to stitch directly at the star point where the white fabric meets the color fabric.
Then repeat, adding each block until the column is sewn together.
Press the seams towards the sashings.
At this point, you can see I made my sashings longer than necessary as noted earlier.
Now, we will sew the columns together.
Place the long sashings onto each side of the first column and onto the right-hand side of the second and third column.
Sew a 1/4" seam along the edge.
If you made your sashings longer, trim them using the edge of the column as a reference.
Press the seams towards the long sashing strips. Only four seams left!
Place the second column onto the first column with right sides together, aligning and pinning the edges.
Sew a 1/4" seam along the edge.
Then, place the third column onto the center column with right sides together.
Again, align and pin the seams and then stitch a 1/4" seam along the edge.
Press both seams towards the sashing.
Finally, place the top and bottom sashing onto the top and bottom of the quilt with right sides together aligning the raw edges.
Sew a 1/4" seam along both edges and trim if you made your sashing long.
Press the seams towards the sashing.
FINISHING
All that is left is to turn that finished quilt top into a finished quilt!
Time to baste it, quilt it, and bind it - which is a whole lot in one little sentence.
If you are new to quilting, check out my video tutorial series on finishing your quilt. It will walk you through basting, quilting, and binding step by step.
I quilted mine with some of my favorite all-over designs combined in the background.
There are swirls, echoed paisleys, curls and pebbles.
I quilted the starts with simple stitch in the ditch to really make all that piecing just pop!
Now, you can sit back and enjoy your beautiful 50" x 62" Starlite Rainbow Quilt!!!
Admire Your Prairie Star Quilt
And that is today's project! :)
I hope you have enjoyed this tutorial. If you make your own Starlite Rainbow Quilt, we would love to see it!
Share it with us on social media with the hashtags #happyquiltingwithmc and #AccuQuilt.
We can't wait to see your Starlite Rainbow quilts!
Thank you so much to AccuQuilt for having me here on their blog.
To see more of my happy quilting adventures, then stop by Happy Quilting for a visit. I just love being able to share lots of quilting goodness on a daily basis.
I hope you all have a very happy quilting day!!!