


Hello Friends! It's Melissa Corry from Happy Quilting here and I am thrilled to be bringing you a new quilt tutorial. I love curved piecing and I think too many quilters easily shy away from it, assuming that it is too hard. As we walk through today's project, you will see just how fun curved piecing can be, especially when the amazing curved AccuQuilt Dies take care of the cutting! Between, the perfect cuts and those little notches that help line everything up, making your sewing accurate is a piece of cake!
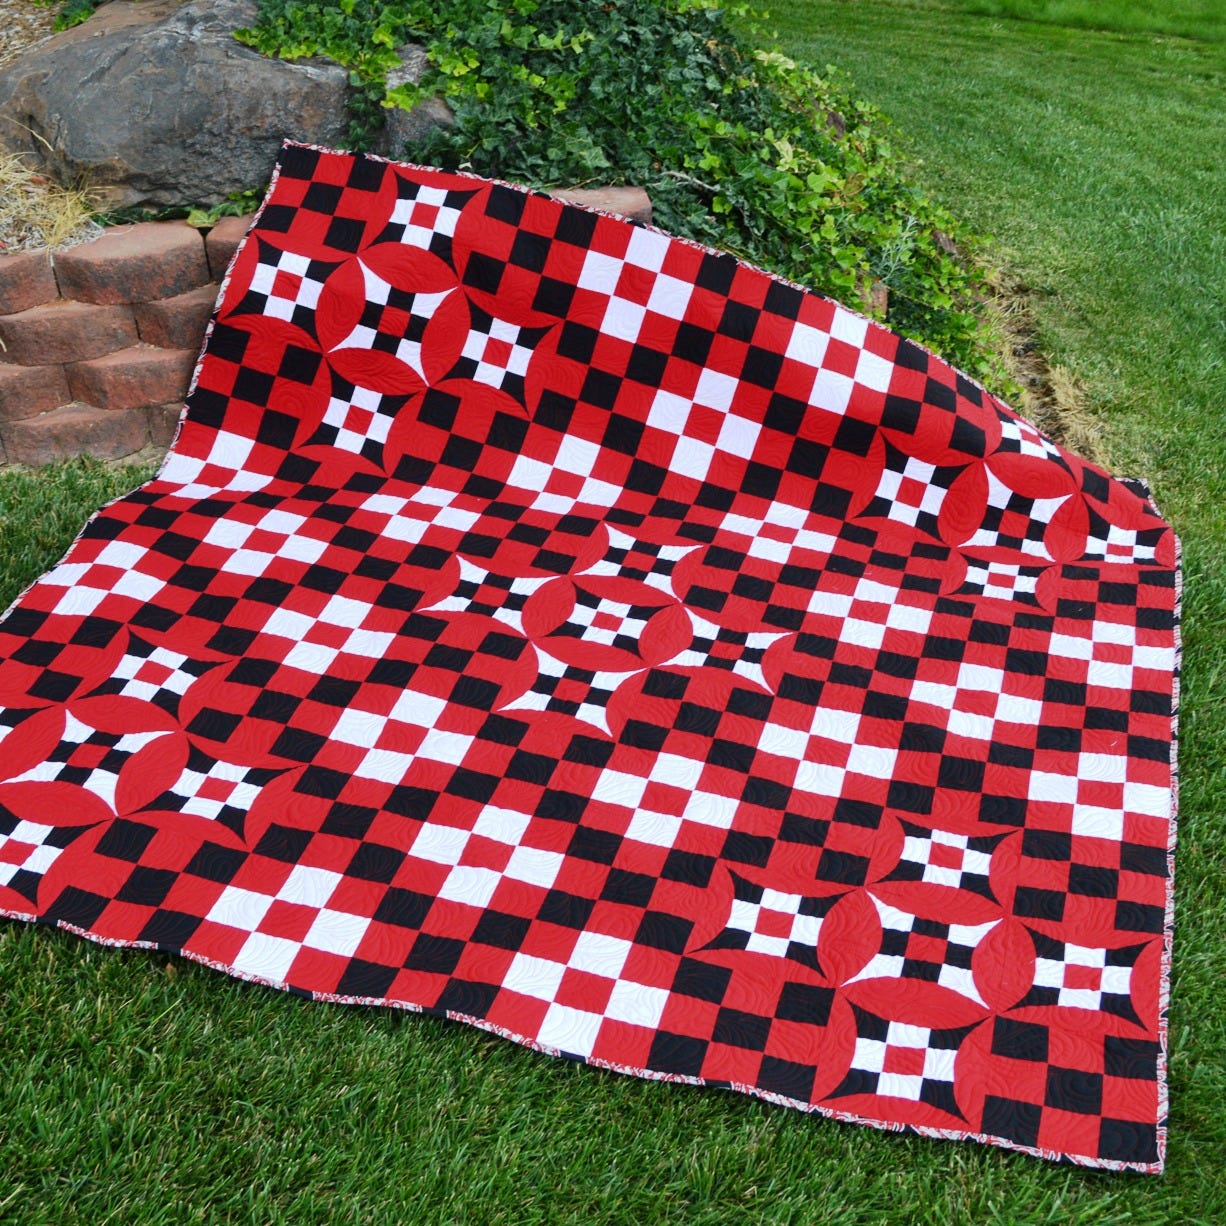
So without further ado, here is my Nine Patch Fun quilt featuring the new GO! Glorified Nine Patch-9" Finished Die (55557), one of the newest Block on Board® (BOB®). Isn't it cool?

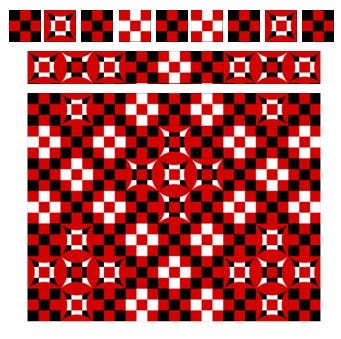
This design combines a basic 9-patch block in two color layouts with the GO! Glorified Nine Patch-9" Finished die block in two color layouts to create a quilt with lots of pop and pizzazz! Although you can use prints, I really like the look of a solids in this quilt as it makes the design shine. Red, black, and white is a classic color combo, but of course, you can use any of your three favorite colors to make this beauty!
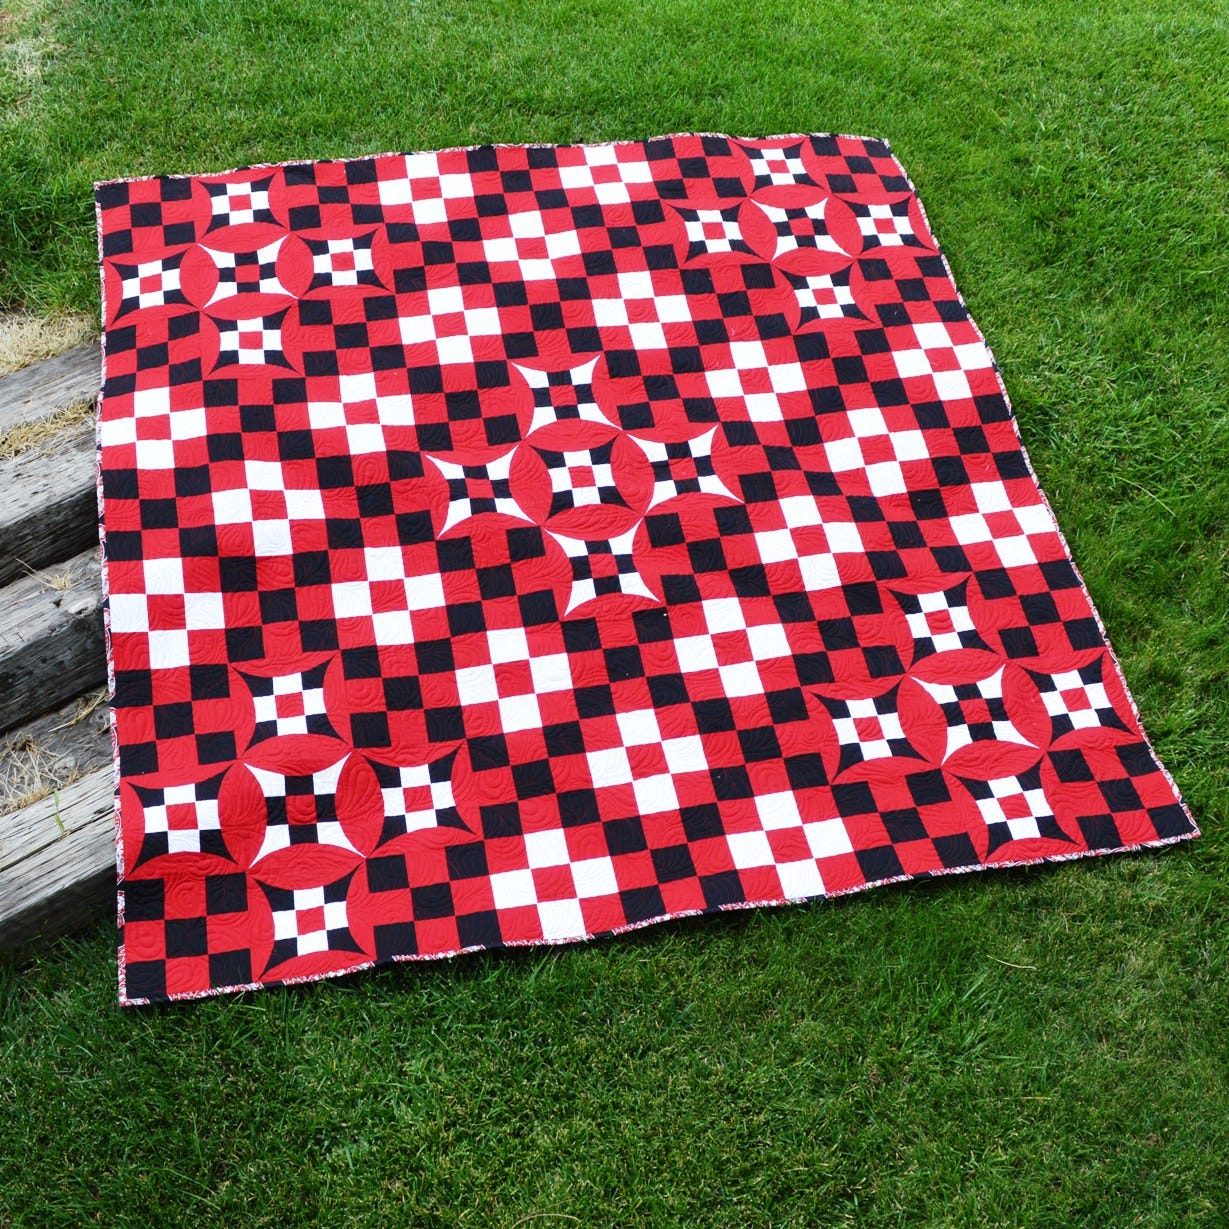
The quilt is made up of 81 blocks that finish at nine inch squares so the quilt is a perfect picnic size of 81" x 81". It's great for picnics at the park, and it would also make for a fantastic rally quilt to take to a game or give to a student! Do you have someone special to make the Nine Patch Fun Quilt for? Excellent, then let's dive in and see just how easy curves can be!
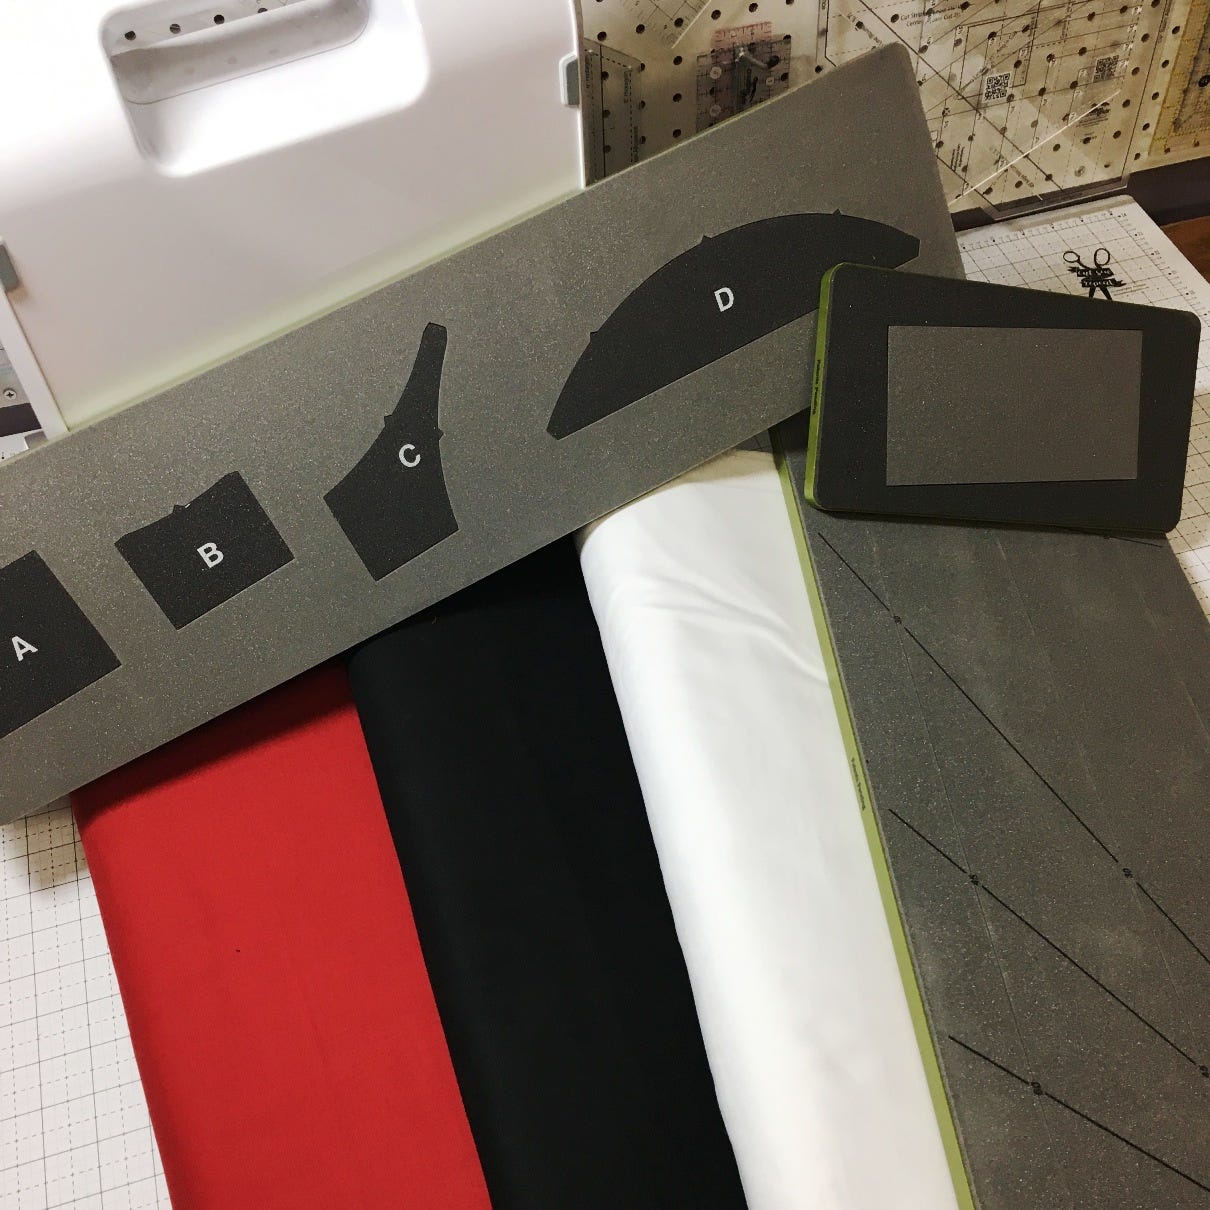
Materials Needed:
To make your own Nine Patch Fun Quilt, grab your AccuQuilt GO! Cutter and...
- GO! Glorified Nine Patch Die (55557) (compatible with GO!, GO! Big and Studio with adapter)
- 4¾ yards of red solid
- 3 yards of black solid
- 1¾ yards of white solid
- ⅔ yard of print for binding
- 5 yards of print for backing
- Optional - GO! Strip Cutter - 3½" (3" Finished) 2 Strips with Angled Guidelines Die (55032)
- Optional - GO! Square - 3½" (3" Finished) Die (55006)
And of course, as mentioned, you can use any color combos you like. The tutorial will just refer to these particular colors.
Step 1 - Cutting
From the Red Solid cut:- 2 Strips 3" x Width of Fabric and then cross-cut (25) 3" x 3" squares and label A
- 25 Strips 3" x Width of Fabric and then cross-cut (100) 3" x 10" rectangles and label D
From the Black Solid cut:
- 2 Strips 3" x Width of Fabric and then cross-cut (32) 2½" x 3" rectangles and label B
- 8 Strips 4½" x Width of Fabric and then cross-cut (68) 4½" x 4½" squares and label C
From the White Solid cut:
- 5 Strips 2½" x Width of Fabric and then cross-cut (68) 2½" x 3" rectangles and label B
- 4 Strips 4½" x Width of Fabric and then cross-cut (32) 4½" x 4½" squares and label C

Now using the Block on Board GO! Glorified Nine Patch-9" Finished Die, cut units A, B, C, and D, from the above coordinating labeled Letter fabric rectangles and squares. Remember, you can cut up to SIX layers of fabric at a time, and you can place fabric on all four units at the same time, cutting 24 units with each pass!
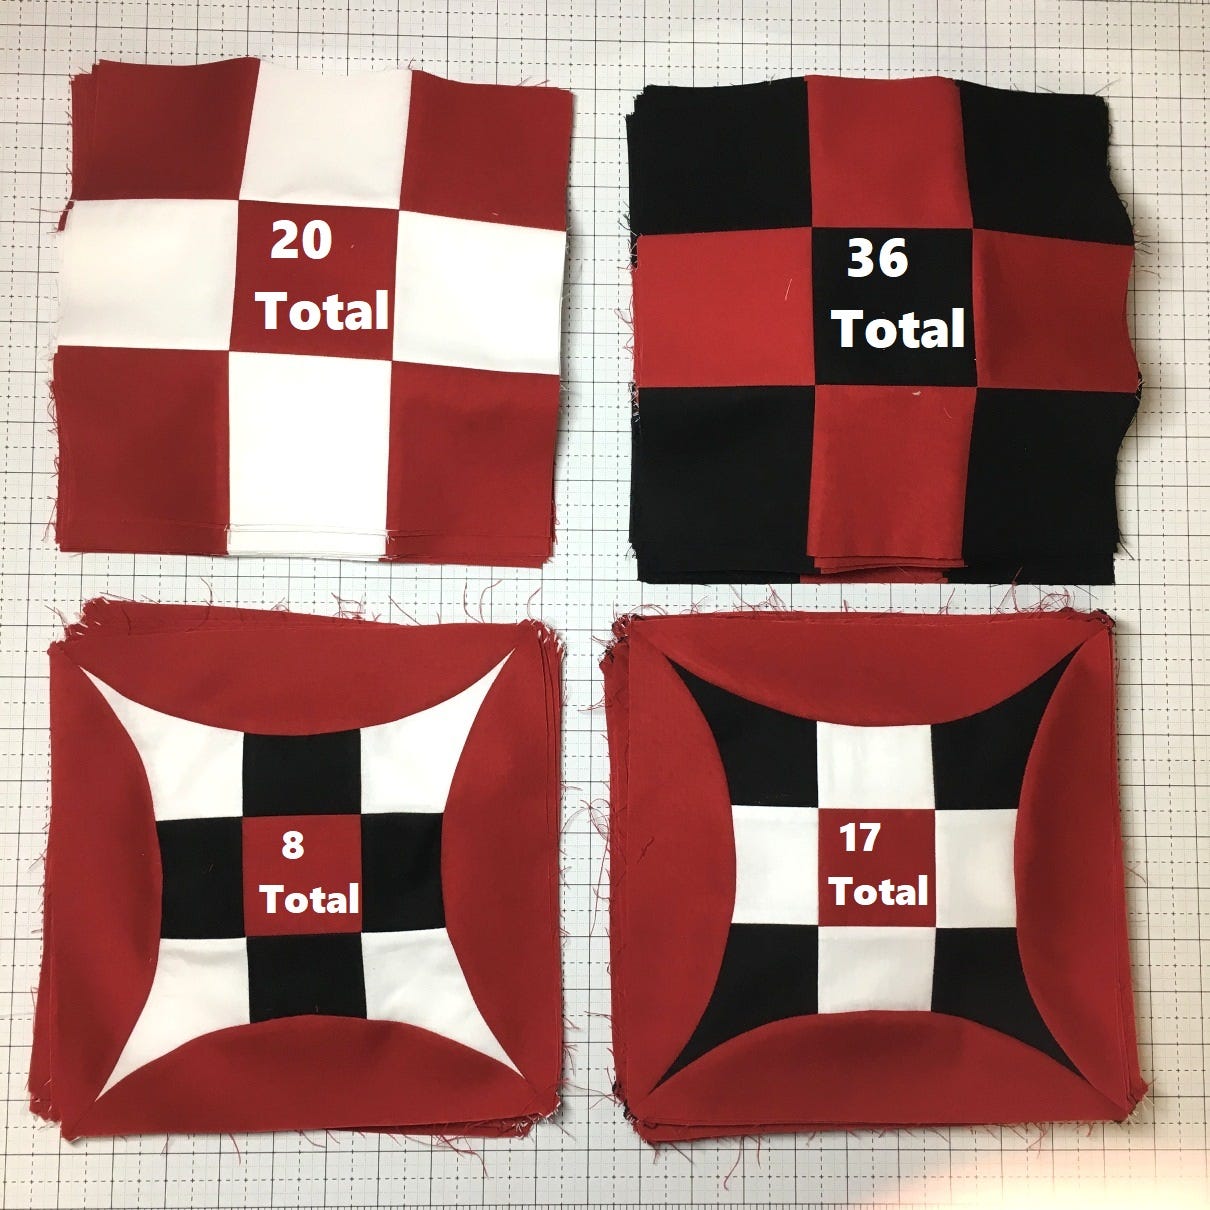
In total, you will have (25) A Units, (68) White B Units, (32) Black B Units, (32) White C Units, (68) Black C Units, and (100) Red D Units. Don't you just love how easy it is to cut curved piecing with curved AccuQuilt Dies! I would never want to cut this out by hand. Once the cutting for your Glorified Nine Patch Blocks is done, you can move on to the regular 9-patch blocks.

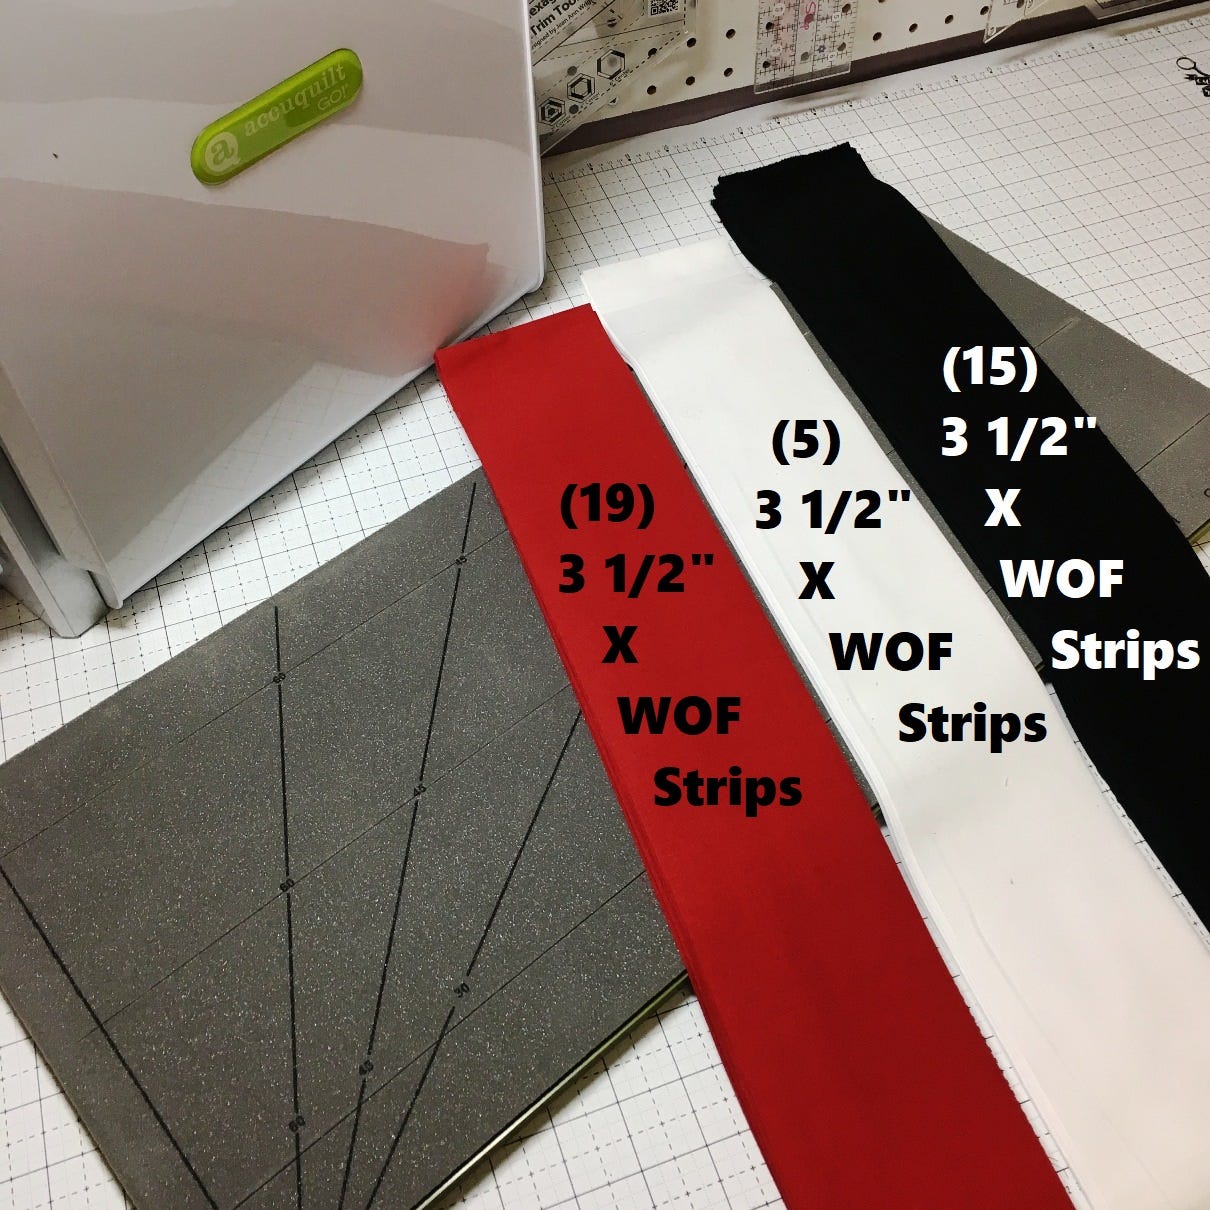
We will be strip piecing the 9-patches to speed things up, so from your remaining yardage you need to cut the following.
From the Red Solid cut: (19) 3½" x Width of Fabric Strips
From the Black Solid cut: (15) 3½" x Width of Fabric Strips
From the White Solid cut: (5) 3½" x Width of Fabric Strips
NOTE: You can use the optional GO! Strip Cutter - 3½" (3" Finished) 2 Strips with Angled Guidelines Die to cut these strips for perfect accuracy, or you can cut them on your cutting mat if you don't have the die.
And finally, a few of our 9-patches can be pieced regularly, so from the last bit of yardage cut the following:
From the Red Solid cut: (16) 3½" x Width of Fabric Strips
From the White Solid cut: (20) 3½" x Width of Fabric Strips
NOTE: You can use the optional GO! Square - 3½" (3" Finished) Die to cut these squares for perfect accuracy, or you can cut them on your cutting mat if you don't have the die.

And easy as that, all your cutting is done! Let's get stitching!
Step 2 - Making the Glorified Nine Patch Blocks
We will start by making the Glorified Nine Patch blocks and we begin by making the rows for the center of the block. Layout two Black C units and one White B unit. Place the C unit onto the B unit on either side and stitch a ¼" seam as shown below. Press the seams inwards towards the B unit. You need to make 34 of these row units total.

To save time and thread, you can chain stitch these units, as well as all of the rest of the units going forward in this tutorial. Chain stitching is simply not clipping your threads between each unit you sew. So when you finish the seam of one unit, simply feed the next paired unit into your machine. Stitch all 34 units on the left, and then clip the threads and repeat for all 34 units on the right. Then clip the threads and press all 34 units.

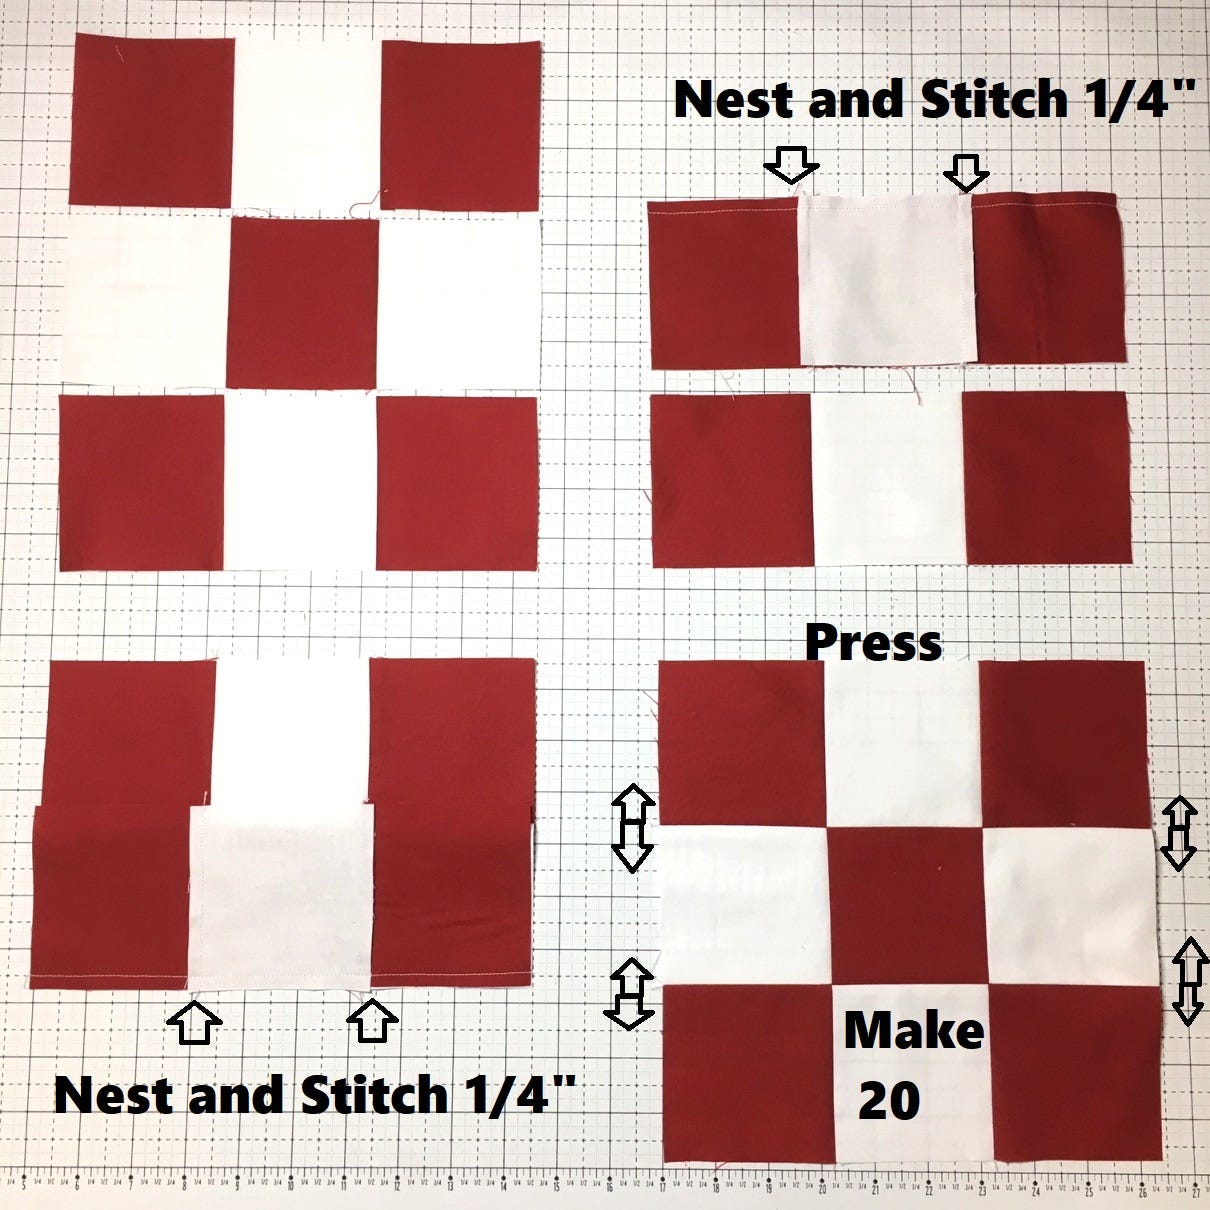
Now to make the Center Row unit. Layout two White B units and one Red A unit. Place the B unit onto the A unit on either side and stitch a ¼" seam as shown below. Press the seams outwards towards the B units. Chain stitch 17 of these Center Row units total.

Now to make the Row unit. Layout two Row units and one Center Row unit as shown below. Place the Top and Bottom Row units onto the Center Row unit and nest the seams and then stitch a ¼" seam as shown below. Press the seams open. Chain stitch 17 of these Center units total.

Now we can finish the block. Layout two D units and one Center unit as shown below. Place the D units onto the Center unit and match and pin the center notches. Then match and pin the side notches. Finally match and pin the corners as shown below. Pin all 17 units.
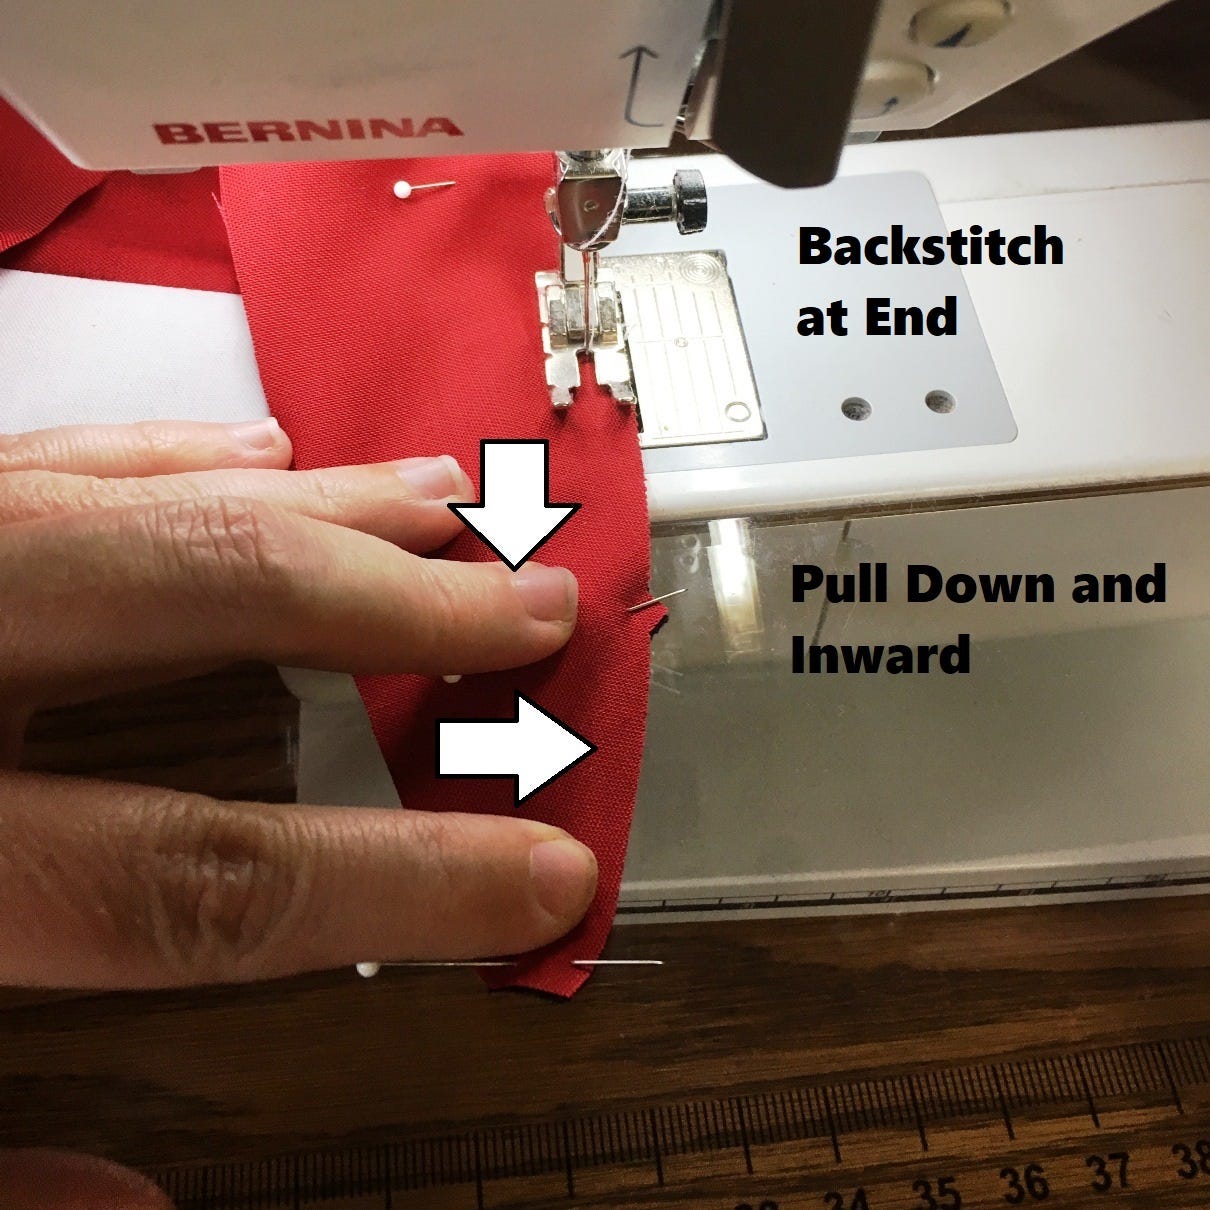
You can now chain-stitch a ¼" seam along all the pinned edges. If you have never sewn with curves before, I highly recommend you see this post, and scroll down to the Curved Sewing Basics section where I shared some helpful tidbits on sewing with curves!

Also, with this particular curve, it is helpful when you are starting off with the top of the curve to pull down and away as the arrows indicate to ensure your center unit below doesn't get tucked up in there (I learned this the hard way ;)

When you get to the center you can simply pull outward. This is the easy part.

When you move back into the outer curve again it is helpful to pull down and inward, keeping the curve in the direction it want's to go and again, this will keep the center unit below from getting tucked up in.
Chain stitch a ¼" along both sides of all 17 units and then press the seams outwards towards the D units. Then repeat the process on all 17 units by adding Red D units to the top and bottom of all 17 blocks. Pin the notches and corners and stitch a ¼" seam along the pinned edges. The seam will overlap the previous seam in the corners. To finish, press towards the D units.
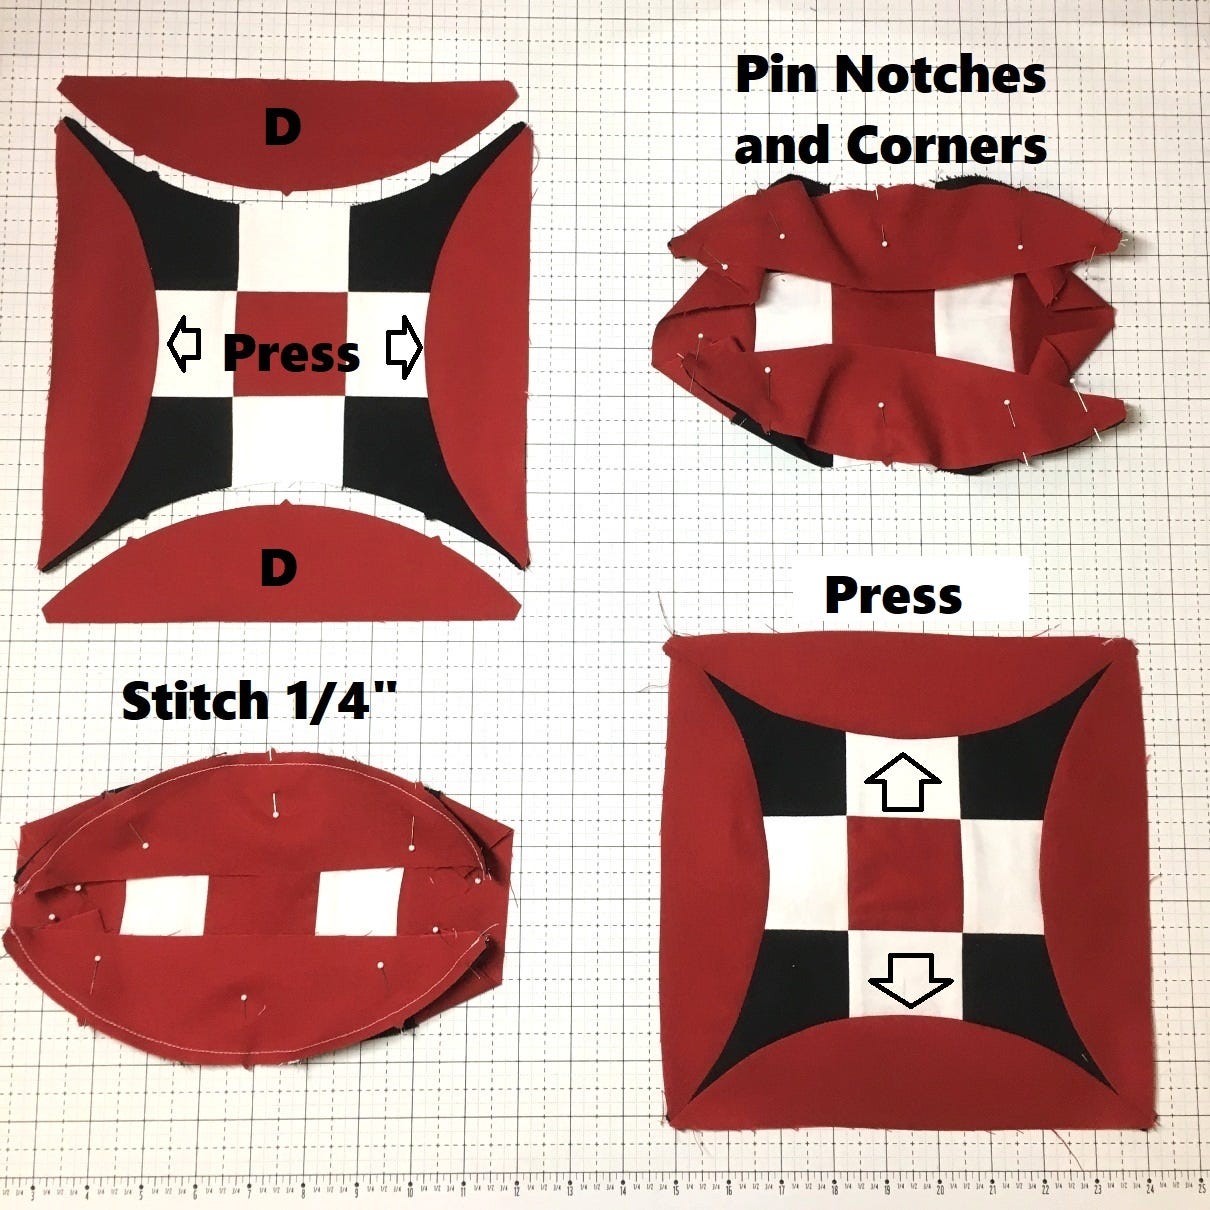
You now have 17 Black/White/Black Glorified Nine Patch Blocks! Way to conquer those curves!

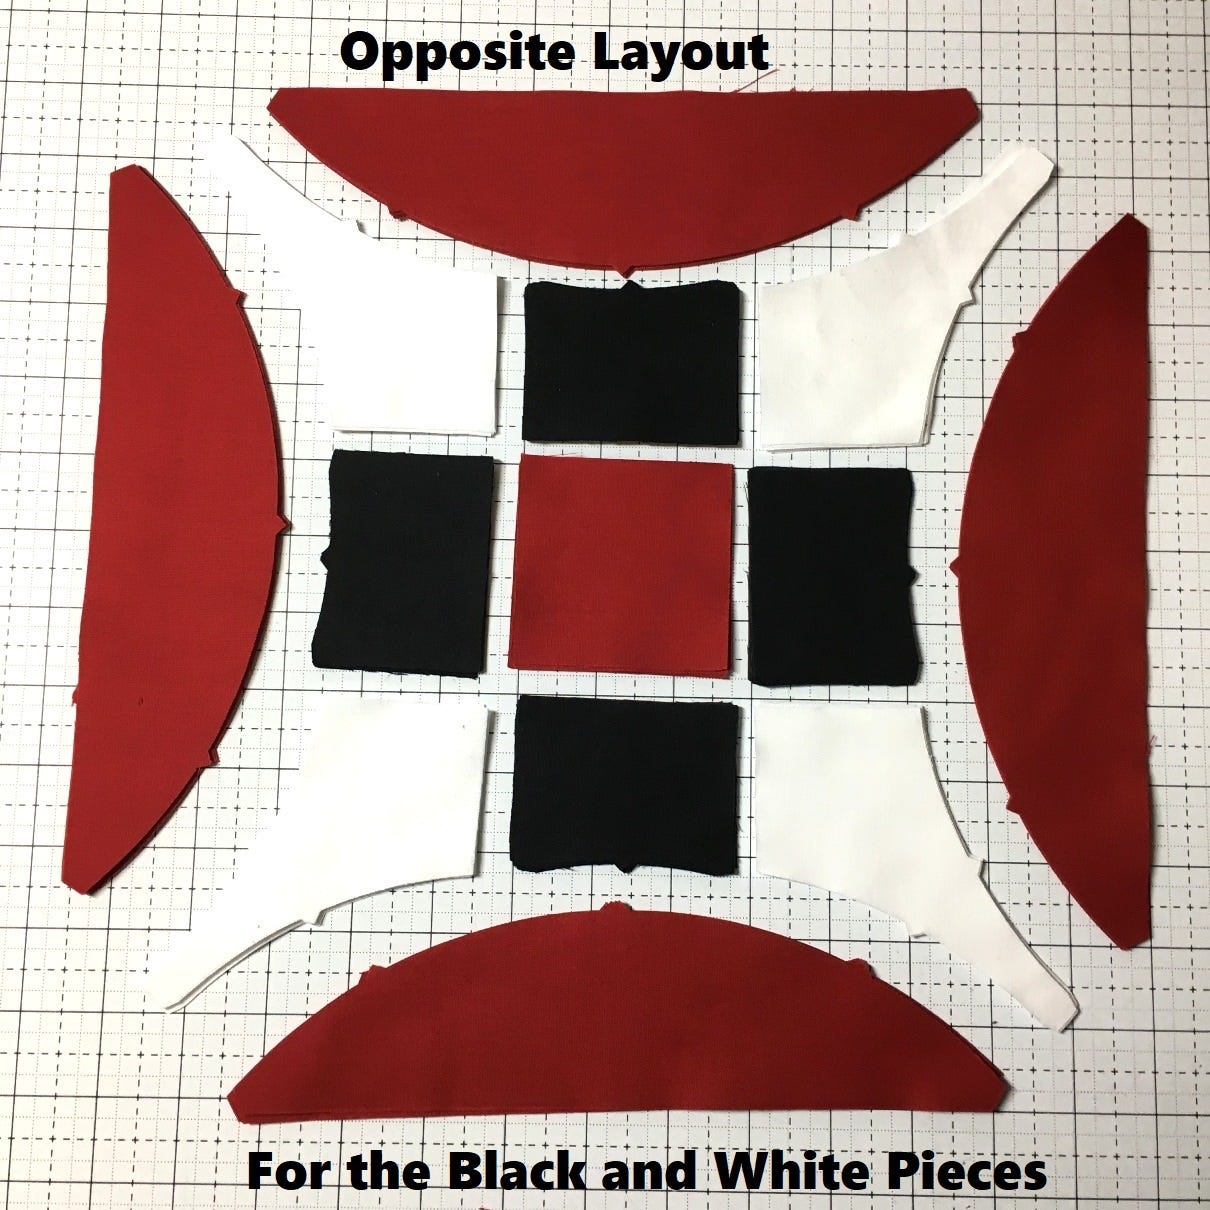
Now you need to repeat the entire process only changing the layout of the Black and White units so they are White/Black/White this time in the center of the block. Use Black unit B's and White unit C's in the exact same directions above to make eight blocks.
You now have eight White/Black/White Glorified Nine Patch Blocks! Great job! You are now a master of the curves! You can set all of your Glorified Nine Patch blocks aside now.

Step 3 - Making the Nine Patch Blocks
And now we can move onto the regular Nine Patch blocks. As I said in the beginning, we will be strip piecing these to save time. Strip piecing just means we will sew strips together long ways first and then cross-cut them into the units we need. When strip piecing, I recommend using a smaller stitch length as you will be cutting through the stitches.
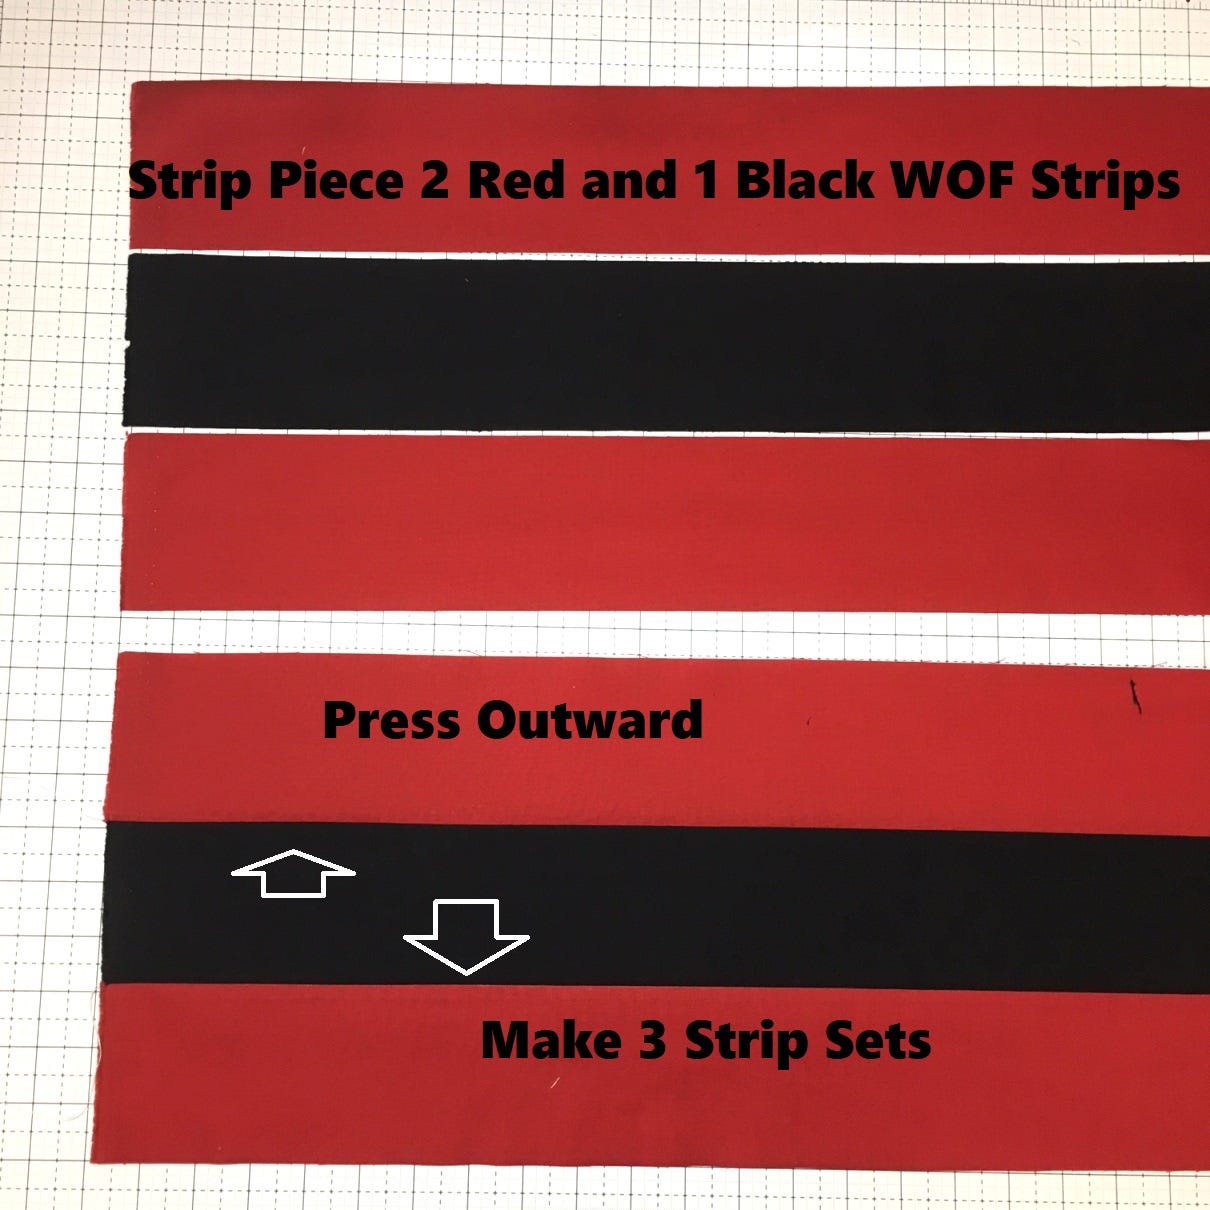
Start by strip piecing two Red 3½" x WOF strips and one Black 3½" x WOF strip together as shown below. You need three strip sets total so it helps again to chain stitch all three red and black strips together first. Then clip the threads and add the final red strip on each set. Press the seam allowances outwards towards the Red strips.
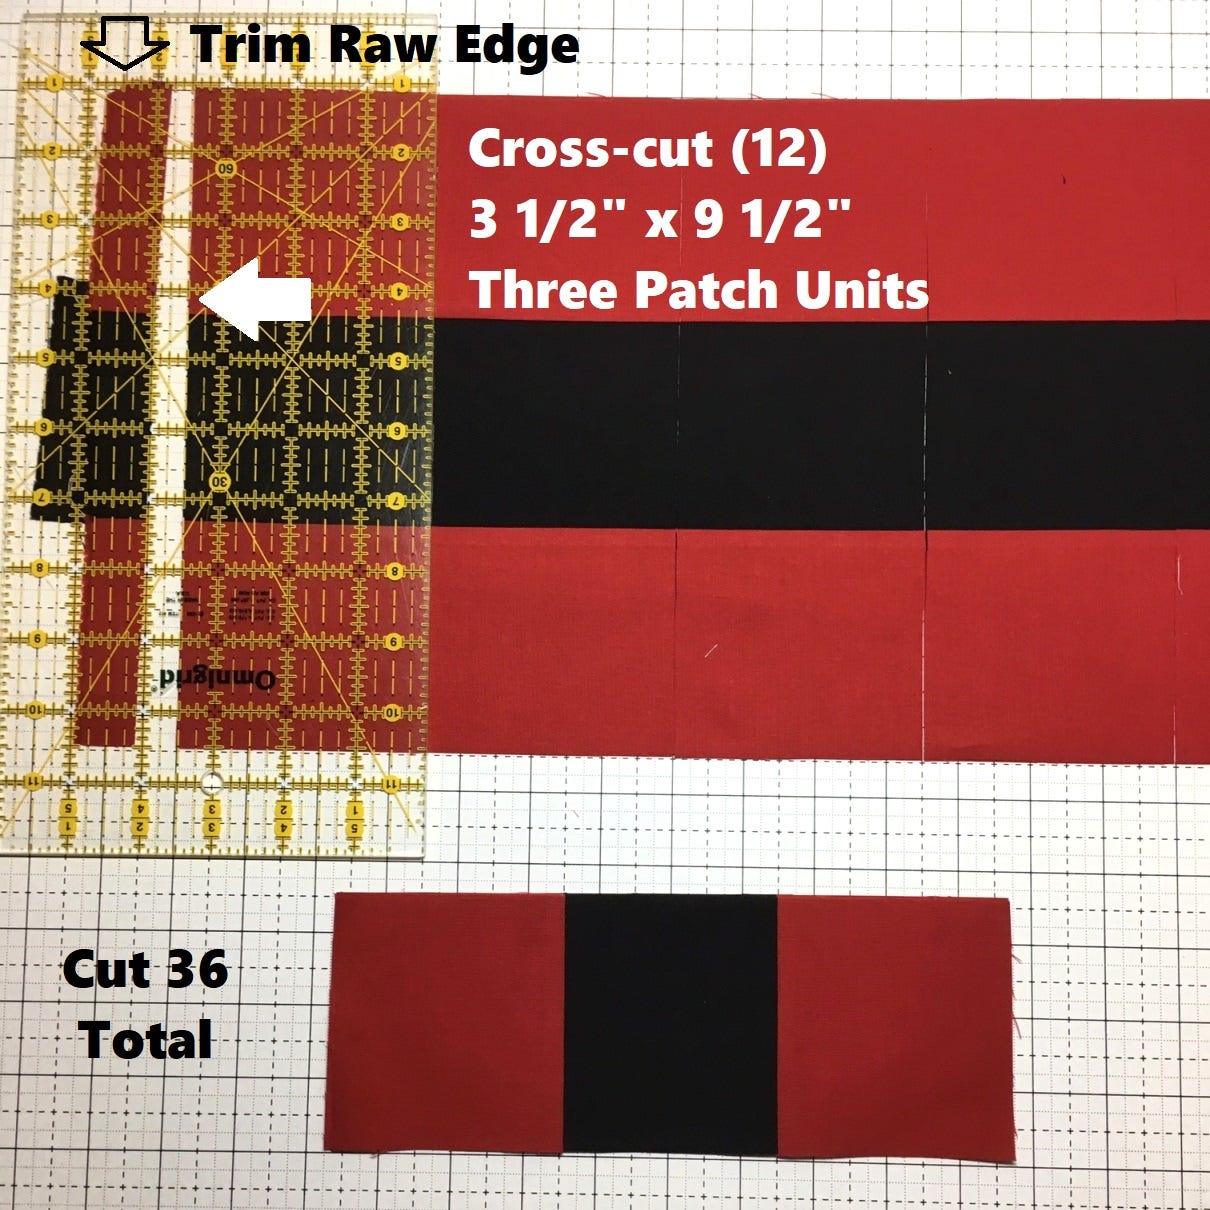
Now you can cross-cut each of the three strip sets. You want to start by trimming the raw edge, but you need 42" of usable fabric, so be sure to trim it right along the selvage edge. Then move your ruler in 3½" inches and begin cross-cutting the 3½" x 9½" 3-patch units. Cut (12) units per strip for a total of 36 Red/Black/Red 3-patch units. If you are new to strip piecing and cross-cutting, you can see this tutorial on speeding up your strip piecing. :)
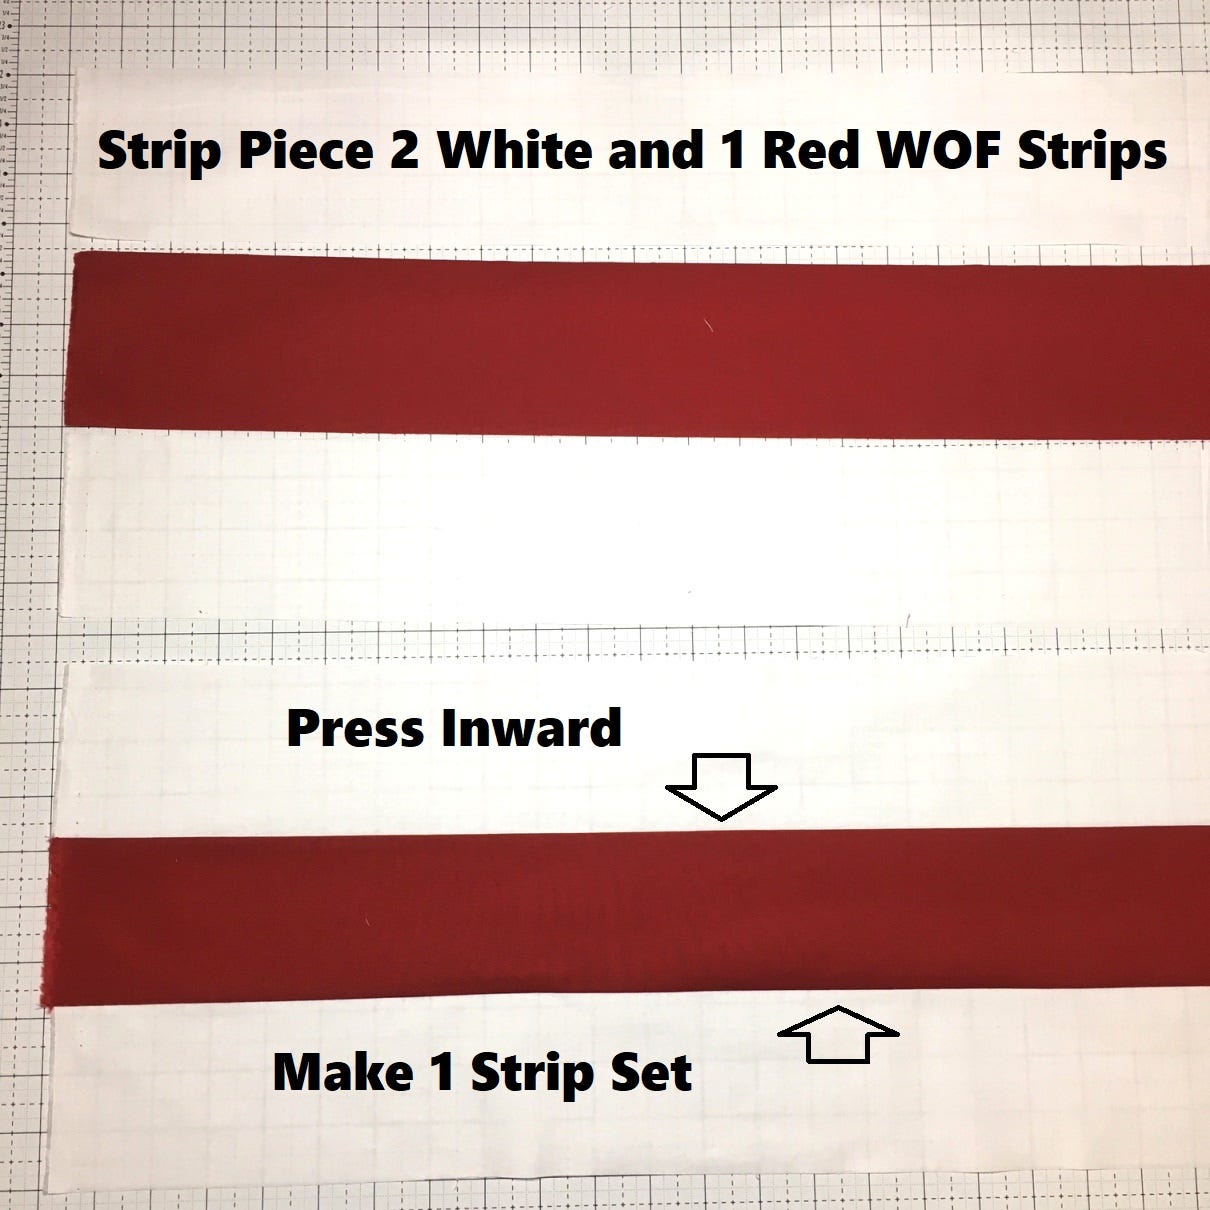
For the rest of the strip sets, we will go over things a little faster. ;) Chain stitch six strips sets using two Black 3½" x WOF strips and one Red 3½" x WOF strip each as shown below. Press the seam allowances inwards towards the Red strip.

Trim the raw edge and cross-cut (12) 3½" x 9½" three patch units from each of the six strip sets for a total of 72 Black/Red/Black 3-patch units.


Trim the raw edge and cross-cut (12) 3½" x 9½" three patch units from each of the three strip sets for a total of 36 Red/White/Red 3-patch units.

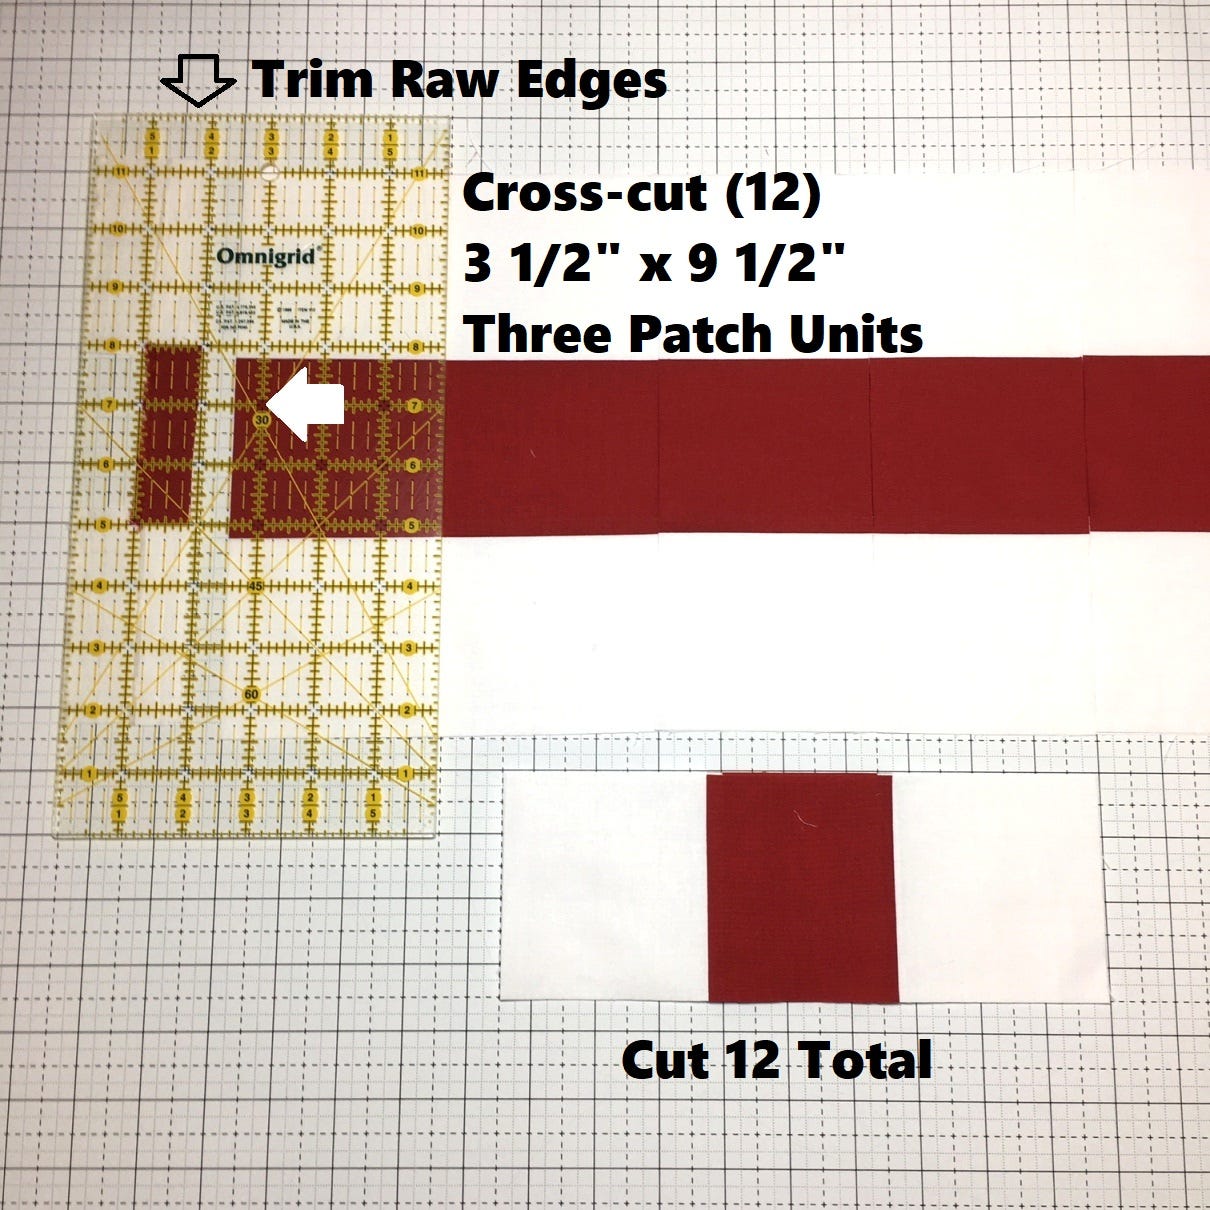
Stitch one strip set using two White 3½" x WOF strips and one Red 3½" x WOF strip each as shown below. Press the seam allowances inwards towards the Red strip.
Trim the raw edge and cross-cut (12) 3½" x 9½" 3-patch units from the strip set for a total of 12 White/Red/White 3-patch units.
Now we need a few more 3-patch units but not enough to warrant another whole strip set. So we will just sew them together like normal.
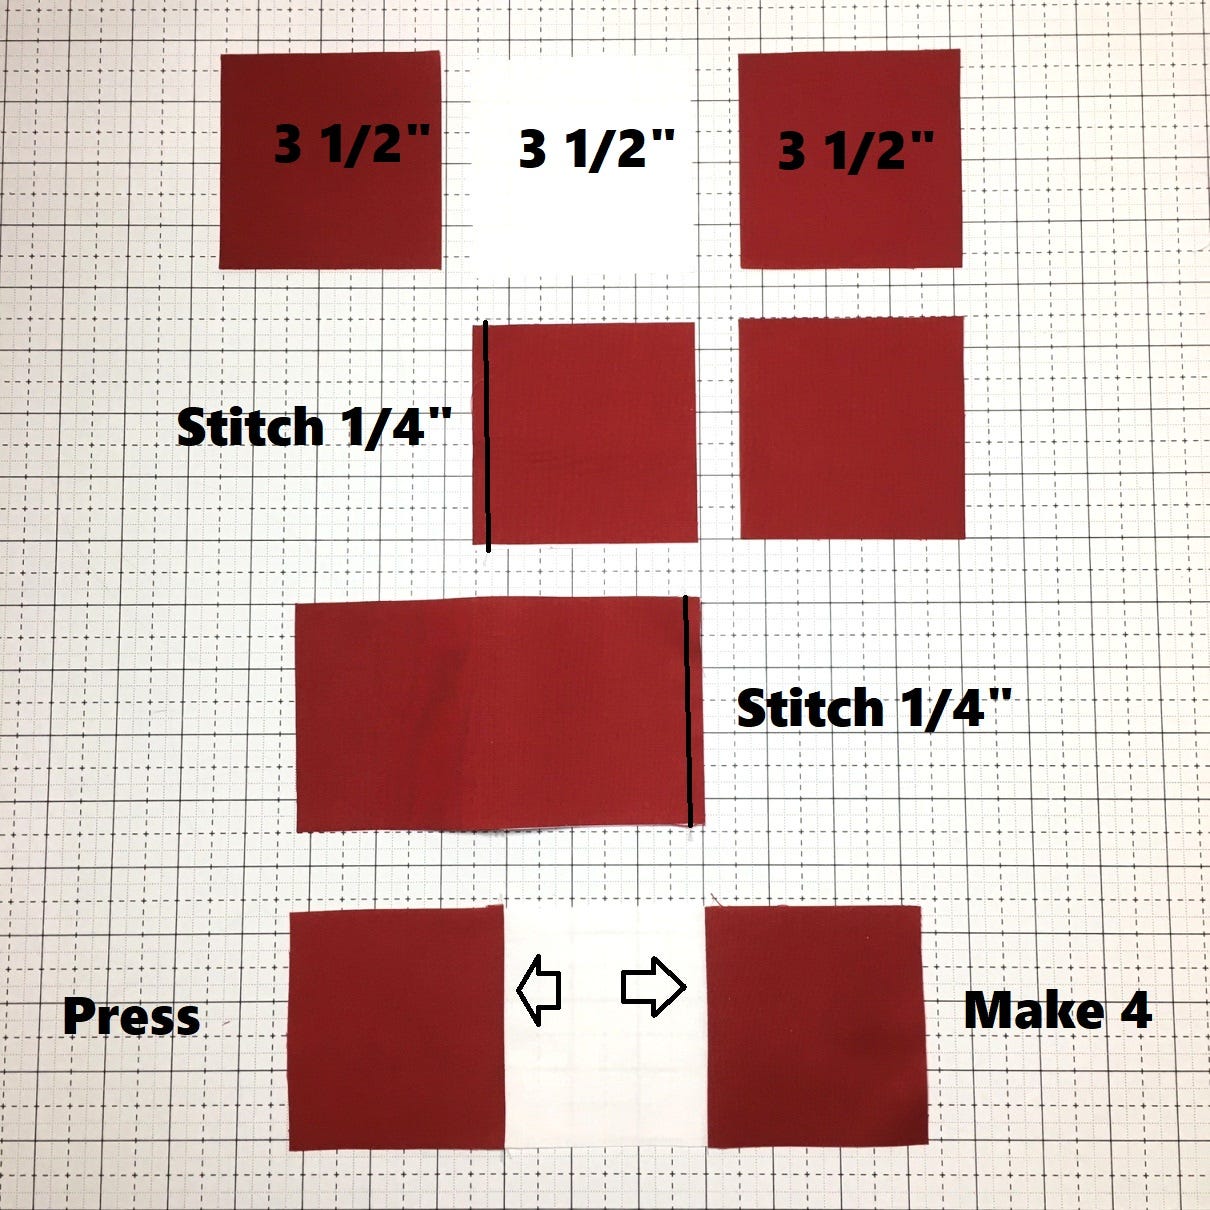
Layout two Red 3½" squares and one White 3½" square as shown below. Place the Red squares onto the White square on either side and stitch a ¼" seam as shown below. Press the seams outwards towards the Red square. Chain stitch four of these Red/White/Red 3-patch units total.
Layout two White 3½" squares and one Red 3½" square as shown below. Place the White squares onto the Red square on either side and stitch a ¼" seam as shown below. Press the seams inwards towards the Red square. Chain stitch eight of these White/Red/White 3-patch units total.

And now with all of the 3-patch units done, you are ready to make your 9-patch blocks. Layout two Black/Red/Black 3 Patch Units and one Red/Black/Red 3-patch unit as shown below. Place the top row onto the center row, nest and stitch a ¼" seam. Then place the bottom row onto center row, nest and stitch a ¼" seam. Press the seams open. Chain stitch 36 Red/Black 9-patch blocks total.

Layout two Red/White/Red 3-patch units and one White/Red/White 3-patch unit as shown below. Place the top row onto the center row, nest and stitch a ¼" seam. Then place the bottom row onto center row, nest and stitch a ¼" seam. Press the seams open. Chain stitch 20 White/Red 9-patch blocks total.
Step 4 - Sewing the Quilt Top
Now with all your blocks sewn up, you are ready to sew the quilt top together! Just do double check, you should have 20 White/Red 9-patch blocks, 36 Red/Black 9-patch blocks, eight White/Black/White Glorified Nine Patch Blocks, and 17 Black/White/Black Glorified Nine Patch Blocks.
Layout your 81 blocks in nine rows of nine blocks each in the following layout. Sew the blocks into rows. Press the seam allowances open. Then sew the rows into the quilt top and again, press the seam allowances open. If you are new to quilting, you see this post for more detailed instructions on how to sew your blocks into a quilt top.
Step 5 - Finishing
And all that is left is to turn that finished quilt top into a finished quilt. ;) Time to baste it, quilt it, and bind it - which is a whole lot in one little sentence. If you are new to quilting, check out my video tutorial series on finishing your quilt. It will walk you through basting, quilting, and binding, step by step. ;) I quilted mine with an all over echoed paisley design which I have a video tutorial of how to do right here.

Finally, I used the print 2½" x WOF strips to bind the quilt.

Step 6 - Enjoy
Once it's done, all that's left is to sit back and enjoy your fantastic 81" x 81" Nine Patch Fun Quilt! Mine will be donated to my Alma Mater to raise funds for women's sports :) I love that I can make quilts for amazing causes, and it makes me smile that this is destined to be a Rally Quilt for someone special.

I hope you have enjoyed this tutorial and if you make your own Nine Patch Fun Quilt, I would love to see it! Share it with us on social media with the hashtags #happyquiltingwithmc and #AccuQuilt. We can't wait to see your Nine Patch Fun quilts!

I hope this tutorial helped you feel more confident approaching quilts with curves, especially if you have AccuQuilt dies on your side! Thank you to AccuQuilt for having me here. To see more of my Happy Quilting adventures, stop by Happy Quilting for a visit. I just love being able to share lots of quilting goodness on a daily basis. And to see other AccuQuilt curved quilts I have made check out here and here. ;)
Have a very Happy Quilting (and maybe even some curved sewing) Day!
-Melissa


