Hi, it’s Marjorie from bluefeatherquiltstudio.com and I’m still working on Christmas projects. Last month, I did a tutorial for my Interchangeable Blocks Wall Hanging. Some of the blocks from the Winter Bliss set are a bit more challenging for those who are new to machine embroidery--this tutorial is just for you. With this post, we will go step by step through the machine embroidery of Block 8 from the Winter Bliss set.
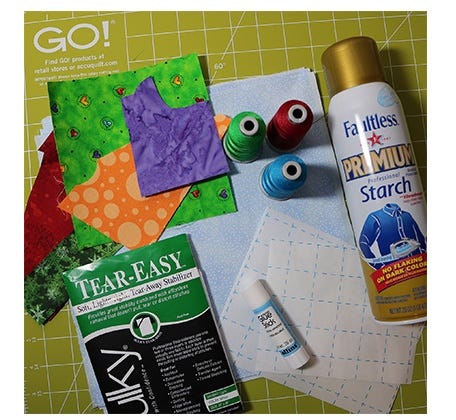
These are the supplies you will need:
- AccuQuilt GO! Dies: Sleigh and Snowflakes (Die #55322) and Carefree Numbers (Die #55099)
- Machine Embroidery Design Set: Winter Bliss
- Winter Bliss Cutting Instructions
- Background Fabric (I press it using spray starch to make it nice and crisp) 10” x 10” for each block
- Fabrics for Appliqué Shapes in Colors of your choice.
- Lite Steam A Seam 2 (using a glue stick is optional as explained in the machine embroidery instructions)
- Coordinating Machine Embroidery Thread (Cotton, Poly, or Rayon) and bobbins wound with neutral thread
- Light to Medium Weight Tearaway Stabilizer
- Curved machine embroidery scissors for trimming tack-down and trim method applique shapes.
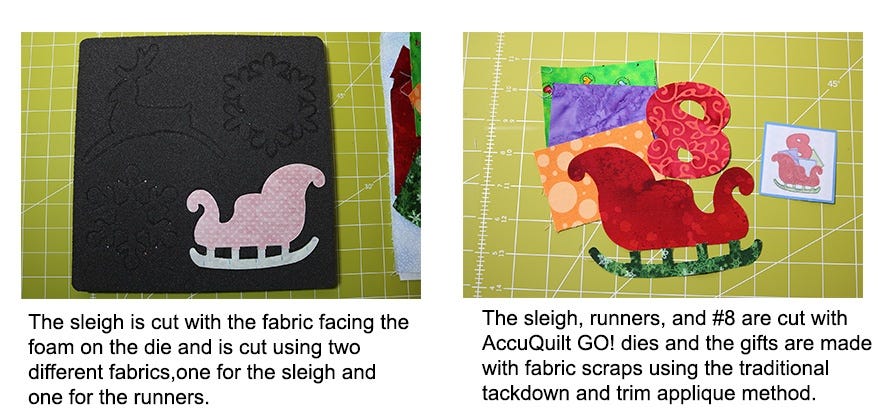
Step 1: Cut the appliqué shapes:
It is helpful to download the cutting instructions for the Winter Bliss set. On some of the blocks, the shapes are cut in mirror image and that kind of detail is included in the cutting instructions. It is also helpful to place the shapes for each block into a separate container like a small sandwich baggie. In addition, you may want to cut apart the cutting instructions and add the little thumbnail photo to the baggie.
I prefer to apply fusible to the back of my fabrics prior to cutting the shapes. However, you can also use spray starch on the fabric before cutting and use water-soluble glue to apply the shapes to the background fabric. Complete written instructions are included for both methods in the machine embroidery design set.
The sleigh can be cut as one piece if desired.
Step 2: Prepare embroidery fabric and stitch gift 1 onto background.
The background fabric is cut 10” X 10”. It is recommended that you spray starch it as that gives it a little more stabilization. Prepare the hoop with the background fabric, tearaway stabilizer, and mount the hoop onto the machine.
The applique fabric for the gifts is cut into 2” x 3” rectangles.
Image 1: Stitch the placement line onto the background fabric.
Image 2: Layer the applique fabric over the placement lines. If you are worried that it will move, you can use a water-soluble glue stick to place glue inside the placement lines to hold the applique fabric in place.
Image 3: Stitch the tack-down stitches onto the applique fabric.
Image 4: Trim carefully around the tack-down stitches. Trim as close as possible to the stitch line. Small applique scissors are very helpful.
Image 5: Completed tack-down of applique shape for gift 1.

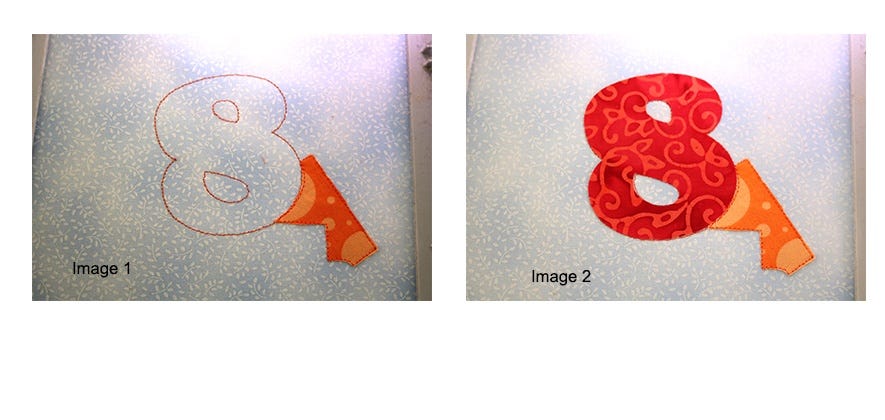
Step 3: Stitch placement and place the AccuQuilt GO! Applique shape number 8.
Image 1: Placement line is stitched.
Image 2: Applique shape 8 is placed just inside or on top of the placement stitches and either fused or glued into place.
Step 4: Stitch gift 2 onto background.
Image 1: Placement line is stitched.
Image 2: Optional—trim the fabric from the number 8 where gift 2 will be placed.
Image 3: Layer the applique fabric over the placement lines. If you are worried that it will move, you can use a water-soluble glue stick to place glue inside the placement lines to hold the applique fabric in place.
Image 4: Stitch the tack-down stitches onto the applique fabric.
Image 5: Trim carefully around the tack-down stitches. Trim as close as possible to the stitch line.

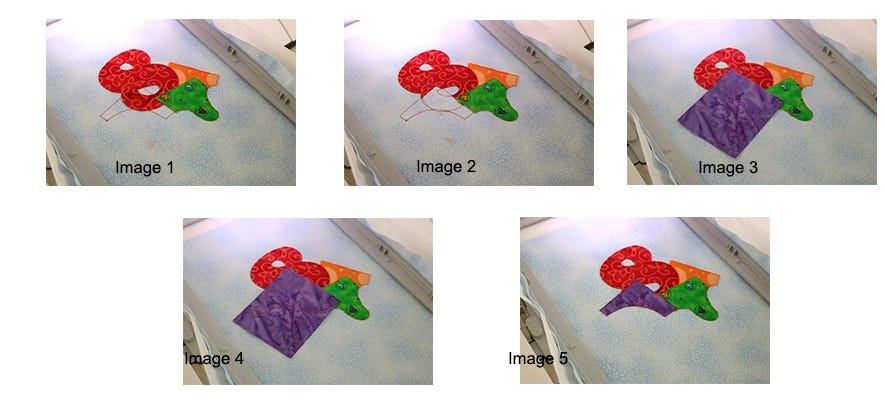
Step 5: Stitch gift 3 onto background.
Image 1: Placement line is stitched.
Image 2: Optional—trim the fabric from the number 8 where gift 2 will be placed.
Image 3: Layer the applique fabric over the placement lines. If you are worried that it will move, you can use a water-soluble glue stick to place glue inside the placement lines to hold the applique fabric in place.
Image 4: Stitch the tack-down stitches onto the applique fabric.
Image 5: Trim carefully around the tack-down stitches. Trim as close as possible to the stitch line. Small applique scissors are very helpful.
NOTE: As I stitched this I found that the satin stitch between the purple and green was very exact. Thus the purple must be trimmed very close to the tackdown stitching or the edge will peek from under the satin stitch. A template is included in the machine embroidery set that can be used to cut the shape with scissors if desired.
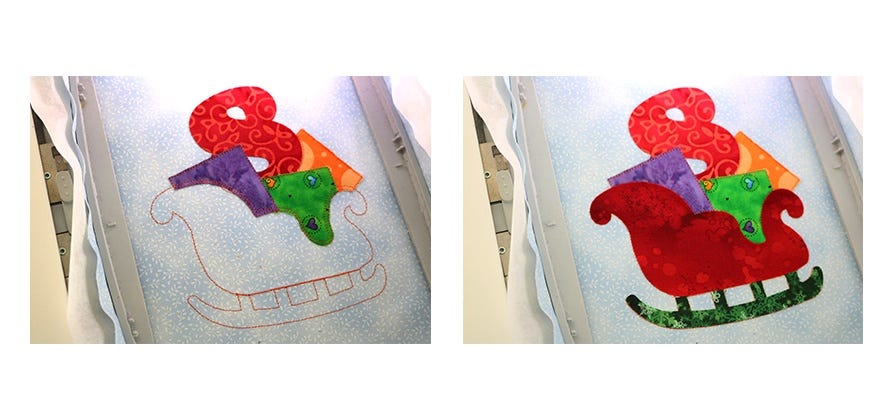
Step 6: Sleigh and Runner placement.
Image 1: Placement line is stitched.
Image 2: Appliqué shapes are applied by either fusing or gluing just inside or on top of the placement lines.
NOTE: When these shapes are cut with the die, there will be some excess fabric of the sleigh on the runner cut and there will be some excess fabric of the runners on the sleigh. Trim these edges carefully so that the fabric covers the placement lines.
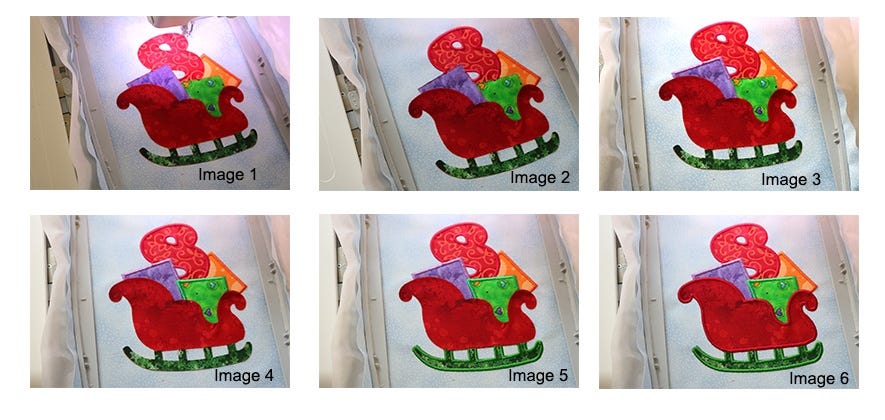
Step 8: Complete the satin stitches around all shapes to complete the block.
Image 1: Satin stitch around gift 1.
Image 2: Satin stitch around the number 8
Image 3: Satin stitch around gift 2
Image 4: Satin stitch around gift 3
Image 5: Satin stitch around sleigh runners
Image 6: Satin stitch around sleigh
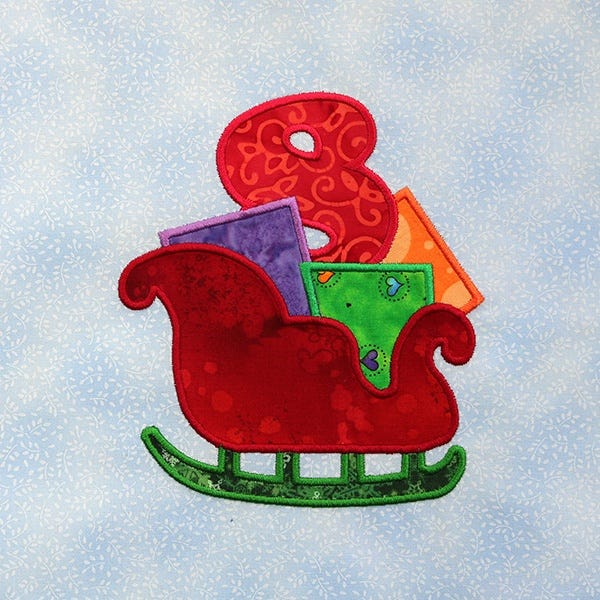
Step 9: Quilt as a single block and bind OR use as a block for the quilt or wall hanging.
Here is the finished machine embroidery block.