
Hi y’all!
If you made it to the flamingo die release party, you know this summer is time to party like a flock star.
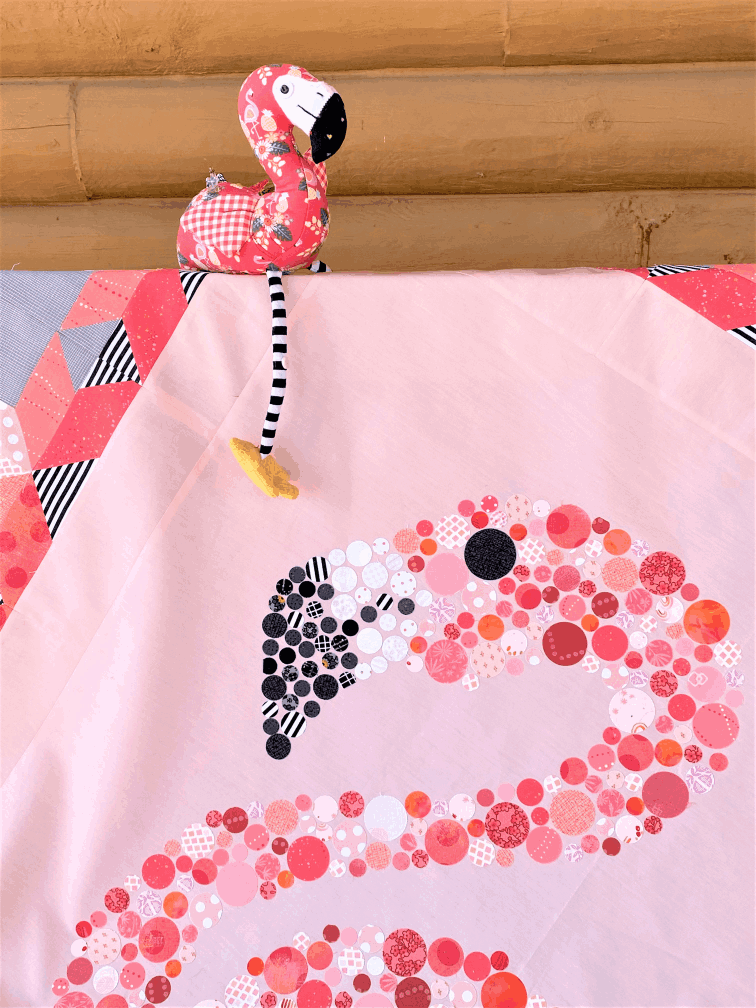
I'm tickled pink as an AccuQuilt GO! Getter Brand Ambassador to share my latest creation using AccuQuilt’s NEW GO! Flamingo Die. SOUTH BEACH BELLA is my newest pattern release using my signature technique, Effervescent AppliqueTM.
It feels like a Mid-century Miami beach party with all of those pinks, grays, blacks, and whites.
.png)
Note: You can visit my website store to purchase the full pattern. Here’s a diagram of where I used each of the dies to form the blocks. More detailed instructions are included in the pattern for this quilt.
I am so happy to show you some tips and tricks for making this quilt.
I used a GO! Qube 8 inch Mix & Match to create my Birds of Paradise Blocks.
Each block is comprised of ¾ of a Hunter's Star and then a strip of background along the bottom. So, that is Die #7 to make the Hunter's Star points.
Die #6 forms the corner squares.
Die #5 is used for the half-square triangles on the ends of the star points.

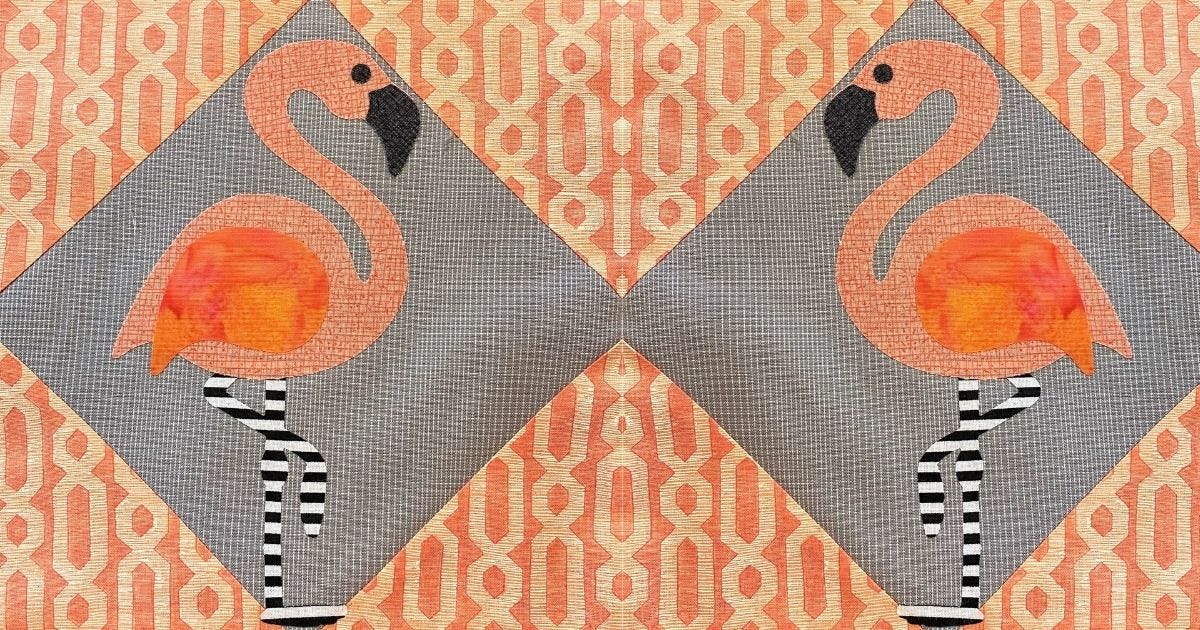
I used the new Flamingo Die to create the cornerstones.
If you look at my photo you will see I have flamingos facing both directions. WHAT?!?!? You can easily achieve this. Here’s how.
First, iron your fusible webbing to the wrong side of the fabric you are going to die cut. Remember, on an AccuQuilt GO! Big Electric, you can cut four layers of fabric with fusible webbing attached. Each layer of fusible webbing counts as a ½ layer when cutting. So, all four of your flamingos can be cut with one pass through the AccuQuilt GO! cutter.
You only need this little magic trick right here to make two flamingos that face right and two that face left.
Layer two of your prepared fabrics with the fabric facing away from the die and layer the other two pieces with the fabric facing toward the die.
And snap! Just like that, you have left facing and right racing flamingos.

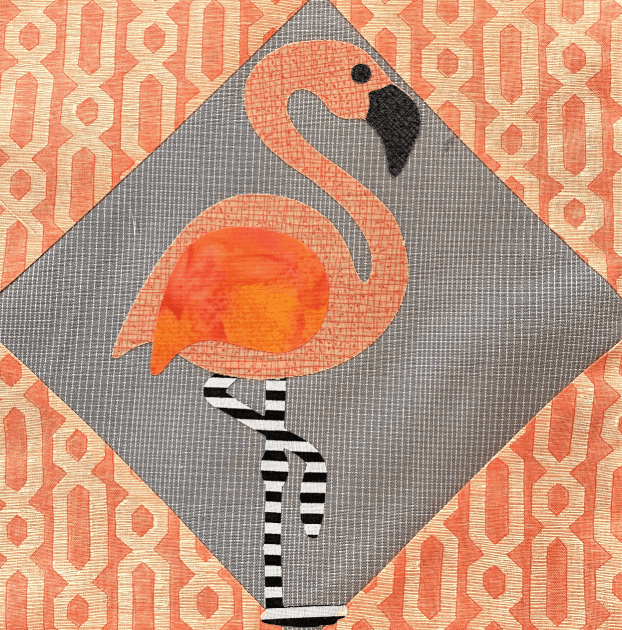 You may have also noticed in my cornerstone blocks the flamingos have different colored wings, eyes, beaks, and legs.
The die itself allows for the separate wing, eye, and beak color. I measure the area that needs to be covered to get just a wing or just a beak.
I cut these smaller segments about ½” larger in both directions to make sure I get a clean cut and layer them onto the die at the same time.
Pro Tip: If the smaller segments overlap in any way, then the machine will not cut all four in one cut. Make sure your smaller segments do not overlap.
If they would, cut all your wings first; then do another pass through the cutter to cut your beaks.
I did something a little different to get those crazy Beetlejuice-inspired striped legs. I didn’t need an entire flamingo cut from the stripe, but I wanted the legs to line up as if it was one cut. To get this, I cut the legs with a portion of the lower section of the body.
When I measured for just the legs, I added 1” to the top of the legs to get the belly curve of the flamingo on my leg cuts. This lower curve of the body allowed me to line up the legs perfectly as if those legs, and body, were cut as one piece.
Pro Tip: Cutting part of the body with the legs in a different fabric allowed me to fuse the main flamingo body and leg pieces together - so there is no gapping or fraying where the body meets the legs.


So, now that your borders are ready, you can create the center Effervescent Applique picture.
I enlarged the flamingo image from the die 600%. To get this size copy, here’s what I did:
I made a copy of the die using my home printer on regular paper. I took it to my local copy center and asked them to enlarge it 600% using their landscape/blueprint/A0 printer.
It cost me a little bit, but it gave me a pattern for a 36” wide by 48” long flamingo.
You can do the same, but it is a bit pricy. If you’d rather not go that route, feel overwhelmed by the idea, or if you just don’t have a local copy center, then check out my pattern! The “South Beach Bella” pattern includes a template already sized to the appropriate size.
“South Beach Bella” Pattern Details: If you choose a digitally downloaded PDF, you will print out about twelve regular size pieces of paper to tape together to form the pattern. If you choose to buy a printed version of the pattern, the large paper template is included.
Once you have a large flamingo template you will transfer the design onto your background.
This is easily achieved with a sunny window or lightbox. Tape the pattern to the window, place the fabric over the pattern, and trace the flamingo outline.
Pro Tip: Use water, or a heat-erasable marker, to do the tracing. Air erasable markers will not last long enough for the process. I recommend what I used - which is a Frixion pen. The mark stays while you build your flamingo and disappears when you iron all your bubbles down. For the best results, I find using a color close to the background color works best. So, here I used a red Frixion pen on a pink background.

Now is the time to make all your bubbles!!!! I made my bubbles using Accuquilt’s circle dies, 55484 (Circle ½”, ¾”, 1”, 1 ¼”) and 55155 (Circle 1 ½”, 1 ¾”, 2 ¼”, 2 ½”).
You will need to apply fusible webbing to the wrong side of the fabric prior to cutting your bubbles.
I’ve included a chart here to show approximately how many circles of each size you will need to construct your flamingo.
This would be a pain to draw and cut by hand. But when you cut using Accuquilt GO! Fabric Cutter system, it makes quick work of all this circle cutting. AND, the circles are perfectly shaped and consistent in size. AMAZING!!!!!

As I make my cuts, I place the various sizes into Ziploc snack bags, by size, to keep them organized.
I build using size as my determining factor, so I can easily find the right size if the pieces are organized that way. No matter what shade of pink/coral the circle is, if it is that size it goes into the same bag.
I use a separate set of bags for each color. So, the blacks and whites used in the beak are in a separate set of snack bags also organized by size.
This process is really time-consuming and labor-intensive when done by hand.
Did I mention you have to cut each circle individually with scissors? No rotary cutting of circles here folks.
Truly, to get the best results and no hand pain, you need a die cutter to make these bubbles.
.jpg)
To begin your applique, place the circle for the eye first. Once you have your eye placed begin building the pinks and corals for the flamingo in the head and neck of the bird.
I start with the biggest circles first and work down. I keep all the circles within the drawn outline and space them about 1/16” apart.
Pro Tip: Be sure to stay within the outline or your flamingo won’t look like a flamingo when you’re done.
I reserved the larger pink circles for use in the body and wing area. But this is your flamingo and you can make it any way you wish.
A large variety of pinks, fuchsia, corals, and pinky-reds will give you a dynamic visual effect. Try to make sure the bubbles are not too close to the background color.
Once all your bubbles are where you want them, press them in place. This will remove the drawn outline and secure the bubbles to the background.
If you need to put your project away while you are still building the Effervescent AppliqueTM; roll it onto a pool noodle to store it.
Pro Tip: Make sure the front of the quilt top is facing the pool noodle to help keep the bubbles safely in place until you can work on it again.
The pattern has all the information to make striped legs for your life-size flamingo to match the legs of your cornerstone flamingo. This quilt is one in a series using my signature technique, Effervescent AppliqueTM.
If you feel inspired to make lovely applique circle quilts, AccuQuilt’s GO! Big Electric Fabric Cutter and the two circle dies are definitely what you want. This will help you slice through the cutting quickly and have you creating with bubbles in minutes - instead of hours or days.
Run, go put on your vintage Hawaiian print shirt or Lilly Pulitzer print dress, grab an umbrella drink and come join Dorothy, Blanche, Rose, Sophia, and me for an AccuQuilt cutting party on the Lanai.
Sing along!
"Thank You for Being a Friend, …
... AccuQuilt threw a party and invited everyone they knew.
You will see the biggest smile will be from me
and this pattern attached that says Thank you for being a friend."


