
Hey AccuQuilters! It’s Lori Miller, from Lori Miller Designs, back with a great new DIY project.
Summer is in full swing here in Michigan and it’s time to enjoy the outdoors - or at least bring a taste of it inside.

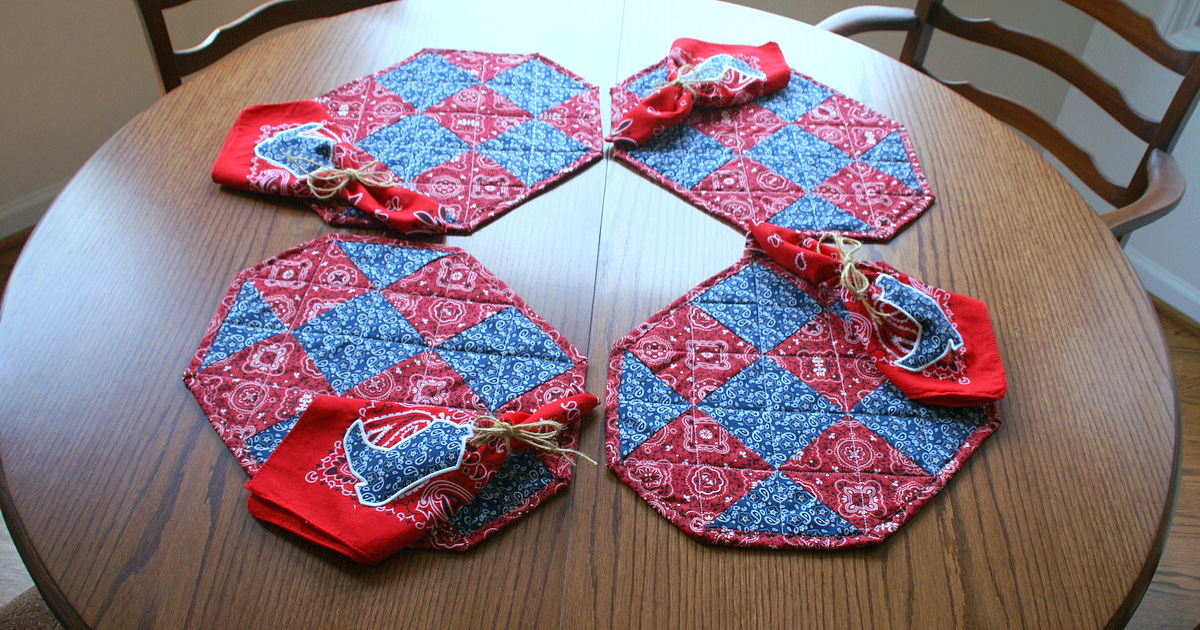
Easy DIY Placemats & Napkins
You will love making these easy, but clever, DIY Western-themed BBQ Placemats and Napkins. They will perfectly set off your table and the bandanna fabrics are a familiar, yet fresh, fabric touch.
This pattern is made with the GO! Qube 8” Mix & Match set (55776) and the GO! Western Medley Die (55227).

These placemats are designed to work on any table, from round to a rectangle, with a unique pieced shape.
Simple quilting makes these stitch up in a hurry for any party or BBQ with family and friends.
The placemats are approximately 12" x 16” finished.
This pattern makes four placemats and napkins.

Dies Used
- GO! Qube Mix & Match 8" Block (55776)
- Shape 1 - Square (4” Finished)(55776, 55060, 55018)
- Shape 3 - 4” Finished Half Square Triangle (HST) (55776, 55031)
- GO! Western Medley Die (55227)
- Western Boot Shape
- Western Boot Shape
- GO! Strip Cutter-2½" (2" Finished) 3 Strips Die (55014 or 55017)
Fabrics
- Red Bandanna: 2 1/8 yds
- Blue Bandanna: 5/8 Yd
- Batting: 1 yd
Other Materials
- Four Red Bandanna scarves for the napkins
- 1/2 yd of Iron on fusible interfacing for applique boot shapes. (For example - Heat and Bond Lite)
Cutting
- Red Bandanna
- Cut 2 – 5” x WOF strips, sub-cut into 16 – 4 ½” squares (Shape #1)
- Cut 1 – 5 1/2” x WOF strips, sub-cut into 8 – HST (Shape #3)
- Cut 2 – 14” x WOF strips, sub-cut into 4 – 14” x 18” rectangles for back of placemat.
- Cut 2 – 10” strips x WOF, sub-cut into 6 – 2 ½” strips for binding
- Blue Bandanna
- Cut 2 – 5” x WOF strips, sub-cut into 16 – 4 ½” squares (Shape #1)
- Cut 1 – 5 1/2” x WOF strips, sub-cut into 8 – HST (Shape #3)
- Cut 1 – 4 1/2” X WOF strip for western boots
- Batting
- Cut 2 – 14” x WOF strips, sub-cut into 4 – 14” x 18” rectangles for the back of the placemat
- Cut 2 – 14” x WOF strips, sub-cut into 4 – 14” x 18” rectangles for the back of the placemat
- Fusible Interfacing
Sewing


Directions for Each Napkin
- Press the fusible interfacing to the wrong side of the 4 ½” strip of blue bandanna fabric for the boots.
- Use the GO! Cutter to cut out four western boots, right side up.
- Peel off the paper from the back of the boots.

- If you are using the free embroidery design for the boot, embroider following the embroidery directions with your sewing machine onto a corner of the red bandanna scarves.
- If you are not using the free embroidery design, arrange the boot in the corner of one of the red bandanna scarves. Press into place. Use a zig-zag, satin, buttonhole or stitch of your choosing to sew around the raw edges of the boot.
- Repeat these steps for the other three red bandanna scarves.
Directions for Each Placemat


-
Arrange the pieces of the placemat as shown - alternating the red and blue fabrics for the design.
-
Piece together in rows. Press the seams in alternating directions so the rows will nest together.

-
Make a quilt sandwich with the 14” x 18” back, batting, and pieced placemat.
-
Pin baste all layers together.

-
Quilt as desired. I used a very simple straight stitch in keeping with the rustic western theme. Then trim away the excess fabric and batting.

-
Bind the placemat using the red bandanna fabric 2 ½” strips to finish. I used a decorative stitch to machine sew the binding on.

-
Make three more placemats for the set.

FREE BONUS
I had extra bandanna fabric, so I made these very handy silverware rolls to go with my western décor theme.
Head over to my blog at www.lorimillerdesigns.com for this free tutorial to make them. They are also easy to whip up. They're also perfect for your BBQ or to throw in the basket for a picnic.
Have a great summer and enjoy those outdoor BBQs!
I would love to see your version of these summery placemats and napkins! Please share and tag AccuQuilt and Lori Miller Designs on Facebook OR @AccuQuilt and @lorimillerdesigns on Instagram.


