


Hi! It’s Jen from Dizzy Quilter, with a quilt I made using the Cleopatra’s Fan Die.
Have you seen this block? I thought I was pretty knowledgeable on old quilt patterns, but I have never seen this one before I saw it on the AccuQuilt website.
Once I saw it, I HAD TO HAVE IT! I’m a huge fan of curved piecing, but not a fan of cutting with templates. And this block only has, you know, ten different pieces.
My first step for this project was to load the block up into my EQ8 Software and fool around with the layout. I was so thrilled that I have Lori Miller’s EQ8 BOB Bundle.
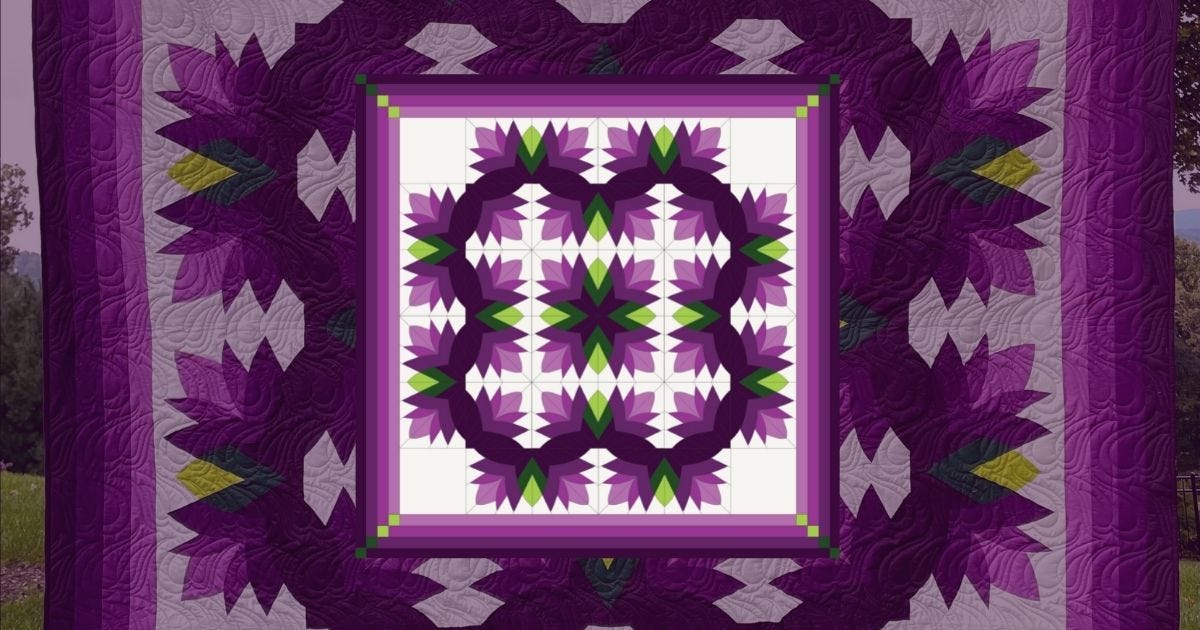
I had wondered how the block would look in a medallion setting, and with more than three colors.
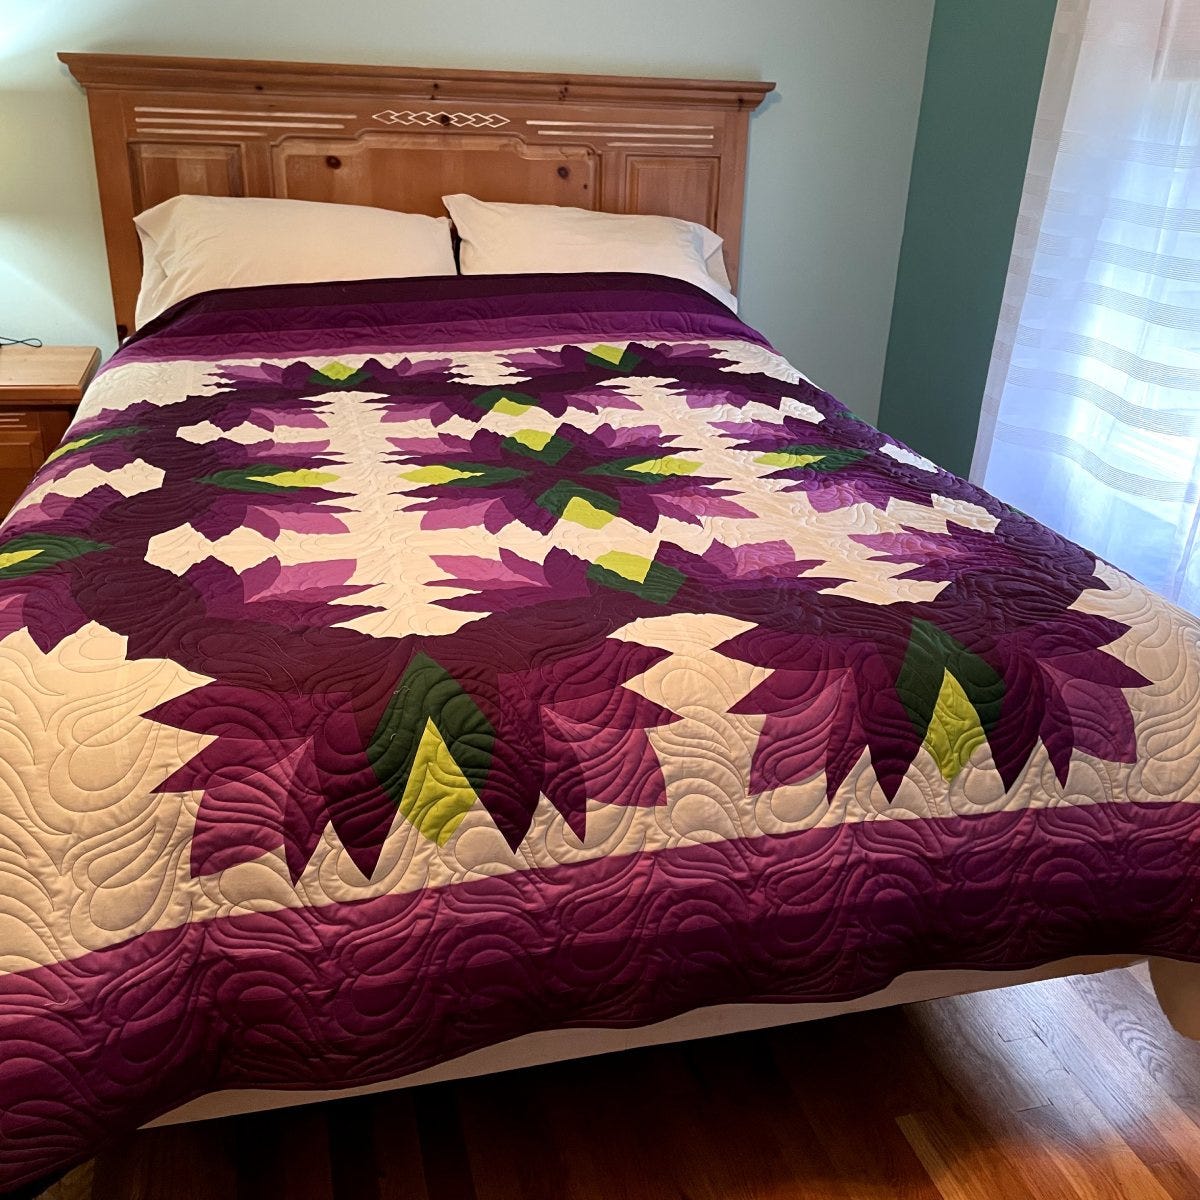
Check this out.
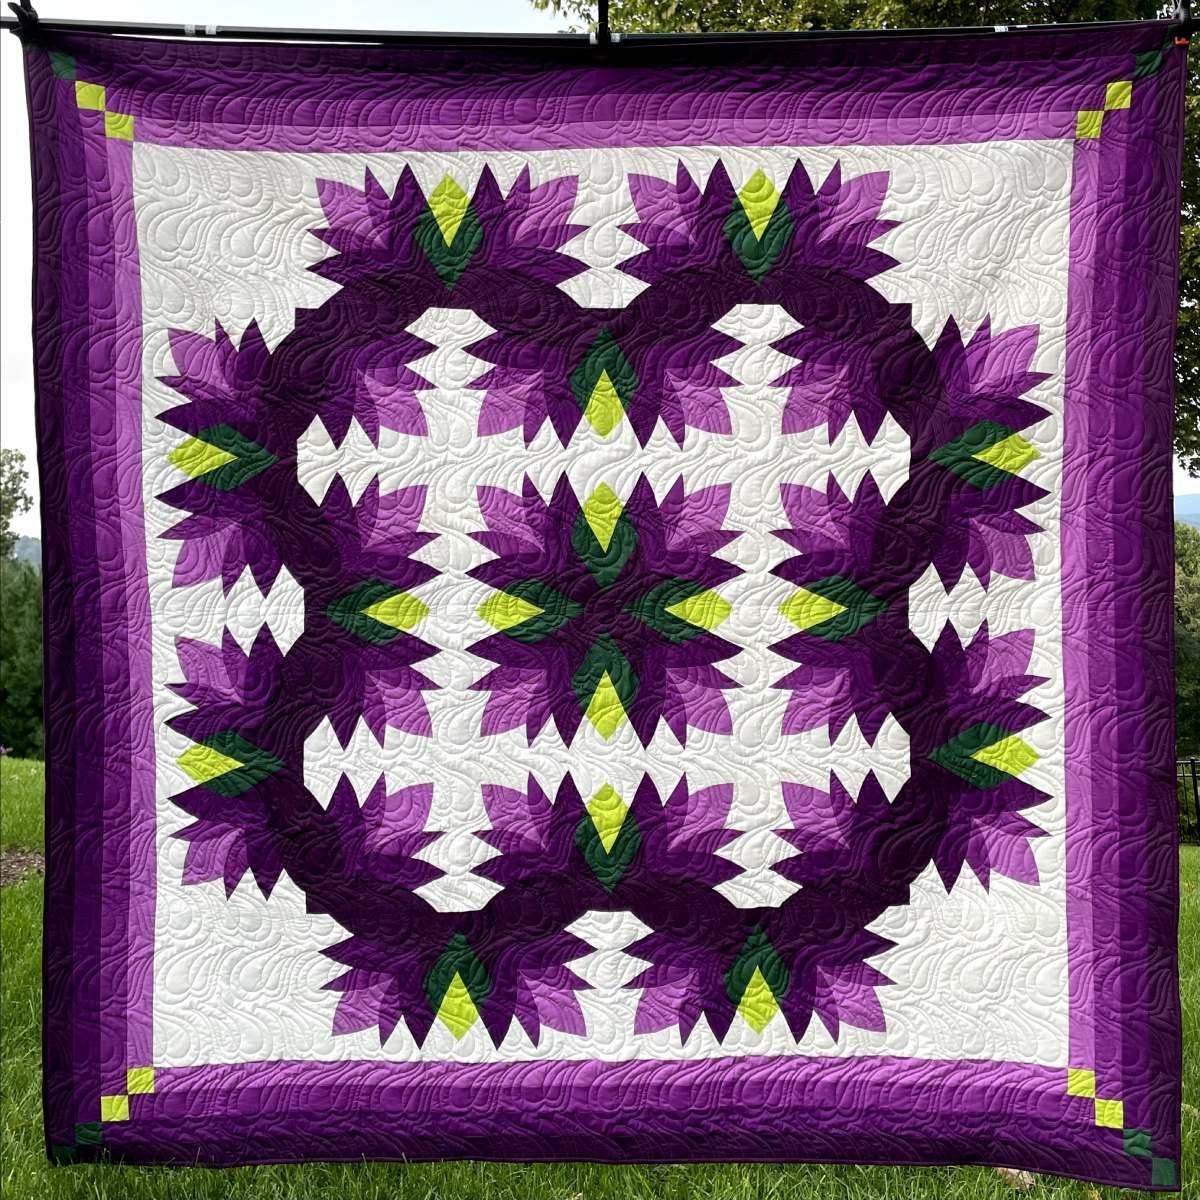
I call it: Cleopatra’s Fan Dance.
I decided on purple with a pop of green for my colorway. I could bedazzle you with talk of color harmony and color psychology, but we need to go cut some fabric.
Purple is my favorite color, and the green looks like leaves to me. I opted to use my favorite line of solids, Cotton Couture. The folks at Michael Miller Fabrics were kind enough to send me yardage in Cotton Couture to make this quilt.
Cotton Couture is like a mix between quilter’s cotton and lawn. It is a little finer than other cotton solids and very soft.
Of course, I decided to make a big quilt. This finished at 88” square. It’s a monster, and it took some time to put together, but it was so worth it.
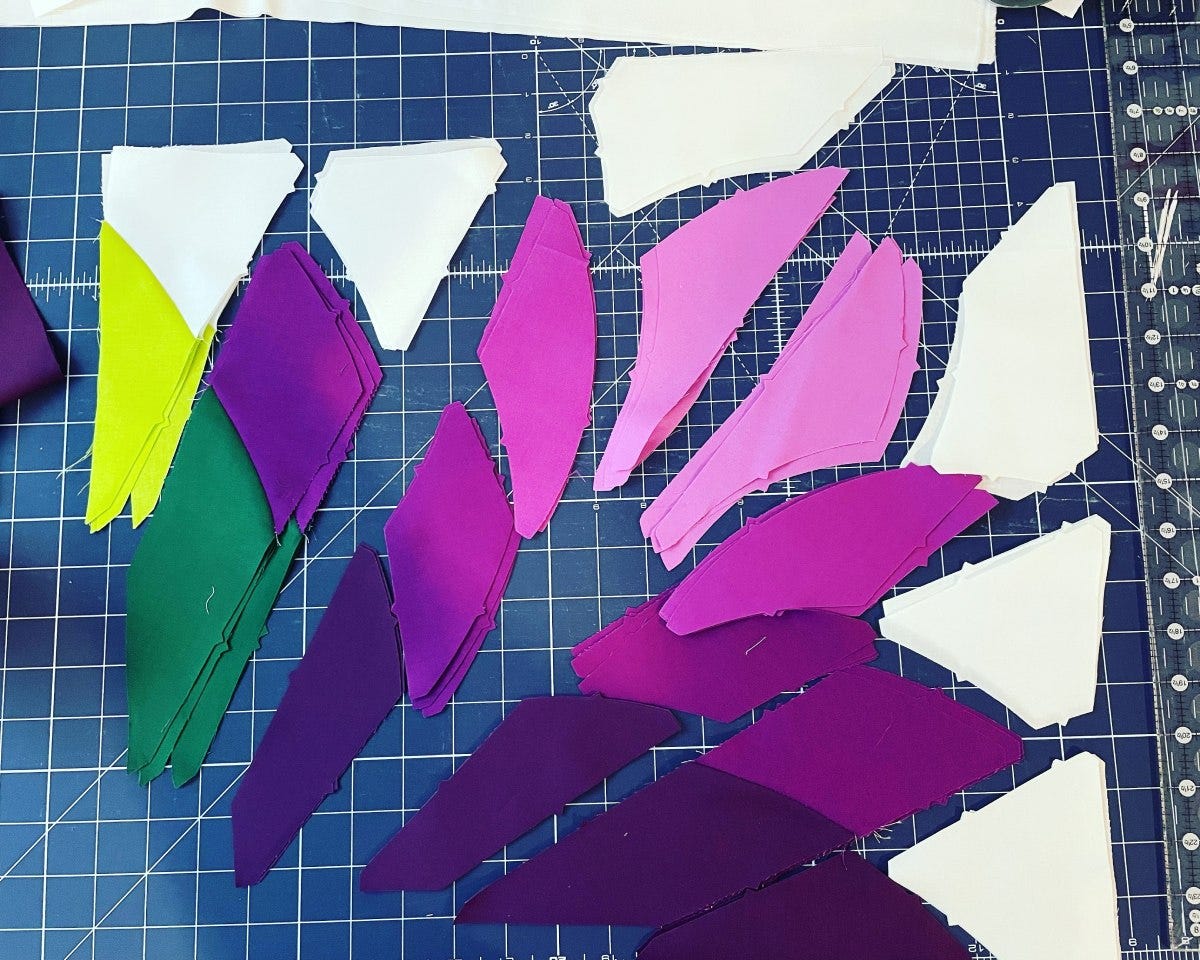
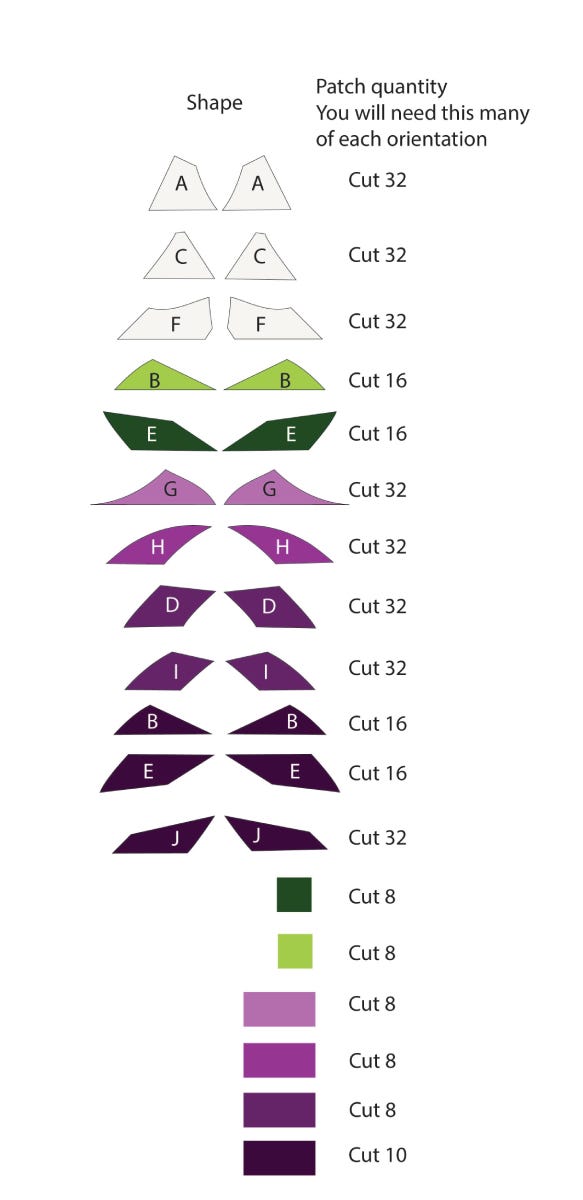
Cleopatra’s Fan is an intricate block. There are ten different shapes. And you have to cut them straight and reversed - so it is actually 20 different pieces per block.
It is really important to pay attention to how the pieces are lined up. I found it helpful to cut out the pieces for one set of four blocks at a time.
Note: When I tried to cut out all of the pieces at once, I often lost track and counted too many of some and not enough of others.
Prep Tips
There are four different colorations of the block to make this pattern come together. This quilt is definitely worth the time to put together.
- I’ve included a coloring page, in case you don’t have access to EQ8.
- Press all of your fabric, and spray it with starch to keep it cooperative.
- If you opt to use printed fabric, make sure you cut half of the pieces reversed. (That is one reason why I like to use solids - it removes one layer of complication.)
For my fabrics, I chose four different purples - going from light to dark, a dark green and light green, as well as a creamy background.
- It’s important that there is some contrast between each shade of purple. If you can, try to keep the steps about even in terms of color change.

I highly recommend laying the pieces out as they will go together.
It is really easy to get a piece flipped, then stitch it together wrong and get a new shape.
Pro Tip: I lay out all of my pieces as they will be in the block, and I put little notes on the stacks with the shape letters for good measure.
It doesn’t take too long before Shape I begins to look a lot like Shape D.
Piecing Directions
Okay. Now that I’ve given you my organization tips - are you ready to get piecing?
Dies Used
Tools
- Rotary Cutter
- Ruler
- Cutting mat
- Pins
- Sewing machine
- Iron
- Spray starch
Fabrics
All fabrics are Cotton Couture Solids by Michael Miller
- Soft White - 3 1/2 yards - Background
- Pine - 3/4 yard (Darker green)
- Lime - 3/4 yard (Bright green)
- Plum - 3 1/2 yards (Darkest purple)
- Violet - 2 1/2 yards
- Purple - 1 1/2 yards
- Sweet Lily - 1 1/2 yards (Lightest purple)
Fabric Preparation
Press and starch your fabric. I prefer to use a spritz of Niagara Spray Starch as I iron.
Pre-cut your Shapes
I like to rough cut my shapes before running them through the dies. You certainly can skip this step and fan-fold longer cuts, but I find this step keeps me organized and minimizes the number of miscut shapes I have at the end of the project.
Soft White
- Corner Blocks - 4 - 12.5” squares
- A, C, F Unit - 64 - 5.25” x 14”
Pine
- Corner Stones - 8 - 2.5” squares
- E - 32 - 3.5” x 8.25”
Lime
- Corner Stones - 8 - 2.5” squares
- B - 32 - 3” x 7”
Plum - darkest purple
- Border - 10 - 2.5” x WOF
- J - 64 - 3.25” x 7.25”
- E - 32 - 3.5” x 8.25”
- B - 32 - 3” x 7”
Violet
- Border - 8 - 2.5” x WOF
- D - 64 - 3.5” x 6.75”
- I - 64 - 3.75” x 5.75”
Purple
- Border - 8 - 2.5” x WOF
- H - 64 - 3.5” x 7.5”
Sweet Lily - lightest purple
- Border - 8 - 2.5” x WOF
- G - 64 - 3” x 9”
Cut Shapes
If you are using print fabric, make sure that half of your pieces are face-down on the die. For instance, on Piece A, you will need 32 face-up, and 32 face-down - so you get the reversed shape.
Block Diagrams
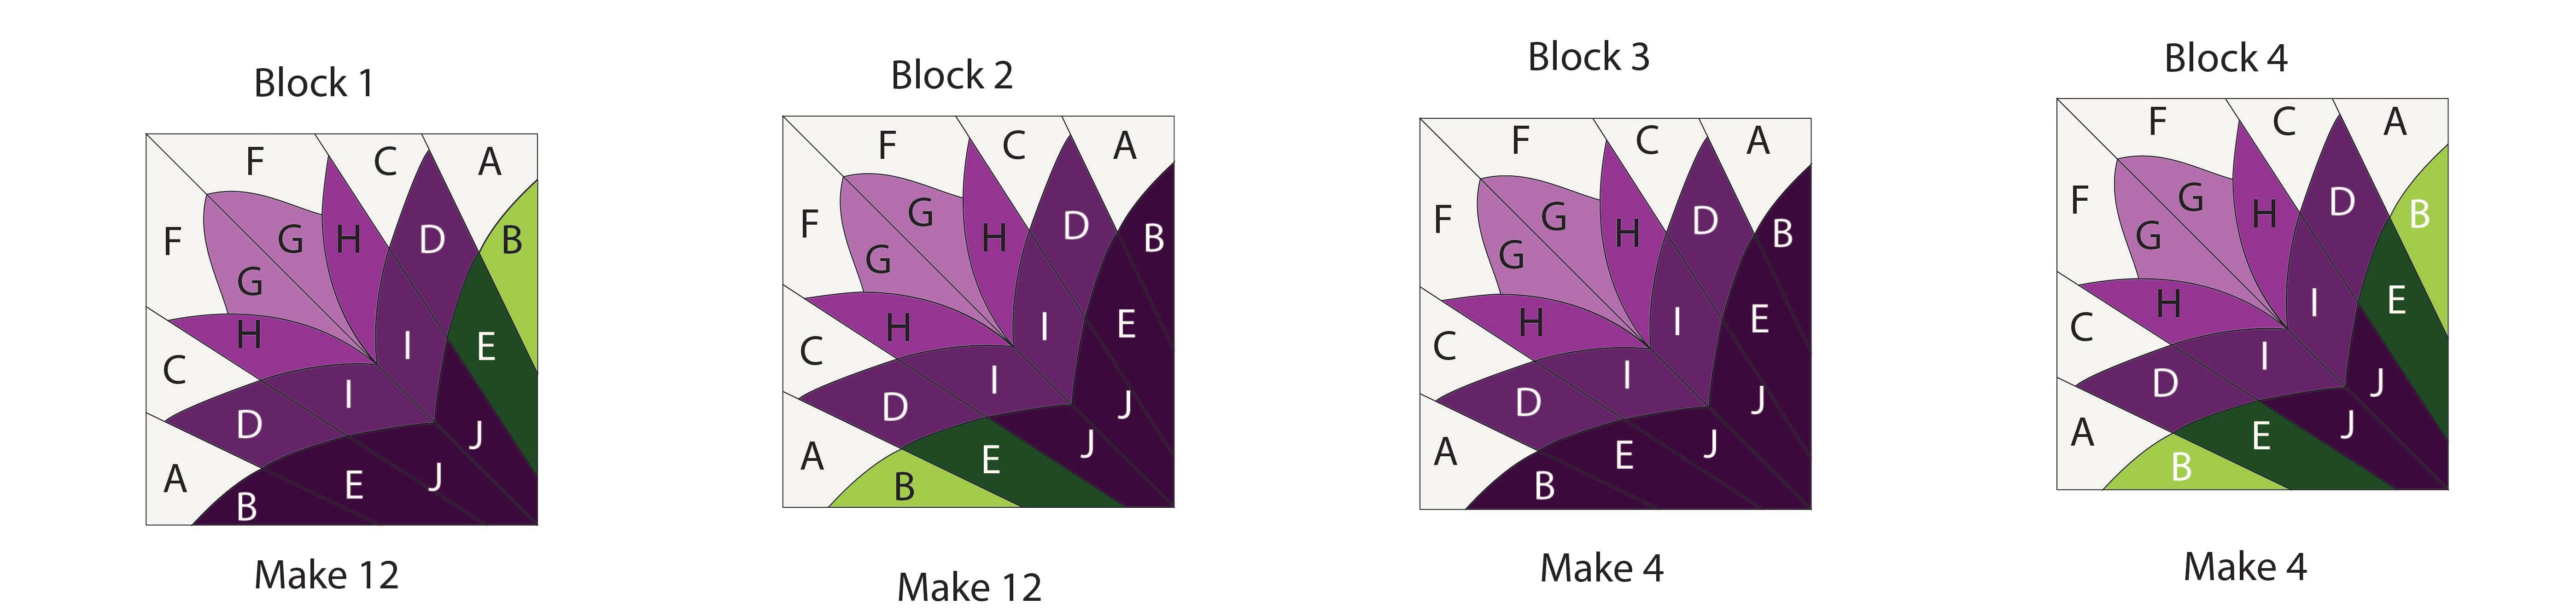
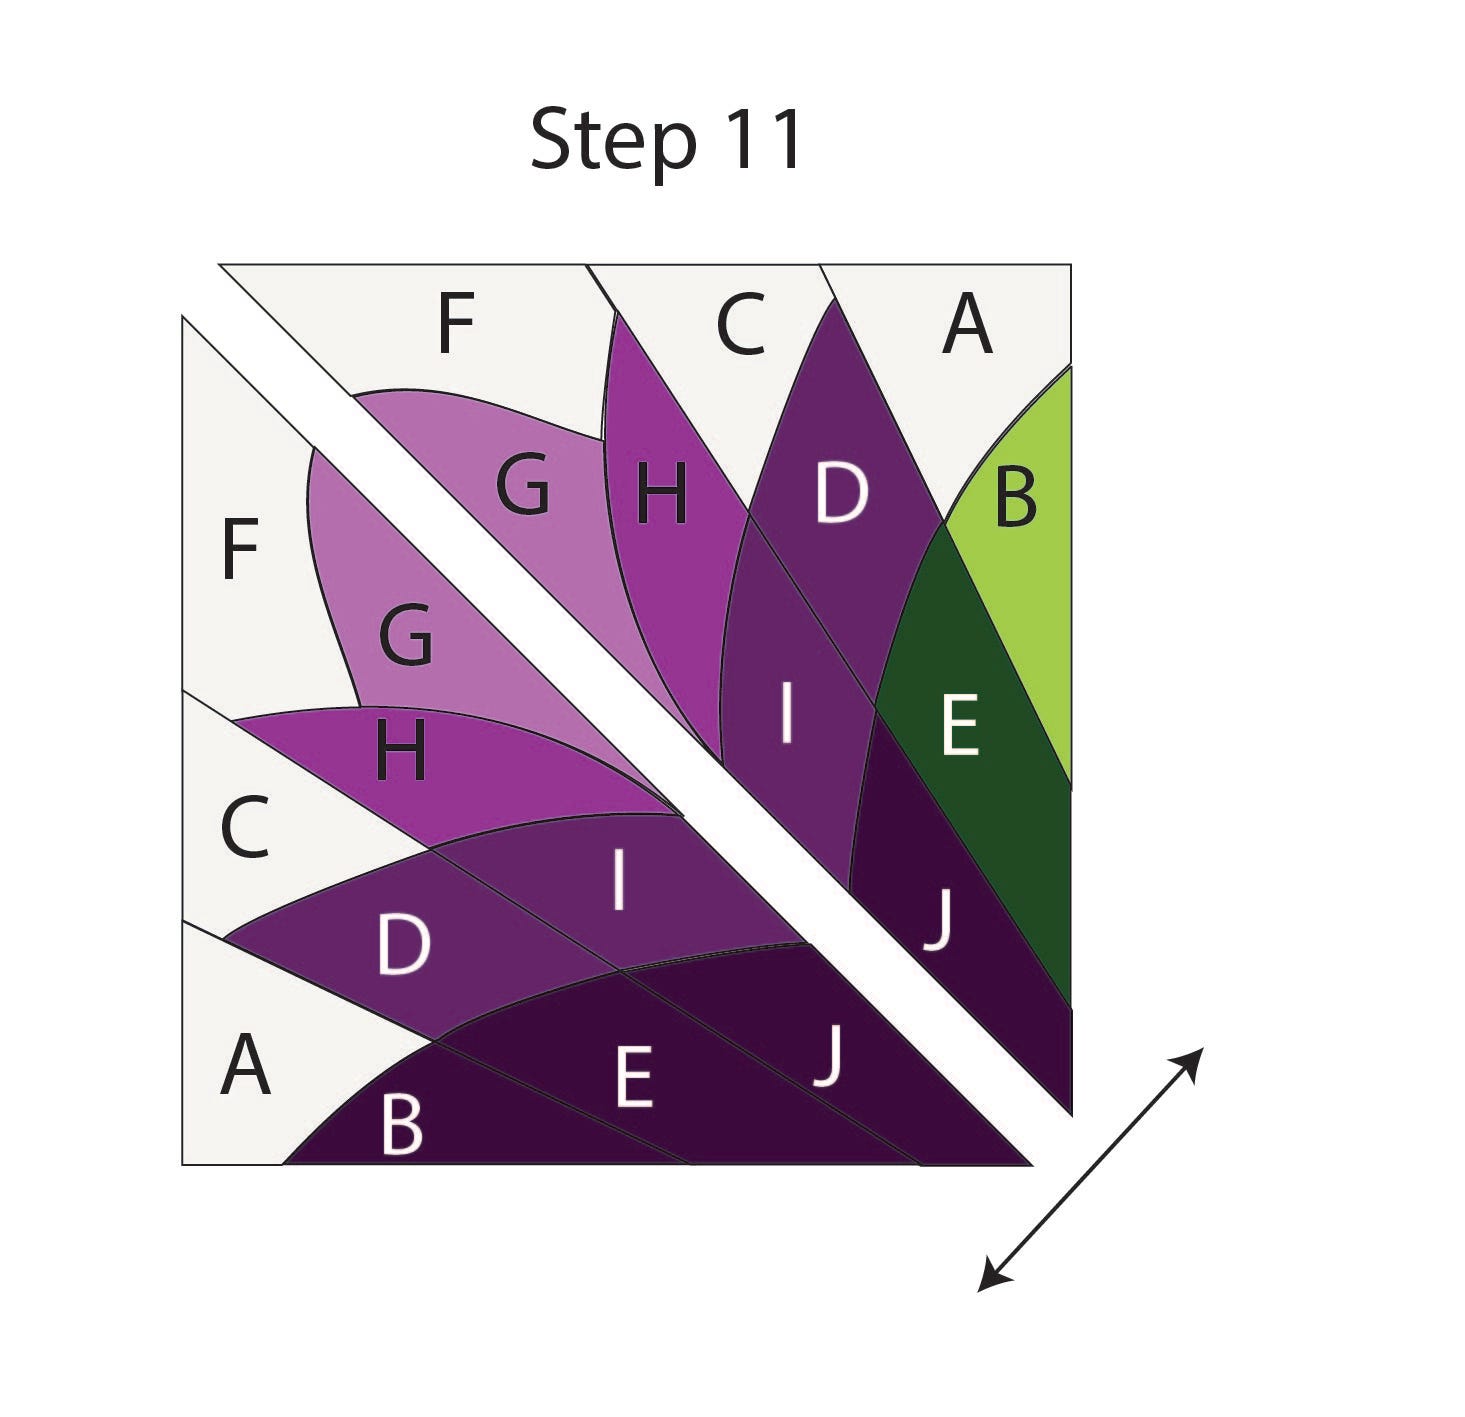
Construct Block 1

- Layout the pieces for Block #1 in the order they will be assembled in. Notice that pieces B and E are different colors on the left and right sides.
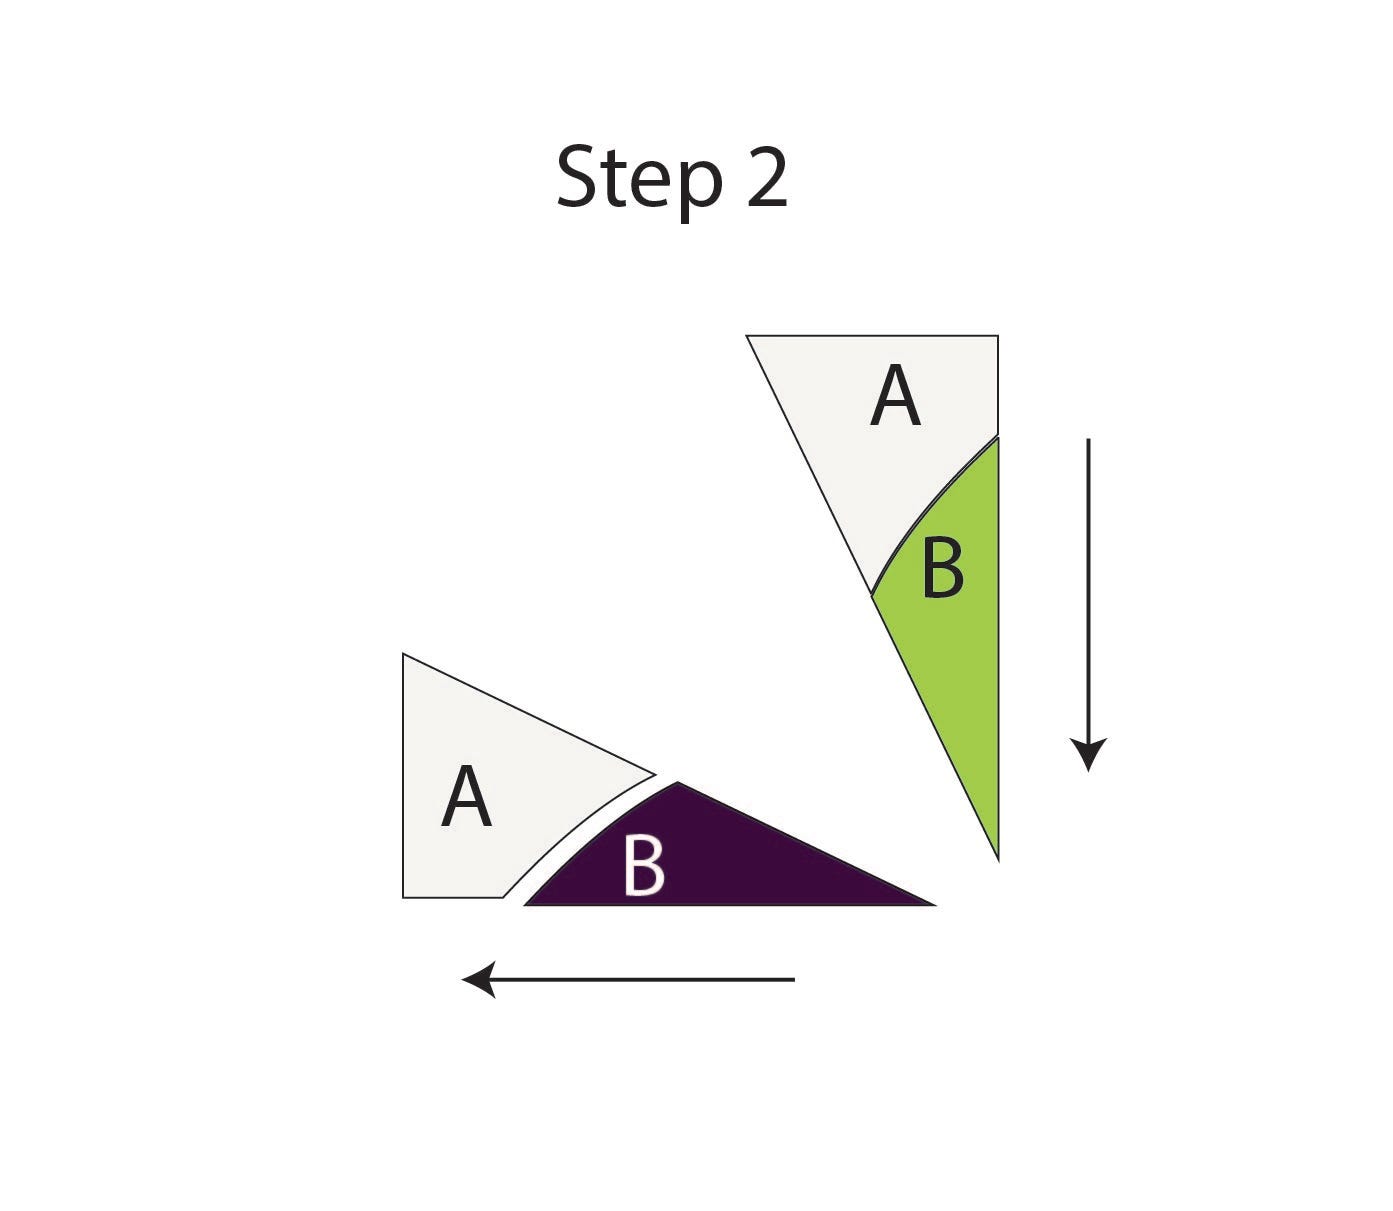
- Sew shape A to shape B in plum. Sew shape A to shape B in lime. Notice that they create mirror images. Press towards shape A on the left side and press towards shape B on the right side. Make 12 sets of each.
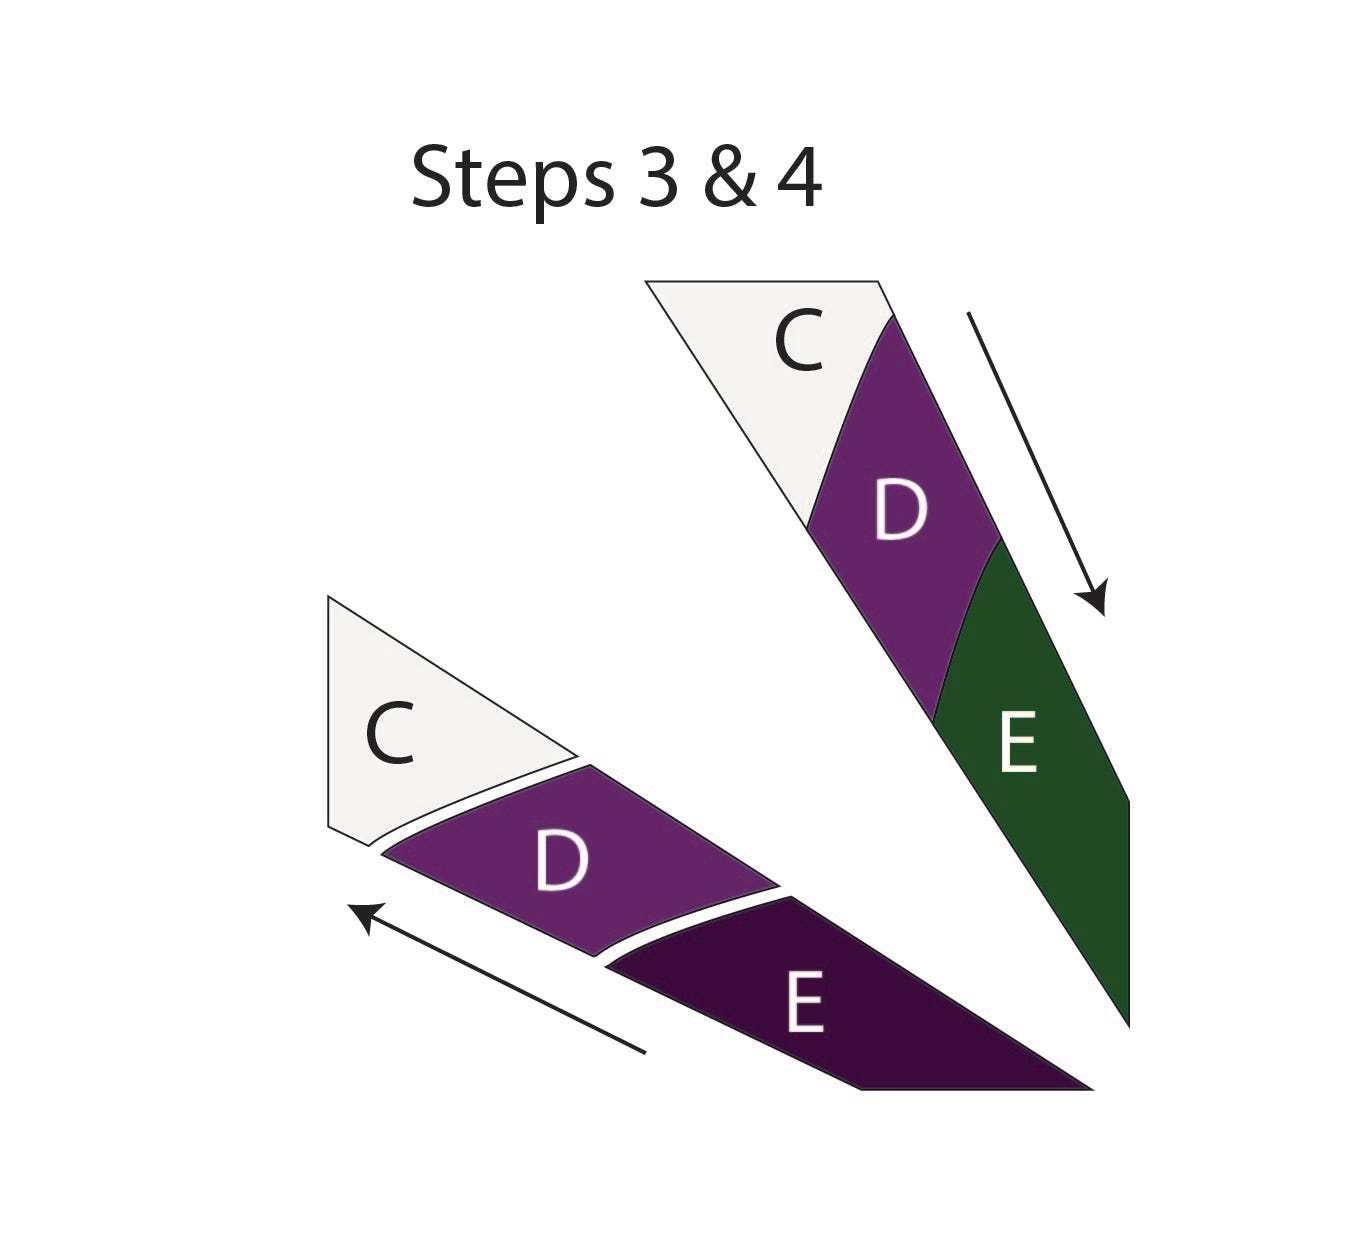
- Sew shape C to shape D. Press towards shape D on the left side and press towards shape C on the right side. You will create 12 sets going in one direction, and 12 sets going in the other direction.
- Sew shape E to unit C/D. The 12 units on the left side will have a plum E, while the units on the right side will have a pine E. Press towards shape E on the left side and press towards Unit C/D on the right side.
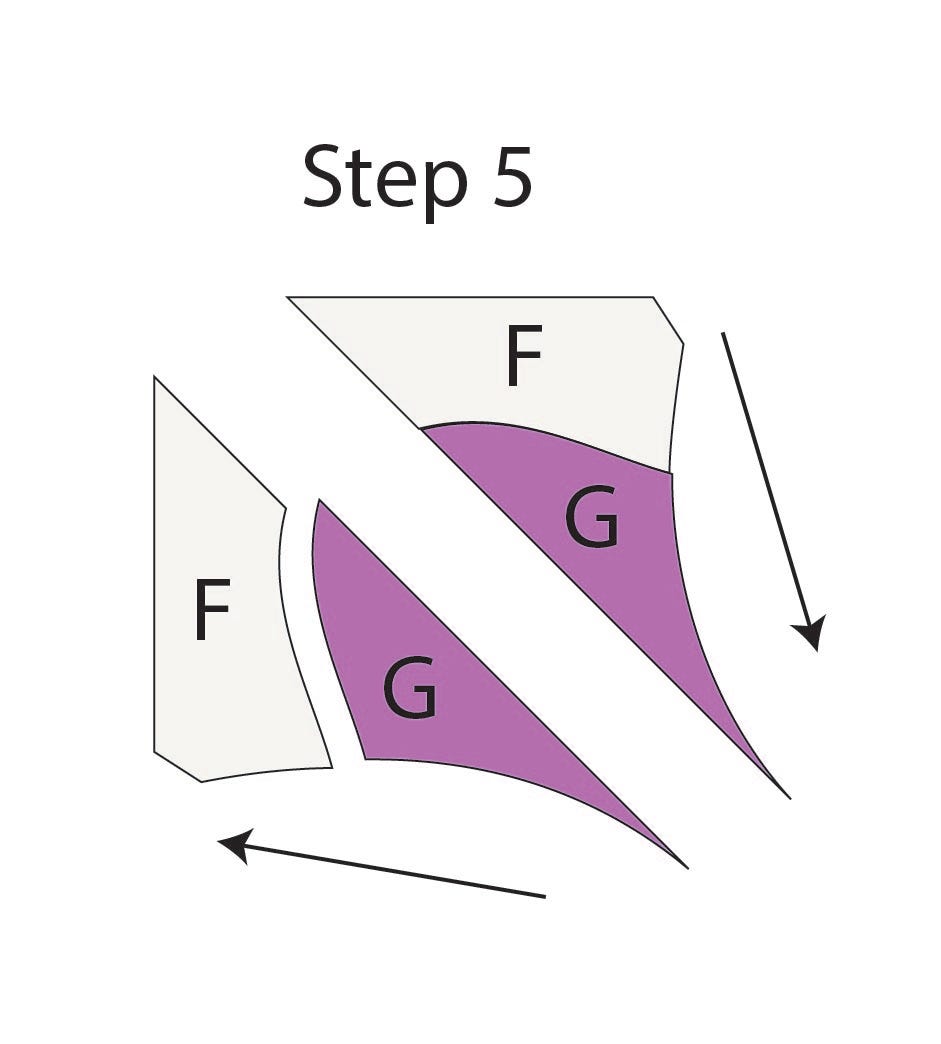
- Sew shape F to shape G. Press towards shape F on the left side and press towards shape G on the right side. Make 12 sets going in each direction.
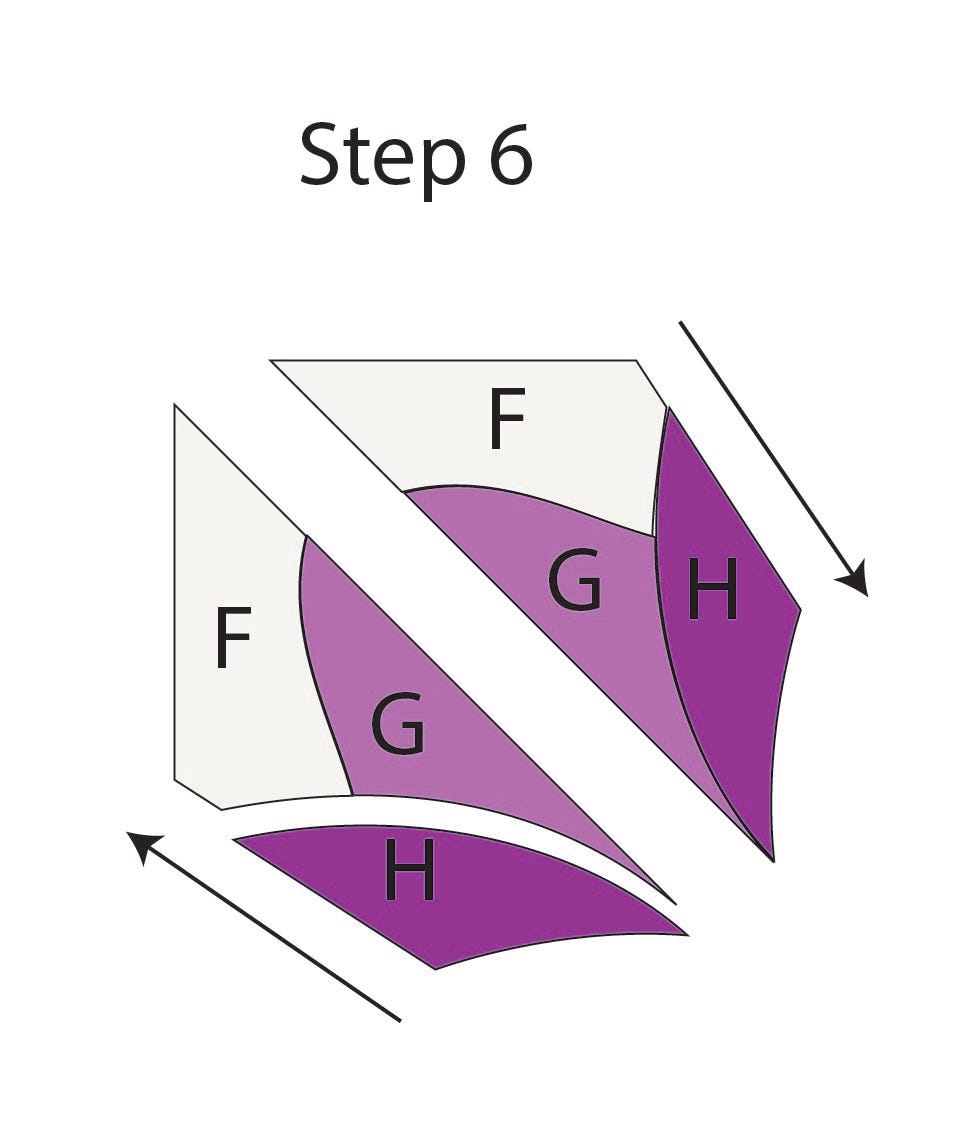
- Sew shape H to unit F/G. Press towards shape F on the left side and press towards unit F/G on the right side. Make 12 sets going in each direction.
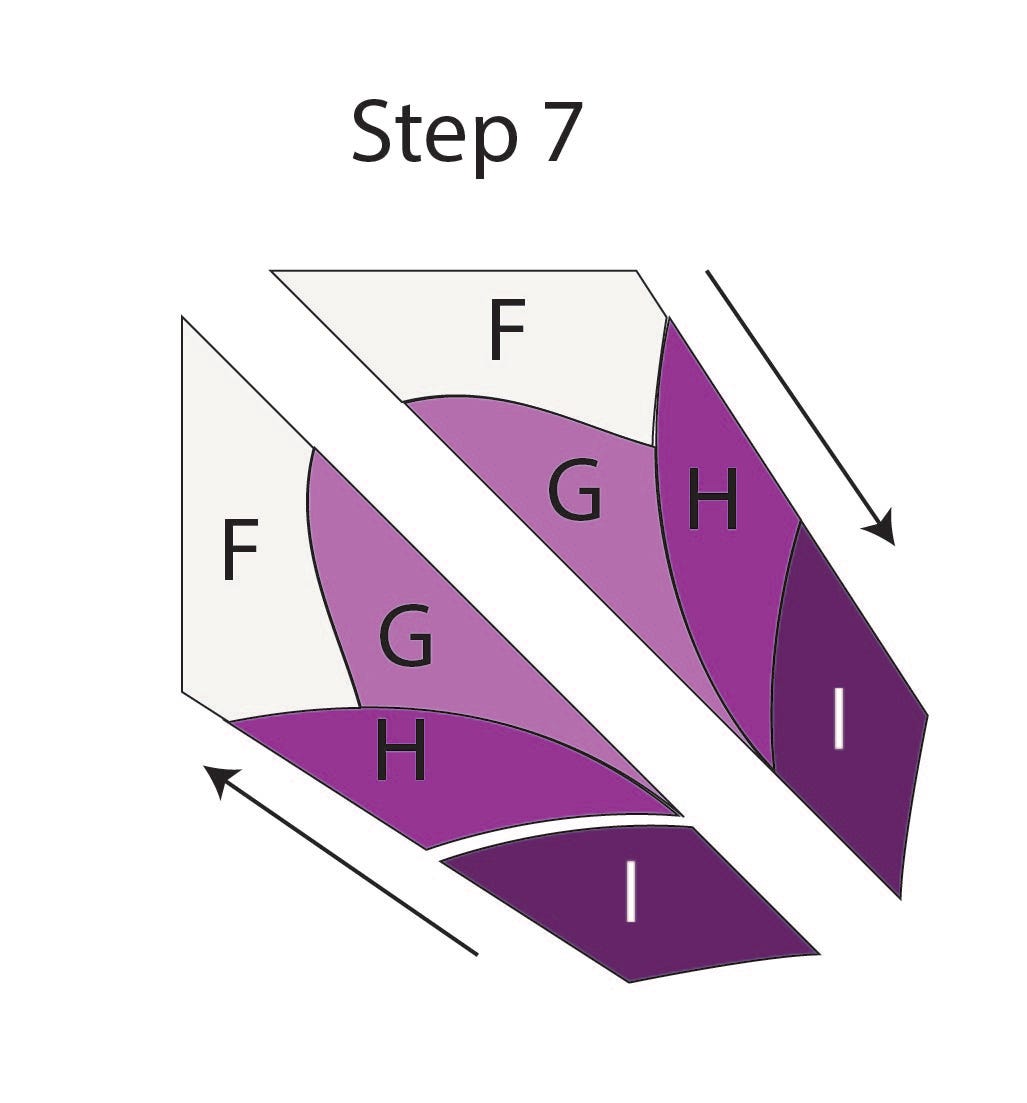
- Sew shape I to unit F/G/H. Press towards shape I on the left side and press towards unit F/G/H on the right side. Make 12 sets going in each direction.
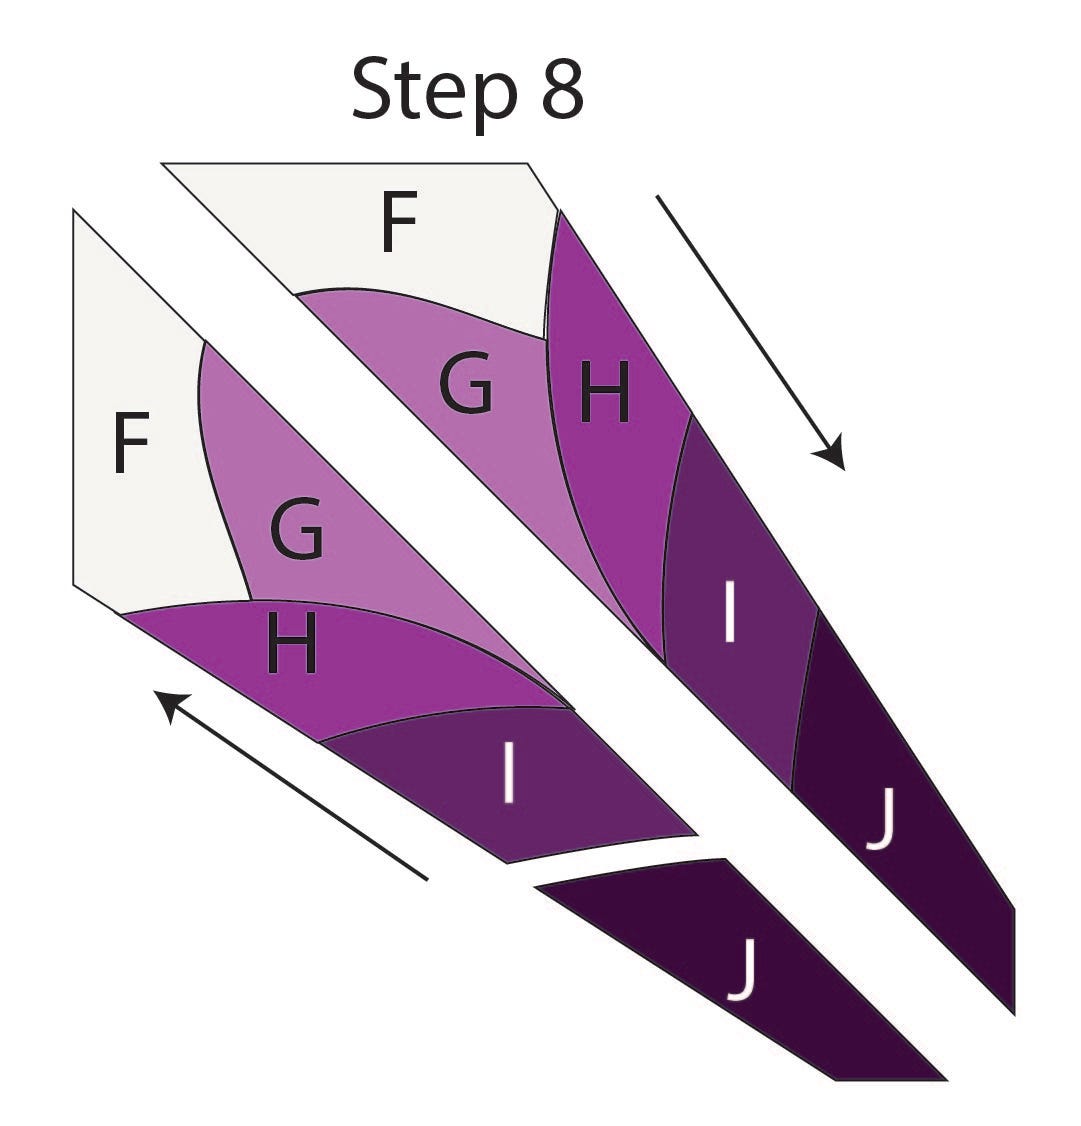
- Sew shape J to unit F/G/H/I. Press towards shape J on the left side and press towards unit F/G/H/I on the right side. Make 12 sets going in each direction.
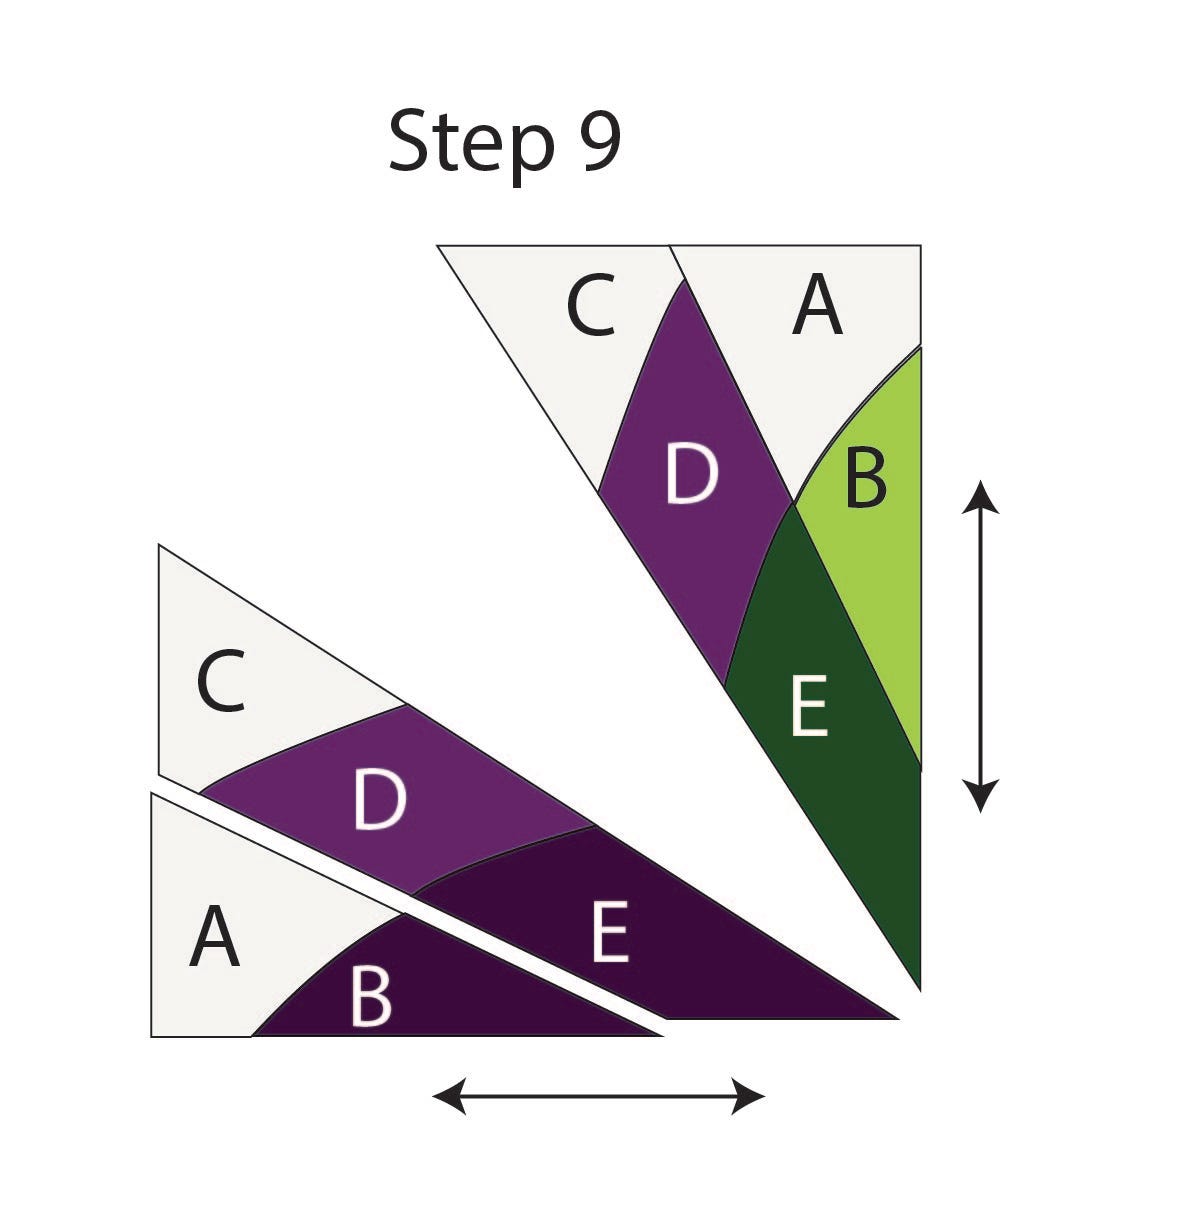
- Sew unit A/B to unit C/D/E. Press seams open. Make 12 sets going in each direction.
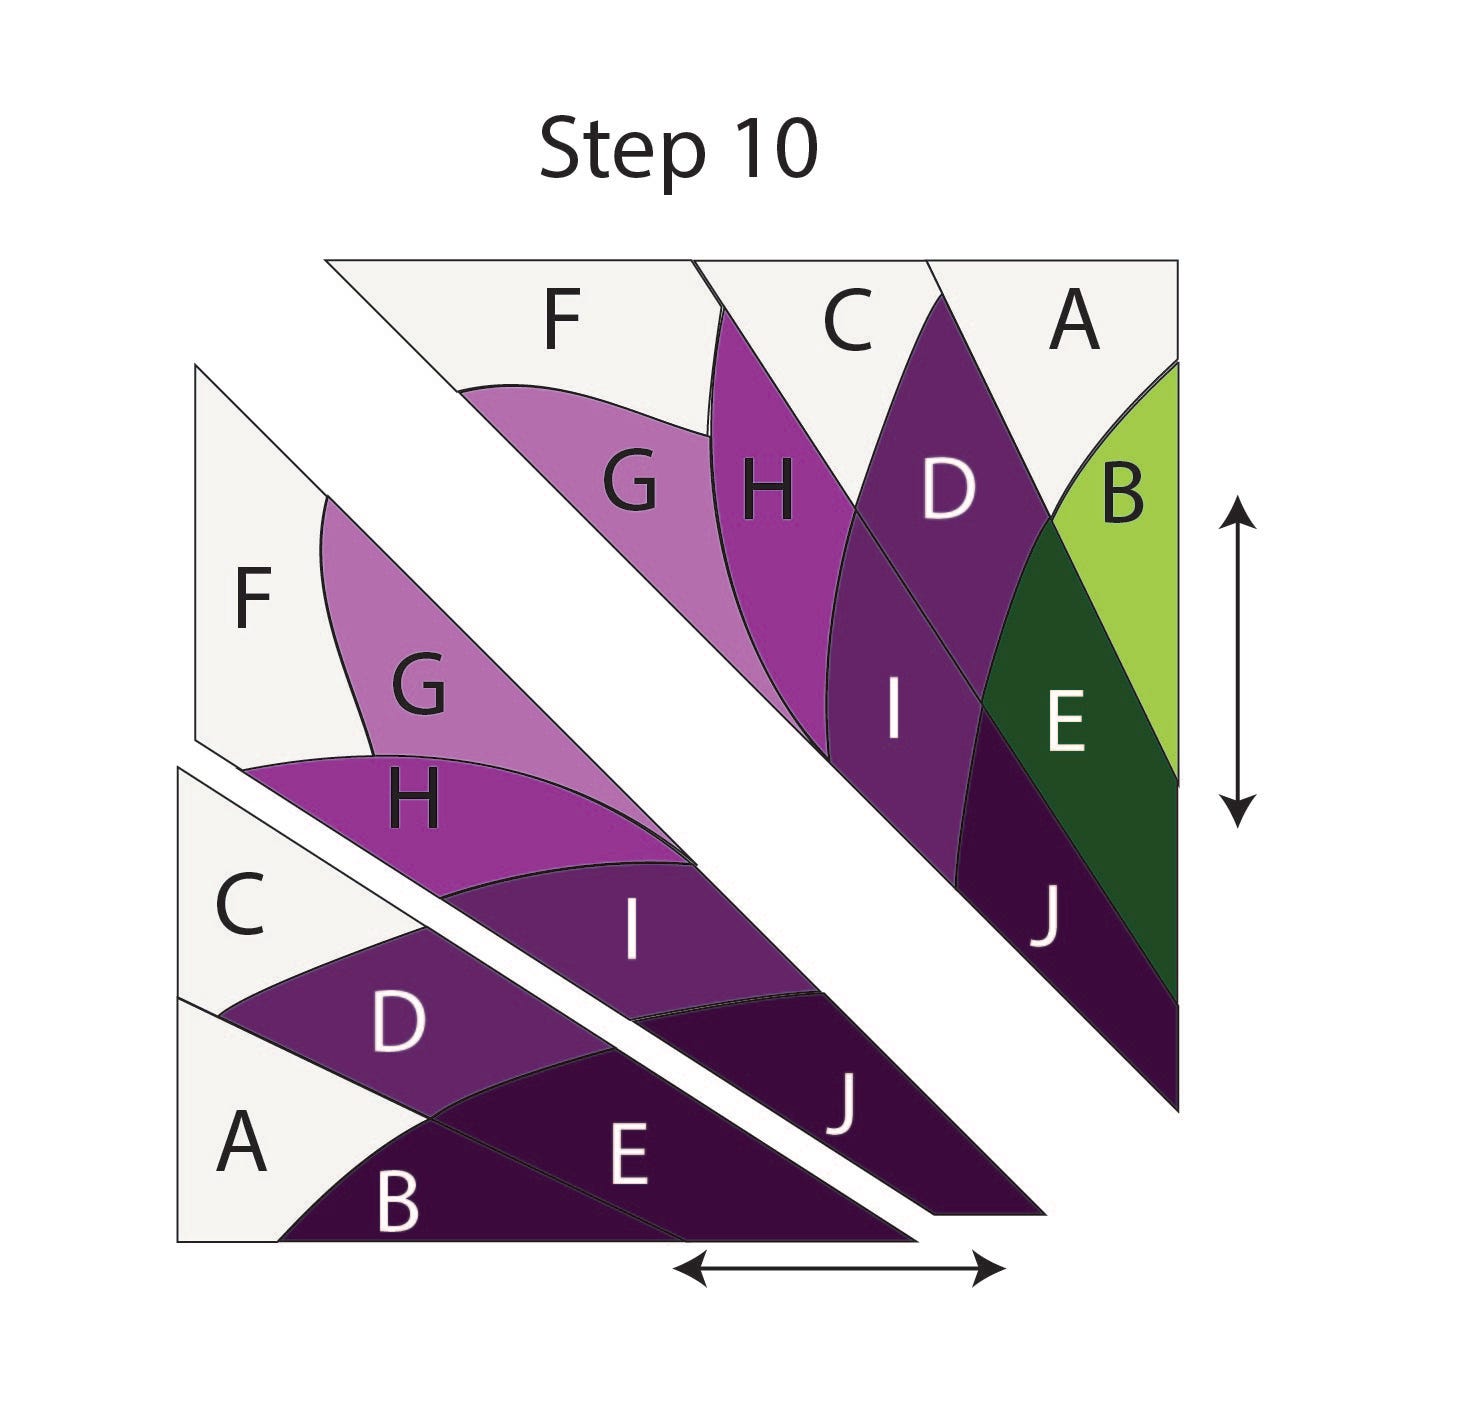
- Sew unit A/B/C/D/E to unit F/G/H/I/J. Press seams open. Make 12 sets going in each direction.
- Sew block halves together. Press seams open. Make 12 blocks.
Complete construction for Blocks 2 - 4, following the same construction order as Block 1, changing color placement as needed.
Top Assembly
Once all of your blocks are constructed and pressed, assemble your quilt as per the diagram.
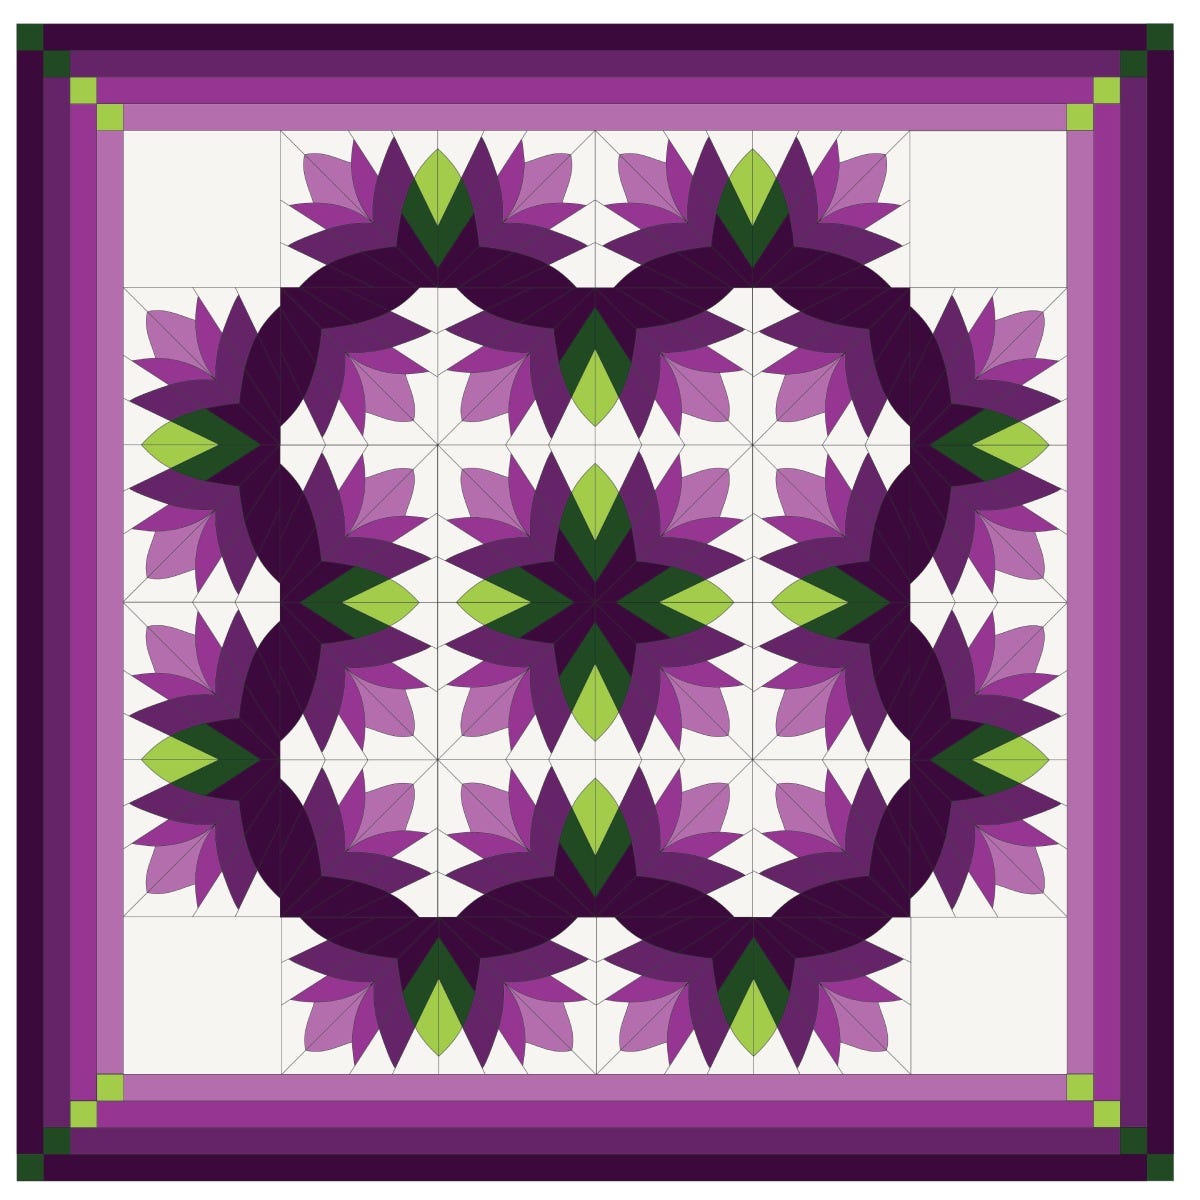
Don’t forget the solid blocks in the four corners.
Press seams on odd-numbered rows to the right and even-numbered rows to the left. That way you can nest your seams and get nice, accurate block intersections.
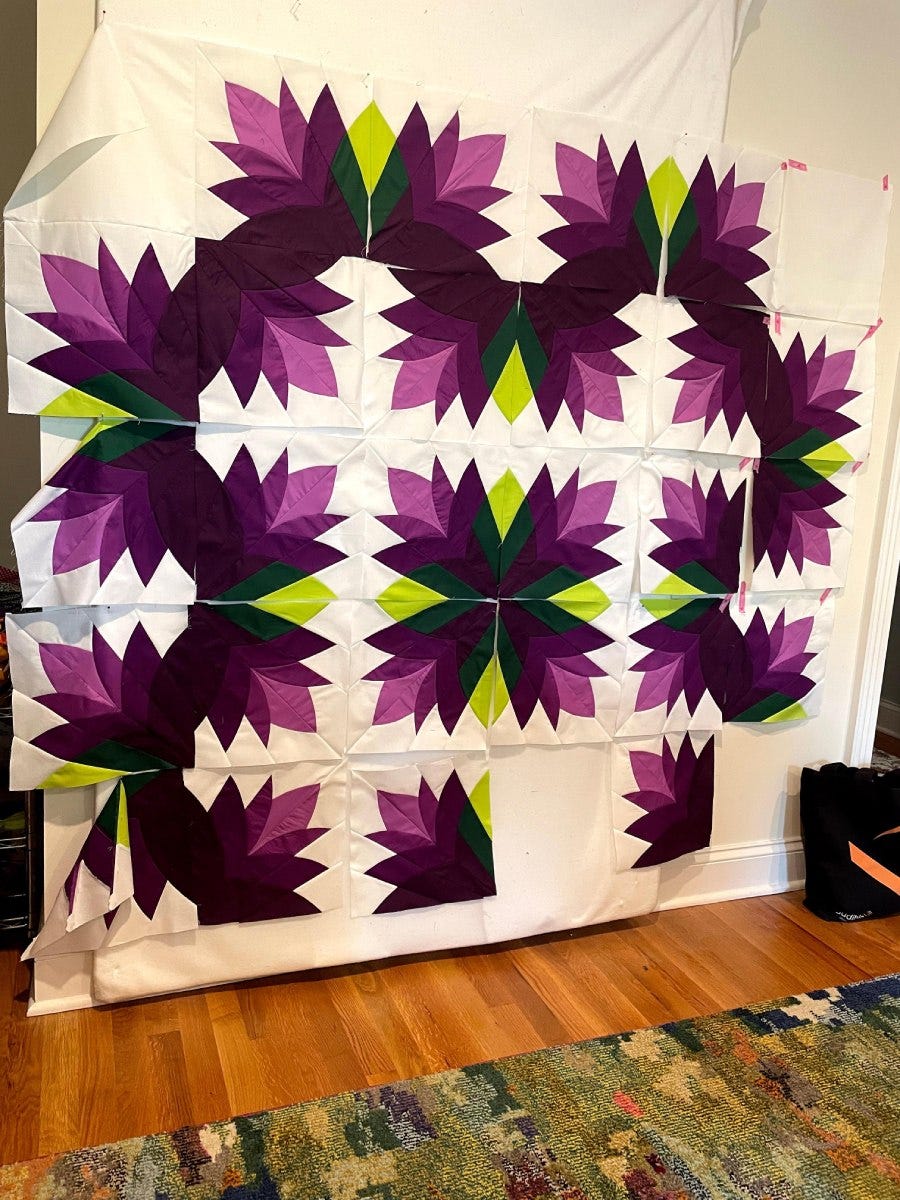
This bad boy challenged my tiny design wall.
Borders
Once your top is assembled and pressed, measure across the middle to make sure it measures 72.5” across. If it does not, take note of that measurement - you will use that for your border length.
Border 1
- Sew 2 pieces of 2.5” x WOF Sweet Lily (lightest purple) to each other, end to end. Trim to your quilt measurement. For me, it was 72.5”. Make four sets.
- Attach two borders to the top and bottom of your quilt top. For the most accurate piecing, fold your border in half and half again, and give the fold lines a quick press with your iron. Do the same with your quilt top, only press a little bit into the top to give yourself a registration mark. Use the ½ and ¼ marks to line up and pin your borders to your top. If there is any fullness between sections, just ease it in as you piece. If one side has fullness, put that side down on the sewing machine and allow your feed dogs to work it in.
- Press.
- To the remaining border strips, add cornerstones in lime to each end of the strip.
- Repeat step 1 & 2.
- Press.
Borders 2 - 3
Repeat steps 1- 4. Remember, I love you and want you to have an awesome quilt.Note: Border 2 should measure 76.5". Border 3 should measure 80.5".
Border 4
This may require an additional bit of fabric - depending on the width of your yardage. That is why I have you cut two additional strips.
Note: It should measure 84.5".
Border Approach
You may be asking, "What if I just sew long strips onto my border and cut off the excess? "
We have all been there, done that. For most of us, the quilt turned out to be fine. That is because either we got lucky, or we didn’t notice the rippling in the border.
Once I started quilting on a longarm machine, I realized the difference between a well-made quilt top and one that was made with enthusiasm...but not necessarily a lot of attention to detail.
As you may have guessed, I am a detail-oriented quilter. I also like to enter my quilts into shows, and I like them to hang flat.
If the idea of measuring, folding, pressing, and pinning turns you off. That's ok. You don’t need to do it. Just remember, your quilt might have a little bit of ruffle and wave in the border.
Plus, if you send it out to a longarmer, it may cause them some trouble as they quilt it. There may be pleats in your finished border, but it will be a finished quilt. And...it will still be fantastic! No one has decreed that all quilts must be perfectly flat and square.
Finish Your Quilt
Quilt and bind as desired!
I used a pantograph called “Patina” from Urban Elementz to finish my quilt top. I also used Hobbs Tuscany Wool batting for a luscious amount of texture.
With curved piecing, where there can be some fullness and rippling, fluffy batting is my friend.
Thank you so much to AccuQuilt and Michael Miller Fabric for supporting my creativity. I love working with my industry partners to design beautiful quilts.
If you make this quilt, please tag me on social media so I can cheer you on! I'm @jenstrauser on Instagram. The hashtag for this quilt is #cleopatrasfandance.
Enjoy your quilting!


