
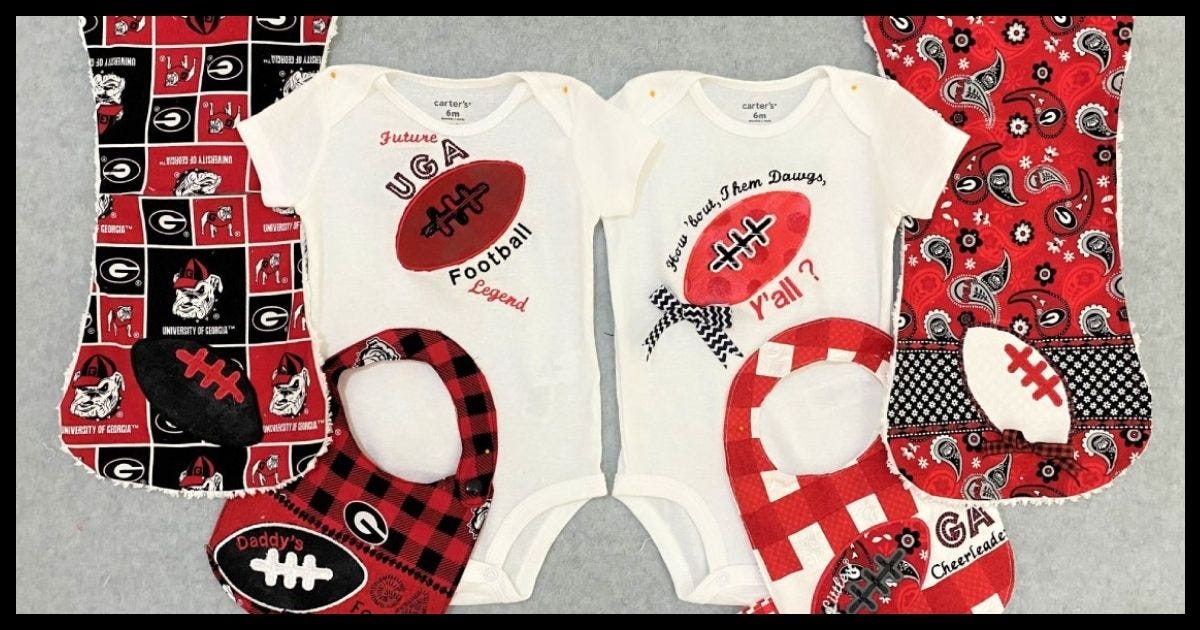
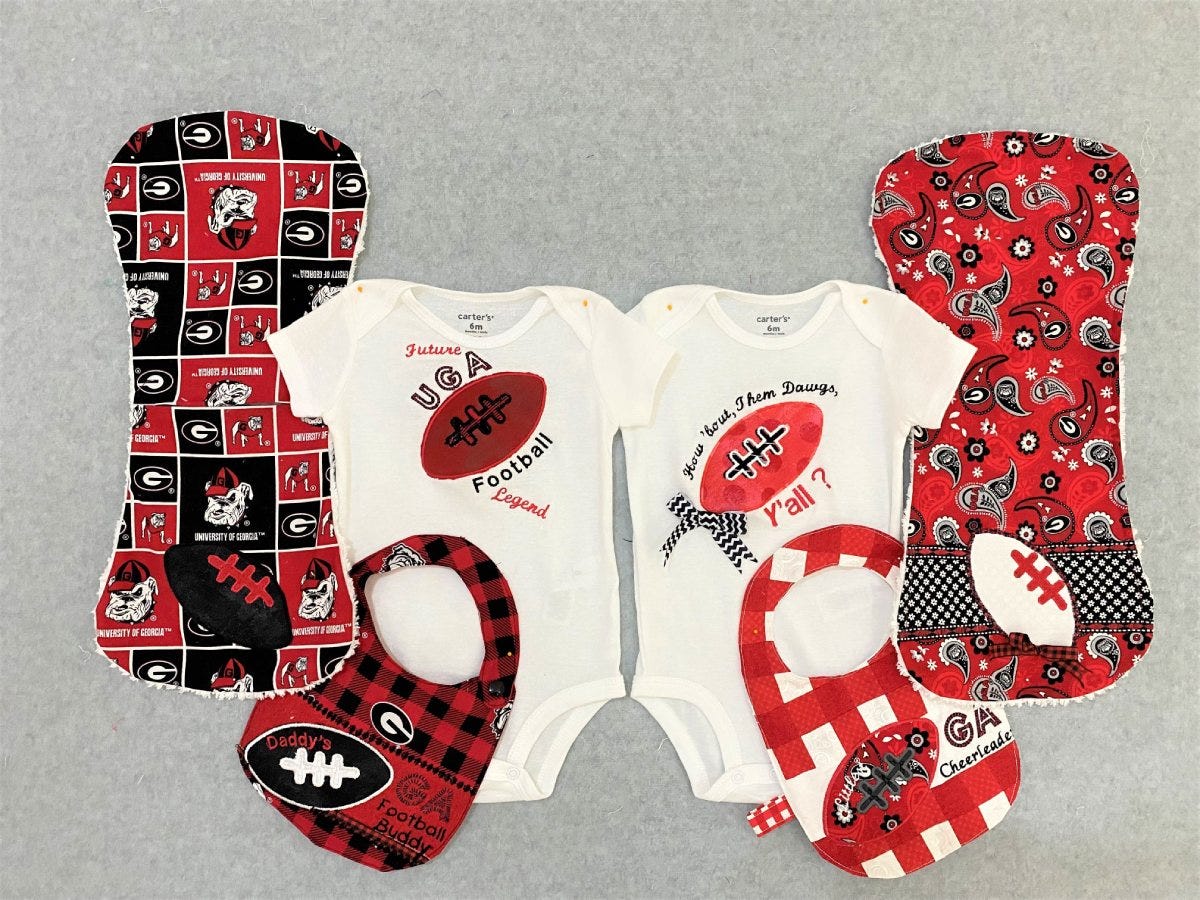
No matter if your newest addition is a bouncing baby boy or a sweet little princess, a custom onesie using the football and football laces on the AccuQuilt Sports Medley Die will make them ready for game day.
I'm sure you have already figured, I am a Southern girl. And if there's one thing I'm sure of it is that Football is a religion in the South. We may worship at church on Sunday, but on Friday nights (and most of Saturday) we are rooting for our hometown boys of fall.
When the air turns crisp, and the stadium lights illuminate the horizon, small towns across the South roll up the sidewalks to cheer on the home team at the high school football stadium.
Everybody bedecked in spirit ribbons, lettermen jackets and well-worn baseball caps converge on the stands to celebrate the touchdowns and agonize over a quarterback sack or turnover on downs.
This sense of community, and team spirit, lay the foundation for many folks to form deep abiding ties with their college Alma Maters.
God forbid you should marry a graduate from the University of Florida or Tennessee if you are a Georgia Bulldog. When this happens (as it often does) Southerners refer to this with Biblical connotations.
We say it's a "house divided." One spouse rooting for the Dawgs and the other for Ol' Smokey or the Gators.

It is with this background in mind that when I saw AccuQuilt's Sports Medley Die.
I knew this die was going to make some fabulous spirit wear. I chose to make onesies for the smallest football fan in the family. Using the sports medley die, and some licensed University of Georgia fabric, I made custom onesies.
Pro Tip: Make sure you stop by AccuQuilt's website and download the complimentary Sports Medley Embroidery files to use in this project.
DIY Sports Onesie
I bought Carter's onesies at a local department store. They came in a pack of four, and the only solid color ones I found were completely white. You can choose long or short sleeves.
Pro Tip: I recommend that you use size 6 months or bigger. The baby outgrows newborn and 3 months quickly and they are both a little small to fit into the embroidery hoop.
Steps
Here are the steps I used to create custom football Spirit wear.
- First, to die cut the footballs, I trim the fabric to a 5 1/2" X 3" piece.
- I trimmed the fabric of the lacing to 1 1/2" X 3".
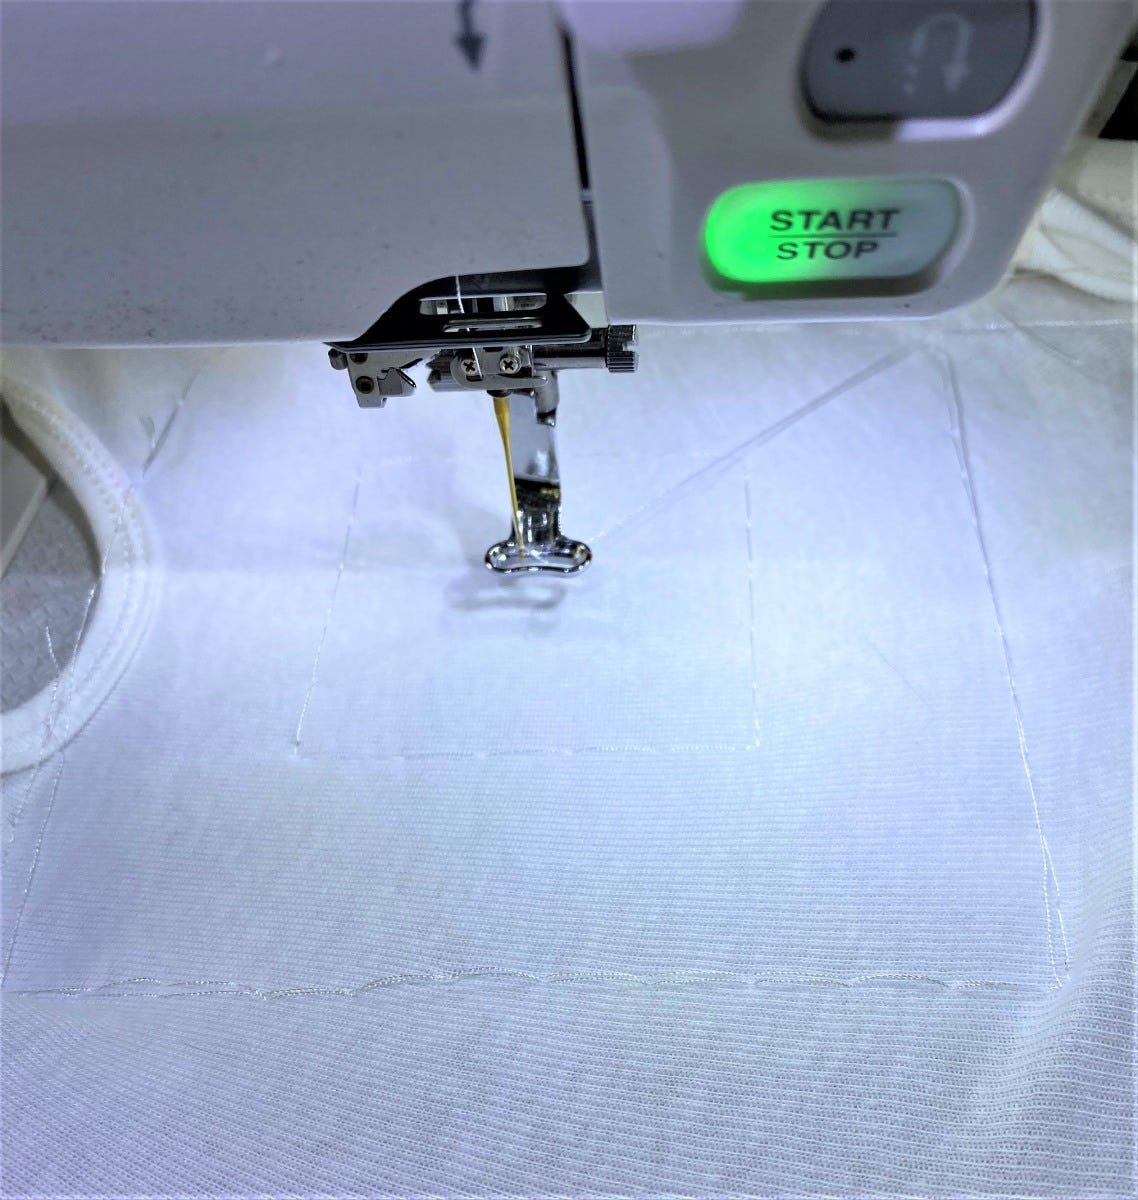
Pro Tip: Since we are embroidering the football to stretch fabric, I do not advise using fusible webbing to attach it to the onesie. I use embroidery tape to hold the shapes in place on the front of the onesie. The tape I like best is the Kimberbell Embroidery Tape. It does not make your needle sticky and it comes off easily without pulling out the stitching.
Pro Tip: I also recommend a ballpoint needle for sewing on stretch fabrics. Regular machine needles can cause holes and runs in your project if the fabric is stretchy.

Pro Tip: Make sure you stop by AccuQuilt's website and download the complimentary Sports Medley Embroidery files to use in this project.
- When you download the files for embroidery you need to know which format of embroidery designs your embroidery machine can read. I sew on a Janome so my embroidery files are JEF.
If you are unsure of the file format you need, check your machine's manual it will be listed there. If your machine has the embroidery unit to the left-hand side, you will need to open the side seams of the onesie and then resew them after the embroidery is done.
Pro Tip: You will need to use a stabilizer for embroidery.
The best rule of thumb is you need a layer of stabilizer for every 10,000 stitches in a design. All of my designs with the AccuQuilt embroidery designs stitch out at between 5,000 and 8,000 stitches.
- So for this project, you will need one layer of a cutaway mesh stabilizer. It needs to be cut away since the fabric is stretchy and the mesh is the thinnest and most comfortable against the skin.

- I mount the stabilizer in the hoop and then float my onesie on top of the hoop.
If you are unfamiliar with this method, floating is hooping only the stabilizer and allowing the garment or fabric to sit on top of the hoop.
When you float a fabric you should always use the embroidery basting to keep it in place throughout your construction.
So, before you begin your design, baste the onesie to the top of the hooped stabilizer. To give the onesie some additional support, I pinned through the outside edges of the onesie. I pinned it to the stabilizer on the outside edges of the hoop.
I also used the magnets included with my embroidery machine to give additional support.
- I chose to accent my football with some cute sayings. I just used the built-in alphabets on my embroidery machine.
If you need inspiration for what to say, you can do some research on google to find sayings that are identifiable with the school you are supporting.

- Once you have added your text to the embroidery design, you need to turn the whole design on its side. This is so it will appear right side up on the garment you are embroidering.
The neck or top of the garment goes to the left and the bottom of the garment goes between your needle and the throat of your sewing machine.

- As I add text to the design, I use different colors for each phrase that way the machine stops between phrases so I can change the thread color if I wish. I do not make them the color they are in the final design.
I put them in color order so red stitches first followed by orange, yellow, green, etc. If you look at my finished project you will see I have made thread changes several times during the construction.
- The football shape and lacing shapes have two color files. On my machine the first file is cream/tan, It is an outline of the shape.
I stitch this on the garment without laying my shape down so I have an exact placement for my die-cut shape to lay. I then lay my die cut on the garment and restitch this first color to secure the fabric applique to the garment before continuing with the embroidery.
Pro Tip: Do not group the colors on these shapes. If you do it will stitch out the outline for both the football and the lacing. You need to complete them as separate units.
- Once all your embroidery stitching is complete, remove the hoop from the machine. Trim up any stray threads on your design.
- Unhoop your garment with stabilizer.
- Trim the stabilizer to just slightly bigger than the embroidery itself. Be careful not to accidentally clip into your garment.
- Give your project a good press with steam.
I like to back the embroidery - especially in shirts and babywear. The stitching and stabilizers can often feel scratchy.
To prevent this irritation you can press a square of Pellon SF 101 to the back of your complete embroidery.
Make sure the interfacing is slightly larger than the area which needs to be covered. There are also products from RNK and Sulky that you can use instead of the SF 101.
Ask your local stabilizer retailer if you want one of these products.

On the little girl version, I added a black and white chevron bow. I tacked this down using my sewing machine's button tack stitch. Now your onesie is ready to gift.
If you do not have an embroidery machine you can still make this with a regular free arm sewing machine. You will sew the football to the garment using a satin stitch. A satin stitch is a very tight zig-zag stitch. So if your machine has zig-zag stitching, you can make this onesie. Shorten the stitch length so that it completely encloses the edge of the applique.
If that's not an option, I have one final recommendation for lovely die-cut spirit wear. AccuQuilt dies are able to be used with Heat Transfer Vinyl. You can cut the shape from HTV and press it to the onesie for a lovely and quick baby gift.
Layette Set
So after making these onesies, I was inspired to create a whole layette set for this year's smallest fans. AccuQuilt has a burp cloth and a bib die. These dies and the AccuQuilt Go! Big Electric will cut enough burp cloths and bibs for an entire maternity ward in just minutes.
Why not create these items to coordinate with your team onesies? This is a wonderfully personal and easily manageable project that you could create in just a weekend.
Custom layette sets go for a pretty penny on Etsy. So, with this group of dies, you can certainly make the most coveted shower gift in your circle of ladies.
DIY Sports Burp Cloth
On the burp cloths, I backed the licensed collegiate prints with white chenille fabric. This is super absorbent and also launders very nicely.

Some of the licensed prints I purchased were directional, so instead of cutting one whole burp cloth. I cut two that were 1/2" longer than half of the whole burp cloth.

This allowed me to have the fabric facing the right direction when on your shoulder in both the front and the back. It also provides a way to turn and finish the burp cloth without having a funny shaped edge anywhere along your curves on the burp cloth.
If you leave a 2-3" hole in the middle of the seam created where the two pieces meet, you can whip stitch it shut by hand. Once you have turned it, pressed it, and whip stitched it shut you can then topstitch around the outside to finish the burp cloth.

DIY Sports Bib
Ok, so now to the final piece of our custom football layette set, the bib!
AccuQuilt has this super cute bib die that makes lovely baby bibs. You could make dozens of these in just a weekend.
For this piece of the project, I did the embroidery prior to cutting the fabric into the bib shape.

On the bib version, I added a 2 1/2" strip to accent the die cut and wording. This strip sits low on the front of the bib - about 2 1/2" from the front center collar.

For the girl version, I pieced the bib to look like gingham check or buffalo plaid. I cut 1 1/2" strips using the AccuQuilt 1 1/2" strip die.

I needed two strips of the darkest color, four strips of the lighter color, and two strips of white.
- Sew the strips in pairs. You will have two pairs of white with the lighter color, and two pairs of the dark and lighter color.
- Then, sew them into sets of four, then eight.
- And finally, add two additional strips to the eight-count strip.
This will give you a 10 1/2" wide strip set. You need seven strips cut from each strip set.
Alternate them back and forth between the dark color with the light color and the white with the light color.
See the picture for clarification. I added a 2" strip to the front of this bib as well.

For the back of both of these bibs, I used a product called PUL ( Polyurethane Laminated Fabric ). This is often used in diaper covers. It is completely waterproof and easy to sew.

I used this fabric so the bib would be waterproof. If the baby gets the bib wet from eating or drooling, the clothes underneath will remain fresh and dry.
You want the matte side of the PUL to be facing out. The shiny side of PUL is the wrong side.
One last thing, when I was constructing the girl bib, I added a fabric loop to the left side of the bib. This loop is a pacifier tender or as I like to call them a "mam nanny."
- To make a "mam nanny," you need about 4"x 2" of fabric. You will iron Pellon SF 101 to the back to give it strength.
- Fold it in half and press.
- Unfold and bring both edges to the center crease and press again.
- Refold on the center crease and press again.
- Topstitch along both sides to keep it closed.
- Insert into the side seam as you sew the bib lining (PUL) to the bib front. I usually have about half of this piece left showing when I turn to bib right side out.

- To finish the bibs, I set KAM snaps for the neck strap. You can also use Velcro.
Pro Tip: Do not use buttons. They are a choking hazard for small children.

You're Ready for the Game!

So. go put some green peanut on to boil and deck out your newest addition to the family in full sports regalia.
You are ready to root for your home team.
And, may the best team win. GO GATORS!!! lol
Subscribe to Our Blog
Receive crafting, sewing, quilting, DIY projects, and more directly in your email!


