
It’s here! It’s here! The GO! Cleopatra’s Fan - 12" Finished (55490) is here!

Hello, folks! I’m Gina from Gem Hill Quilts and I’m so excited to be working with the GO! Cleopatra's Fan -12" Finished (55490). I first saw a fabulous quilt with this block design several years ago. The quilt maker had used templates to make the blocks – templates are something for which I rarely have the patience!
In the past year or so, I read about fellow quilters ordering the Cleopatra’s Fan Custom Die from AccuQuilt. It was very exciting when the Studio Cleopatra’s Fan – 12” Finished (50863) became available and I started to hope that there would soon be a GO! version.
So, when I finally got the chance to use the GO! Cleopatra’s Fan – 12” Finished (55490), I immediately thought of making this Cutting Mat Shoulder Tote with a large ruler pocket that showcases the Cleopatra’s Fan block! It’s a stunning but quick project! This Shoulder Tote will hold an 18” x 24” Cutting Mat and up to a 16” square ruler in the pocket.

Determining which fabrics to use for a 3-color Cleopatra’s Fan block is the most important and the rest of the fabrics are simply coordinating prints.

Fabric Yardage

Low-loft Cotton or Polyester Batting – Cut one 28” x 44” for tote bag body.
Cut one 19” square for pocket.
Cut four 1” x 42” strips for handles.
Tote Bag Body
I sewed the 5” x WOF Orange strip to one edge of the 23” x WOF Light Yellow to create a 27 1/2" x WOF tote bag body. Layered with batting and the 28” x WOF Medium Blue Lining, I machine quilted it with an overall pattern. I then trimmed it to get a 26 1/2" x 40” tote bag body which includes a 4 1/4" x 40” Orange bottom strip. (Note that this is the result of trimming about 1/2" off the orange bottom and about 1/2" off the light yellow top of the tote bag body as well as about 2" off the sides).

There is a really simple alternative to this, by the way. Use double-sided pre-quilted fabric! All you have to do then, is cut a 26 1/2" x 40” rectangle for the tote bag body.
Baste along the raw edges. Then, zigzag stitch along the raw edges. Use a serger for this step if you wish.

Set this aside for now.
Making the Cleopatra’s Fan Block
Twenty patches make up this 12” square block. Ten of these are mirror-images of the other ten. So, on the GO! Cleopatra’s Fan – 12” Finished (55490) are these 10 shapes, laid out in such a way to especially cut the three-fabric version of this block efficiently. For each fabric used, 2 rectangles are cut. One rectangle is placed on the die face up while the other is placed faced down to get the mirror-image shapes.
Note that each shape is irregular and several of the edges are curved. Be careful handling the fabric shapes as a lot of the edges will be on the bias and may be prone to stretching. Using spray starch or sizing on the fabrics before you cut may be a good idea.
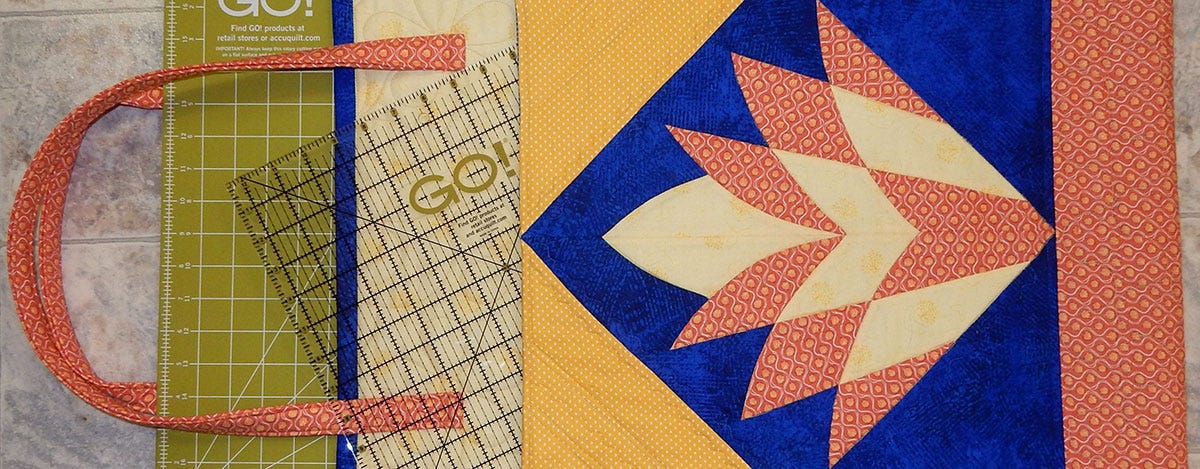
The 3 shapes on the top row of the die – A, C and F – are the “background”; dark blue in the project. The middle row – I, E and G – are the center point and interior pieces; light yellow in the project. Lastly, the bottom row – J, H, D and B – are the side points and the center interior pieces; orange in the project.


After cutting the 20 pieces, be sure to lay at least half the block out or mark each one with their letter designation.

I also cut one set of paper templates that I then laid out as half a block. (I love that I can cut paper with my AccuQuilt GO! dies with no problem!)

These helped me figure out which letter designation each shape had as well as how to lay them out and which edges needed to be sewn together.

There are several gently curved edges to sew together. The curves were not a problem at all - just go slow and easy and try it! Each edge also has notches that you can match with the next piece so sewing this block was mostly quick and easy-peasy! However, be sure to follow the pressing directions found in the die packaging. It was very helpful in making all the seams nest together.
Using a 1/4" seam allowance consistently (very important for this block!), sew the A and B pieces together to make the first column. Then, sew the C, D and E together for the second column. Then, sew the F, G, H, I and J together into the third column.
Sew the A/B column together with the C/D/E column.

Do you see how beautifully they fit together? The tops and bottoms of the columns match and with minimal pinning, points match!


Sew the F/G/H/I/J column onto the other side of the C/D/E column to complete half of the block. Repeat to make the mirror-image half of the block.

When sewing half-blocks together, be careful where the G and H patches all meet. That is the single tricky section to match in the whole project just because there are several seams that meet at that point.

Now, how do you like completing your first Cleopatra’s Fan block? Marvelous, isn’t it?!
Making the Cleopatra’s Fan Pocket
Set the block on point on your design wall. Now, layout the dark blue triangles as the bottom corners and the yellow triangles as the top corners. Match the center point of each triangle with the center point on the block edge. Sew each triangle onto the block to make the Pocket top that measures about 17 1/2" square.

Place the Pocket top, right side down, on top of the Pocket Lining and place both on top of the Pocket batting square.

Stitch the sides and the top down, leaving the bottom open. Trim the excess lining and batting off of the sides and the top and clip the top corners.

Turn inside out, making sure the edges are crisp. Press with an iron if you like but just be mindful of the type of batting (cotton or polyester or something else?) you are using and the best heat setting for it.

Baste with pins and quilt as desired. I simple quilted in the ditch around the block shapes and added some lines and squiggles around it!
Top stitch 1/4” from the top edge for a nice finish.
Baste the bottom raw edge shut. Then, zigzag stitch or serge along this bottom raw edge. Trim the excess batting and lining off.
Set aside for now.
Bag Straps
To make straps, take the two 4” x WOF orange strips along with the four 1” x 42” batting strips to the ironing board! Set the iron heat setting appropriate to your batting.
Press one of the orange strips in half vertically, right sides out. Open it up and place a batting strip on both sides of the creased center line. Fold the outer edges of the fabric up and over the batting strips and press. Now, fold again in half.


With a coordinating thread, top-stitch on both sides of the strap, around 1/8” – 1/4" from the outside edges. Your finished strap should be about 1” wide. Trim the selvage ends off.


Repeat to make the 2 straps.
Tote Bag Assembly
Mark the center of the tote bag body and sew a line with a coordinating thread.
Lightly mark a 16” line centered around 1/4" above the orange fabric bottom. This is about 4 1/2" from the bottom raw edge and about 2” from the stitched center line as well as 2” from the side raw edge.

Line up the bottom raw edge of the Pocket with this marked line. Position the Pocket about 1 1/4" from the stitched center line. Note that the Pocket is placed lining side up and that the bottom raw edge is toward the top of the tote.


With a 1/4” seam, stitch along the bottom raw edge of the Pocket. This stitching should just be right where the orange fabric seam is. Flip the Pocket up and pin in place, especially along the sides.
This would be a good time to add some type of a closure (magnetic snap, Velcro or button) for the Pocket if you want. I did not add a closure and I’m happy without it!
With coordinating thread, I top stitched the sides and the bottom of the Pocket, about 1/4" from the edges, to attach and secure to the tote bag body. Make sure you tack or backstitch at the top edges and where you stop and start. Because I used yellow and dark blue fabrics, I decided to use yellow thread on the yellow fabric and dark blue thread on the dark blue fabric.


Place the bag straps around 4” down from the top raw edge and about 4” from the vertical center stitch line and about 4 1/2" from the side raw edge. Pin in place around 1/2" from the raw edges of the straps. Do the same to the strap for the other side of the tote.

Pin the side raw edges of the tote bag body together. Now, determine a comfortable strap length for you by carefully putting the bag straps over your shoulder. (Avoid those pins!) Adjust the straps as needed.
Unpin the side raw edges for easier sewing. Then, sew the straps in place. Fold the strap up over the raw edge and sew a couple of stitch lines again.


Fold the tote bag body, lining side out. With a scant 1/2" seam, stitch the sides and the bottom, again tacking or backstitching when starting or stopping.
Turn the tote bag body right sides out.
To prepare the binding, press the 3 1/2" x WOF dark blue fabric in half vertically. To the raw edge at the top of the tote bag, apply binding with a 1/2" seam. This is larger than usual to give the tote bag an accent as well as a finished look.

Now place your 18” x 24” cutting mat inside the tote and hang the tote. Isn’t that one pretty!

We would love to see your own version of Cleo's Fan Fun Cutting Mat Shoulder Tote!


