
Greetings fellow quilters, sewists, and AccuQuilt enthusiasts - it's me, Belinda from Blue Ribbon Designs and the Samplings from a Blue Ribbon Girl blog, stopping by for my latest guest post. I am back today to share another one of my AccuQuilt pattern creations - my Snow Buddies Quilted Table Runner.
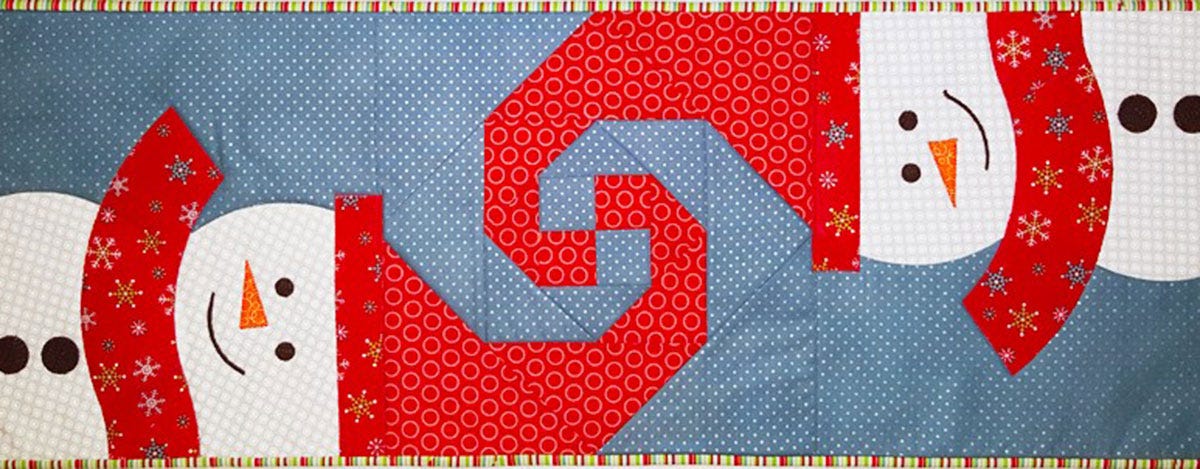
Sometimes a "project in my head" plan comes together perfectly and the finished product is exactly as I imagined...and that is precisely what happened with "Snow Buddies". Every time I would see a GO! Big Snail's Trail finished quilt block, I would see two stocking caps (or Santa hats) twisting together - so I thought it would be adorable to have a snowman on either end, with their hats meeting in the middle.
My quilting tutorial will show you how to make a table runner using the GO! Big Snail's Trail-12" Finished cutting die for the center block and the GO! Big Circle-4", 6", 7", 8" cutting die to create the snowmen...and the fun part is, you can find other dies in your collection to embellish/dress-up your snowmen.
This table runner combines traditional piecing and machine appliqué (along with a bit of creativity) to create a cheerful, winter design that is sure to bring a smile to your face! This runner is quite versatile for decorating, as it measures 36" x 12" and can be made with a variety of fabric solids and/or prints. The die cut shapes make this a quick and easy project - especially when pressing the fusible web to the back of the appliqué fabrics before cutting the motifs....and the GO! Big Snail's Trail BOB allows you to create an entire (accurate) block with just one die.
So, let's get started with my latest quilting tutorial - it's the perfect winter project for a beginner or an advanced quilter...
Snow Buddies Table Runner
Finished Size: 36" x 12"

GO! Fabric Cutter:
GO! Big Electric Fabric Cutter (55500)
GO! Cutting Dies:
GO! Big Snail's Trail-12" Finished (55460)
GO! Big Circle-4", 6", 7", 8" (55462)
GO! Strip Cutter-2" (1½" Finished) (55025 or 55164) (Binding)
Optional GO! Cutting Dies (for embellishing snowmen):
Note: these are the dies I used for embellishing my snowmen - don't be afraid to be creative and use cutting dies you have in your personal collection!
GO! Strip Cutter-1¼" (¾" Finished) (55109) (hat band)
GO! Double Wedding Ring-11½" Finished (2-Die Set) (55078) (shape F - scarf)
GO! Rose of Sharon by Sharon Pederson (55045) (½" circle - eyes, 1" circle - buttons, 2½" W x 1 1/16" H leaf - mouth)
GO! Sparkle-Slim Tree by Sarah Vedeler (55096) (small slim tree triangle top - nose)
Materials Needed:
Blue —½ yard: 1—13½" W x 11¼" H (Snail's Trail) and 2—12½" squares (background for appliqué)
Red Polka Dot—fat quarter: 1—13½" W x 11¼" H (Snail's Trail)
Red Snowflake —fat quarter (hat bands and scarfs)
Dark Brown—scrap or fat eighth (buttons, eyes, and mouths)
Orange—scrap or fat eighth (noses)
White—¼ yard: 4—8½" squares (8" circles)
Stripe—¼ yard: 3—2" strips for binding
Fusible web—½ yard
Backing fabric—42" x 18"
Batting—42" x 18"
Cutting Instructions:
GO! Big Snail's Trail-12" Finished (55460):
Blue—1 fabric layer covering all shapes
Red Polka Dot—1 fabric layer covering all shapes
GO! Strip Cutter-2" (1½" Finished) (55025 or 55164):
Stripe Fabric—3 - 2" strips for binding
NOTE: For each of the following, apply fusible web to the wrong side of fabrics following manufacturer's instructions before cutting each of these appliqué shapes.
GO! Big Circle-4", 6", 7", 8" (55462):
White—4 - 8" circles
GO! Strip Cutter-1 ¼" (¾" Finished) (55109):
Red Snowflake—2 - 1 ¼" x 7 ¼" strips
GO! Double Wedding Ring-11½" Finished (2-Die Set) (55078):
Red Snowflake— 4 shape F (2 for each scarf)
GO! Rose of Sharon by Sharon Pederson (55045):
Dark Brown—4 - ½" circles (eyes)
Dark Brown—6 - 1" circles (buttons)
Dark Brown—1 - 2½" W x 1 1/16" H leaf (trim an arc approximately ⅜" wide off either side for two mouths)
GO! Sparkle-Slim Tree by Sarah Vedeler (55096):
Orange—2 small slim tree triangle tops (noses)
Assembly:
1. Create one GO! Big Snail's Trail Block according to the cutting die instructions.

2. Pin and sew one 12½" blue square on either side of the GO! Big Snail's Trail quilt block, making sure to position the GO! Big Snail's Trail block so the red polka dot swirls can be used as hats.

3. Lay out and trim the 8" white circles to your liking for the snowmen bodies - fuse into place. Machine appliqué.


4. Lay out, fuse, and machine appliqué the remaining shapes into place, using the following image as a guide. I used a blanket stitch for all machine appliqué - choose your favorite machine appliqué stitch. You may choose to use the die shapes I listed, or choose shapes from your own die collection - be creative! For each scarf, I used one full shape F (GO! Double Wedding Ring) and one partial shape F. For the snowmen mouths, I trimmed an arc off each side of a large Rose of Sharon leaf, as directed in the cutting instructions.

5. Layer batting between table runner top and backing fabric.
6. Pin or baste layers together.
7. Quilt as desired.
8. Add striped binding, mitering corners.
Your Snow Buddies Table Runner is now complete - display and enjoy!!
You could easily adapt this design idea for a quilt or bed runner...or add blocks to make a longer runner...you could also use your favorite pillow finishing instructions to make a bench pillow. I can see quite a few possibilities for these Snail's Trail Snowmen...
I hope my guest blog post will entice and inspire you to make a Snow Buddies Table Runner of your very own...and I hope you will experiment with your personal die collection to embellish and dress your snowmen. Perhaps you will use actual buttons for the eyes and add fringe to the scarf...there are tons of fun ways to add your own creative touch!
I would really enjoy hearing about your GO! winter projects - stop by my blog, website, or social media pages. I am happy to answer any questions regarding this AccuQuilt project...and I always enjoy meeting new virtual quilting friends!


