
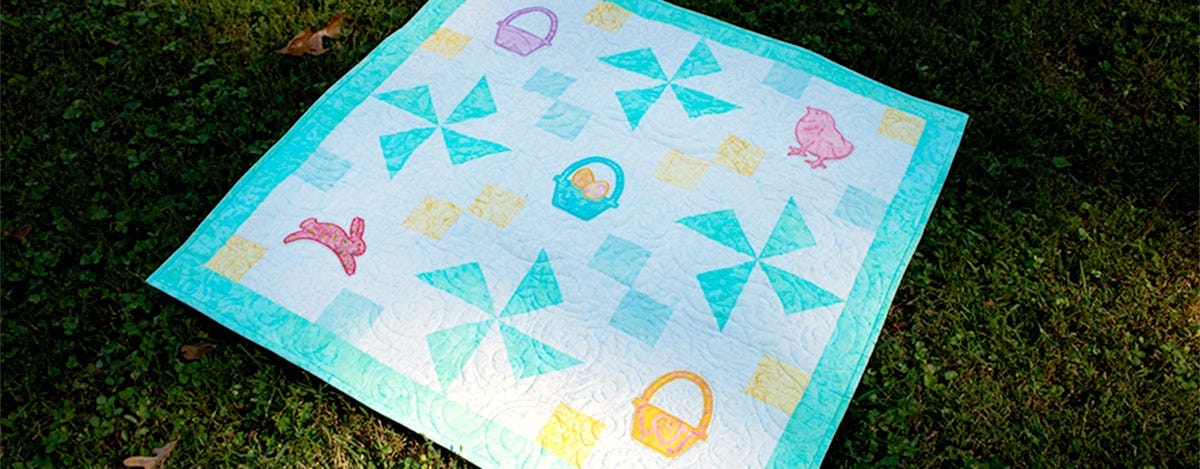
This tutorial will show you how to use the GO! Spring Medley die and the free Spring Medley Embroidery Designs for appliqué to create beautiful embroidered quilt blocks. This quilt is made using the GO! QUBE Mix & Match 10” Block die set and the Uneven Nine Patch Block and the Louisiana Block from the free 72 block brochure from AccuQuilt. A free pattern is available for making the Spring Medley Baby Quilt, so this tutorial will focus on how to stitch the embroidery onto a quilt block.

Supplies Needed for Quilt:
GO! QUBE Mix & Match 10” Block # 55797
GO! 2-1/2” Strip (2” Finished) Die # 55014 or 55017
GO! Fabric Cutter, GO! Big Electric Fabric Cutter, or Studio (with GO! Adapter) Die Cutter
72 Block Mix & Match Set Brochure
Fabric as per the quilt pattern
Supplies Needed for Embroidery:
- GO! Spring Medley Die (55494)
- GO! Spring Medley Embroidery Designs (free)
- Assorted coordinating fabrics cut into 5” x 5” squares for appliqué shapes
- Paper backed fusible web 5” squares or acid-free water soluble glue stick
- Machine Embroidery Hoop: At least 120mm (5”) x 120mm (5”)
- Stabilizer: Cutaway or tearaway stabilizer. The blanket stitch and the motif stitch appliqué work well with a lightweight stabilizer and the satin stitch designs work best with a medium weight stabilizer
- Embroidery machine thread in colors to coordinate with fabrics. Thread may be polyester, rayon, or cotton
- Neutral color bobbin thread
- Mini iron or small iron that will fit inside the embroidery hoop to be used for fusing appliqué shapes to the background fabric
Cutting Instructions:
Using manufacturer’s instructions, attach the 5” square of fusible web to the wrong side of the 5” square of fabric. Do not remove the paper from the back of the square.
Decide on placement of designs. Some designs like the bunny or the chick can be cut looking to the right or left. If the appliqué should be looking to the right, place the fabric on the die with the right side of the fabric facing the foam and the fusible web/wrong side of the fabric facing up. If the appliqué should be looking to the left, place the fabric on the die with the fusible web/wrong side of the fabric facing the foam on the die and the right side of the fabric facing up.
Place the fabric on the die in the correct orientation for the design you want to make. The fusible web paper should be attached to the back side of the appliqué. Place the cutting mat onto the die and run through the cutter.
After the shape is cut, you can use a sharp pin or the point of your seam ripper to lightly score the paper on the appliqué shape. Bend the paper to break it and remove the paper from the back of the appliqué shape.
Machine Embroidery of Quilt Blocks:
Step 1: Place assembled quilt block into embroidery hoop.
Assemble quilt block, making sure to press seams open during block construction. Press the finished block so there are no wrinkles. Fold the finished quilt block in half and finger press the folds at the outer edges of the quilt block. Fold the finished quilt block in half in the opposite direction and finger press the folds at the outer edges again. You will be able to see the finger pressed folds in the picture below.
Lay the block out flat on the stabilizer and carefully place the embroidery hoop over the block. Match the folds on all four edges of the quilt block with the center points of the embroidery hoop. Secure the quilt block/stabilizer sandwich in the embroidery hoop making sure the surface of the quilt block is smooth and even and the center folds match the center points of the embroidery hoop.

Step 2: Stitch the placement line onto the quilt block and secure the appliqué shape to the quilt block.
In the examples below, you will see the basket placement line in the first picture and the chick secured to the background fabric and ready to begin stitching in the second picture.
The placement line is a single stitch and should be stitched in the same color thread as the appliqué.
The appliqué shape is secured just inside or on top of the placement line. It is best to use fusible appliqué and a mini iron. An alternative method is to use an acid-free glue stick on the background fabric just inside the placement line and then carefully secure the shape in the same manner as with fusible using a mini iron.

Step 3: Stitch the appliqué stitch around the appliqué shape.

Step 4: Add additional shapes on appliqué designs that have multiple shapes.
One of the appliqué designs has eggs in the basket. With that design the basket is stitched first and then the additional shapes are added. It is important in this step to change the thread color to match the eggs and to layer the eggs in the correct order so that the embroidery stitches match the edges of the eggs.
After the basket has been stitched, change the embroidery thread and stitch the placement stitches for the eggs. As shown in the embroidery instructions, the egg on the left will be placed first and the egg on the right will be placed with a slight overlap of the left egg. See the pictures below. 
Step 5: Stitch your beautifully embroidered blocks into a quilt top; then quilt, bind and enjoy.
by Marjorie Busby


