
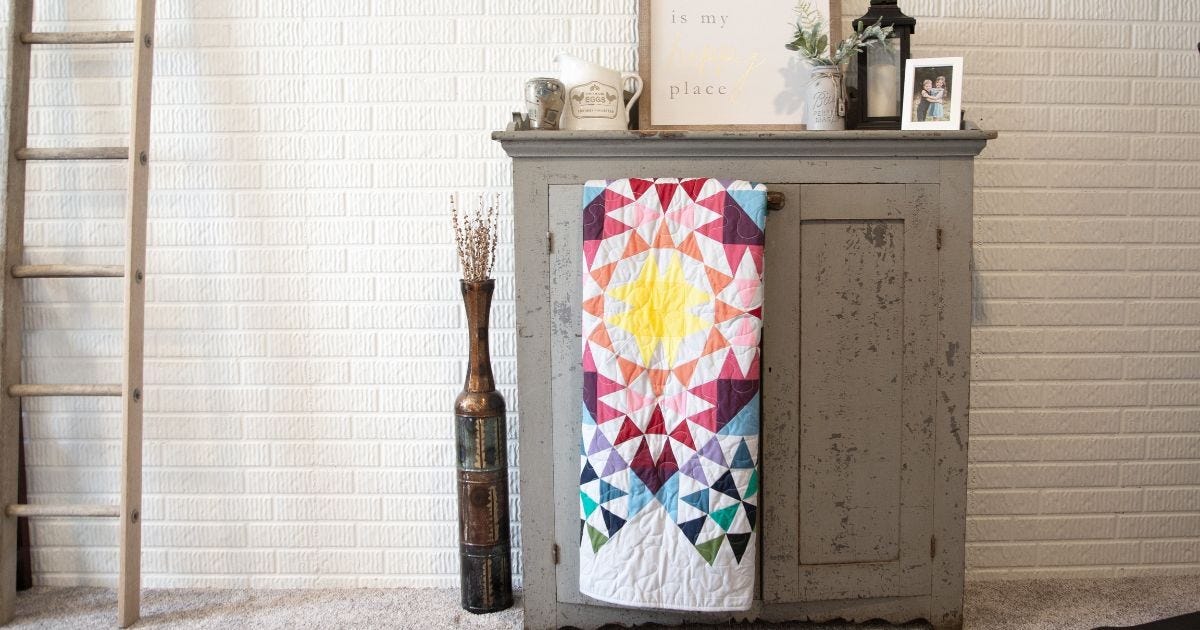
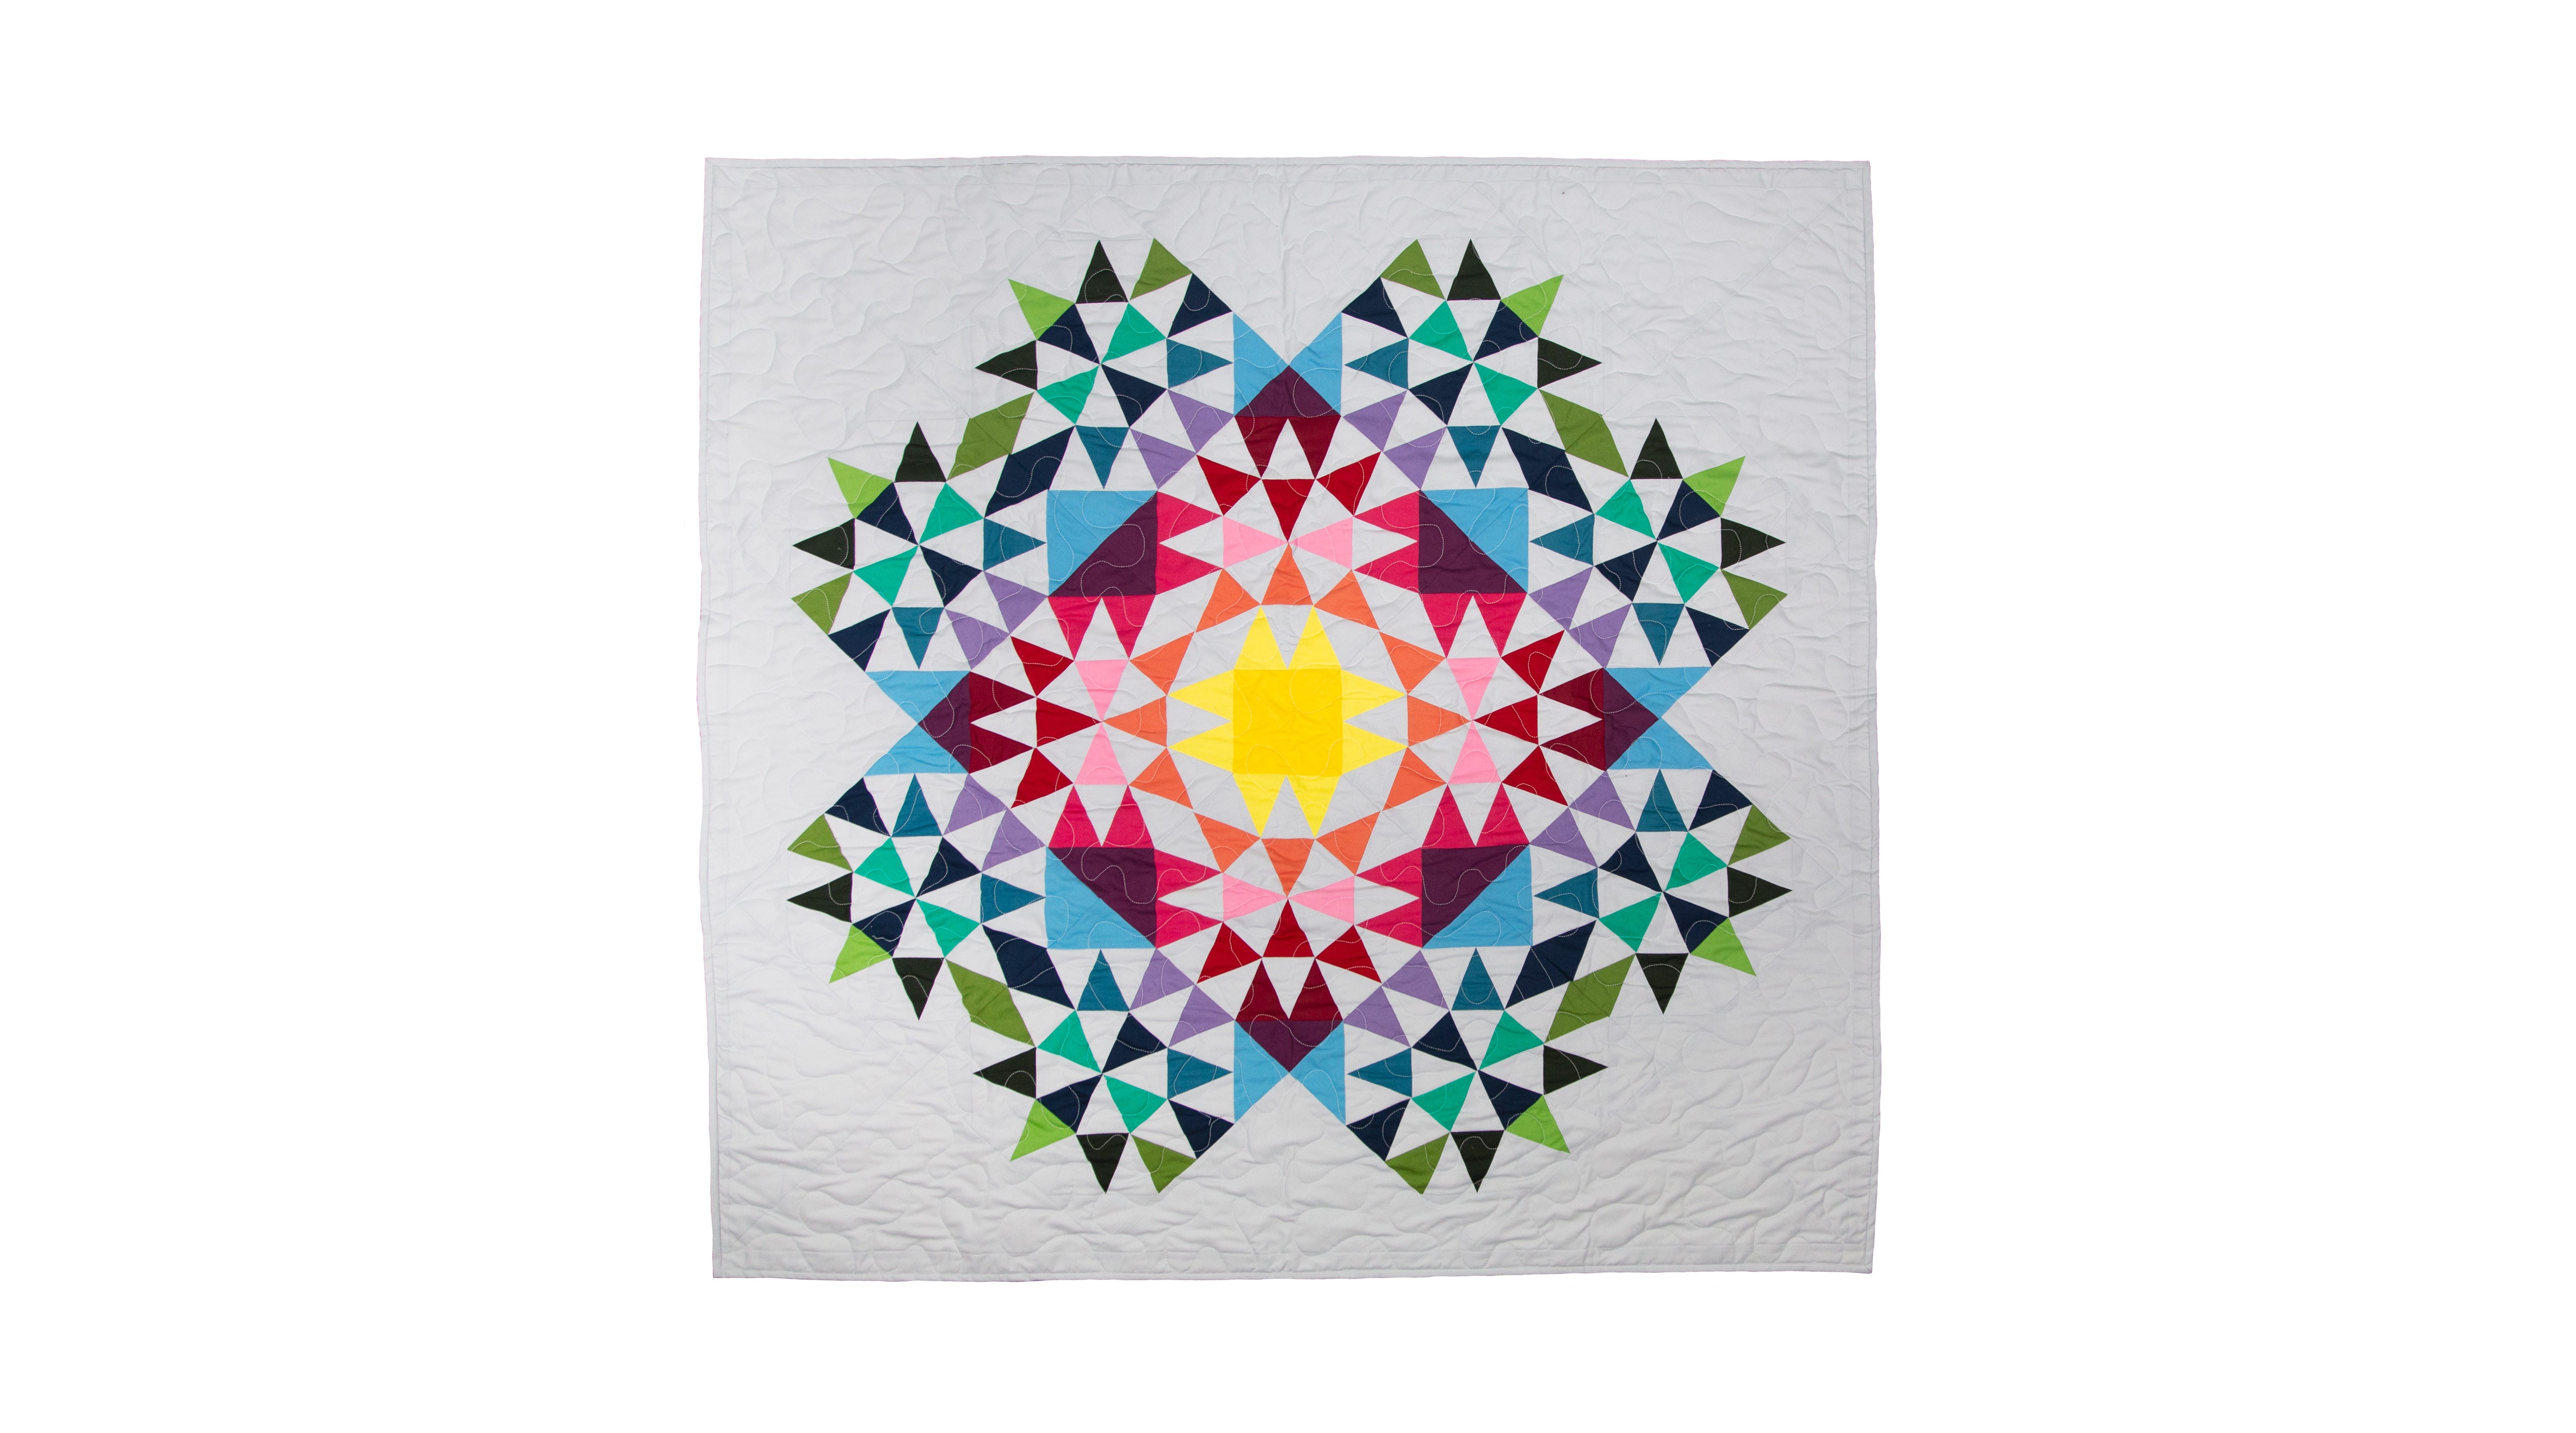
It seems like we just got started with this project, and it’s certainly been a fun journey. We started with an introduction to the project back on May 24 and jumped into cutting and organizing our pieces, starting on June 6. Since then, we’ve sewn together our outer/"cool" blocks and our inner/"warm" blocks and cut our setting triangles, so it’s time to layout our project and put it all together!

If you’ve missed any of the steps, be sure to go back and check the blog posts both from AccuQuilt and AQS. You can also watch all the shows on our website, Facebook page and YouTube channel.
I hope you’ve also joined in the fun on the AQS Quilting Project Parade Facebook group, so you can see all the stunning projects being made by fellow quilters all over the world! If you haven’t joined yet, it’s easy to do. Be sure you’re sharing pictures of your project on social media and using the hashtag #AQSews because this helps us find your pictures. Plus, next week is our Show & Tell show and we want to share pictures of your finished quilts!
Layout Time
For this project, our blocks are set on point, and it may be helpful to layout your project on point, so your straight rows are clearly defined. You’ll want to grab your free, downloadable pattern for this. Laying out everything on point will match the diagram in the pattern.

Row 1 will be two of the side setting triangles sewn together to form a large corner. Be sure to follow the diagram and sew short sides together! Press the seam towards the top of your quilt as it’s laid out on point.

Row 2 will be two of your "cool"/outer blocks with setting triangles on either end. It’s very easy to sew these on incorrectly, so it’s really helpful to layout your blocks and pin them together in the correct order and direction. This is coming from the voice of experience here! For this row, press the seams between your blocks towards the bottom of the quilt.
At this point, I like to sew rows 1 and 2 together. Since we’re pressing the seams between the blocks in opposite directions, we’ll be able to nest those seams – and I suggest using a pin or two to help keep everything stay together perfectly!
Keep building and sewing your rows together as we did above, remembering to press your odd and even numbered rows in opposite directions until your top is ready for the border.

Border Time
This quilt has a narrow border that’s cut at 1 1/2” wide. I’ve done this using my GO! Strip Cutter–1 1/2” (1” Finished) 5 Strips Die. You will need a total of five 1 1/2” x Width of Fabric (WOF) strips for the border. Since I’m going to use the die and it has five strips on it, I will be rough cutting an 8” x WOF strip to lay on the die, cover with a cutting mat and cut.
Now, it’s time to sew those strips together, and I like to do this with mitered ends (like binding) because it will spread out the bulk in your quilt. If you’re working with a stripe or plaid fabric, joining the ends straight across instead of on an angle may be the better option.
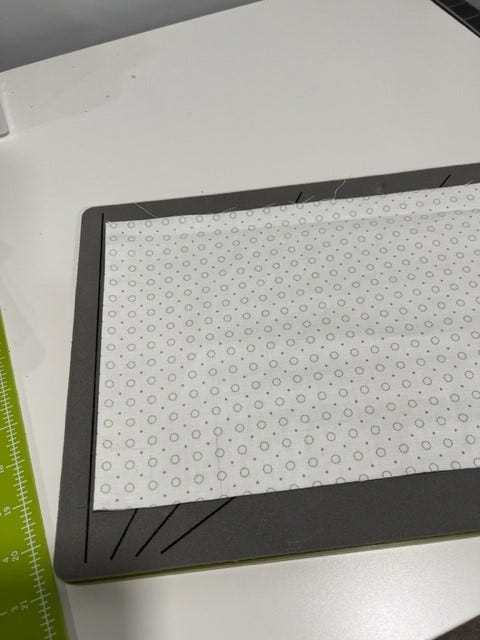
My favorite tip is how to use a half square triangle die to miter the ends of strips! Any half square triangle die will work as long as it’s larger than the strip you’re cutting. For this, I’m just going to use the half square triangle on the GO! Morning Star-12" Finished Die.

Remember: the die will only cut where there is both fabric and a cutting mat. Here’s how you do it:
- Line up the ends of the strips so that they match up perfectly, with all pieces right side up.
- Place on the die so that the long side runs along the blade, but the fabric is over the dog-eared corner.
- Cover only the dog-eared corner and the angled blade with the cutting mat. It’s best to use a 6” x 6” cutting mat for this.
- Be careful not to cover the back blade with your mat so that you don’t chop off the end of your strip!


You can now put those strips together perfectly without having to draw lines or do any trimming! For a more in-depth look, check out this video:
Once your border strips are all sewn together, measure down both sides and the center of your quilt. The pattern will tell you to cut your side border strips to 51 1/2” and the top and bottom borders to 53 1/2”, but I suggest measuring your quilt before cutting!
If your three measurements don’t match, you’ll want to go with an average measurement. Pinning the border strips to your quilt at either end and matching the center points will ensure a nice, straight and flat quilt!
All Done!
Pat yourself on the back because your top is all done! Your next steps are quilting and binding – and there are so many options here! Whether you’re planning to quilt this yourself or take it to a quilter, you’ve got those lovely corners that could really be used to show off some fancy quilting!
Binding: The Final Frontier
Binding can stop many a quilter in their tracks, keeping them form crossing the finish line and leaving quilts in UFO status (UnFinished Objects)!
This pattern shows using your background fabric for your binding so that it blends in and really disappears, but you can also choose a contrasting fabric to act like a frame for your quilt. You can even choose to pool together your scraps from making the top and make a scrappy binding!
I’m really debating between using my background fabric for binding or making a scrappy binding. What do you think?

Whatever binding fabric or method you choose, one of my best tips is to make your binding before you’re ready to put it on your quilt. Sometimes, I even make it before I start the top! That way, it’s all set and ready to GO! I also keep binding supplies by my living room chair where I like to watch television, since I love to hand-finish my bindings – thread, needles, clips and everything else I need are all sitting there, waiting for me!

Take A Picture
Don’t wait till you’re all done! Take pictures of your project all along the way and share them with us on social media, especially in the AQS Quilting Project Parade Facebook group using the hashtag #AQSews.
Next week is Show & Tell time, and we’ll be looking at your projects here in the blog and on our show, so be sure and get those pictures in!


