This is Marjorie Busby from bluefeatherquiltstudio.com, and I want to share an updated machine embroidery project using the new GO! Classic 2" Alphabet Uppercase Set Die (55559). All the letters are on one die and it is fun and easy to personalize any project in as many ways as you like using words. Just look around and you will see word quilts everywhere and there is no better way to create a word quilt than to use an alphabet die which makes your cuts effortless and accurate.
You can use your sewing machine to zigzag stitch around the letter or, if you have an embroidery machine, you can use one of the AccuQuilt machine embroidery design sets which come in motif, blanket and satin stitch. Why not make a quilt that says “Just Quilt It” in the middle and has lots of sampler blocks surrounding the words, or a charm quilt with a name embroidered as one letter in each block.
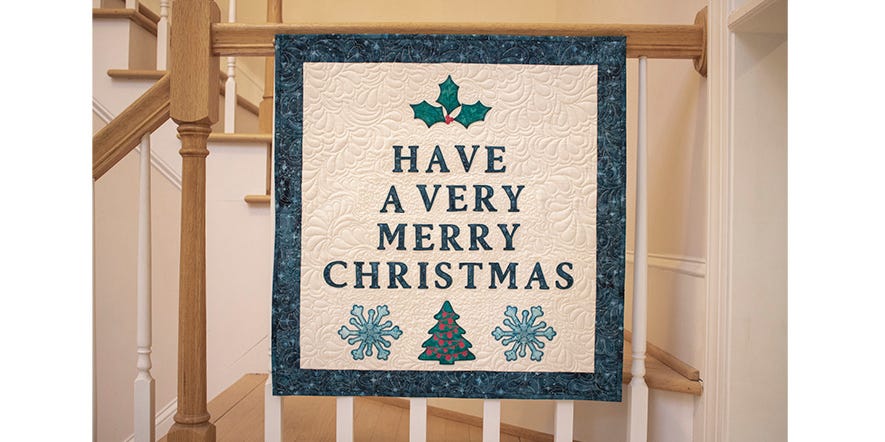
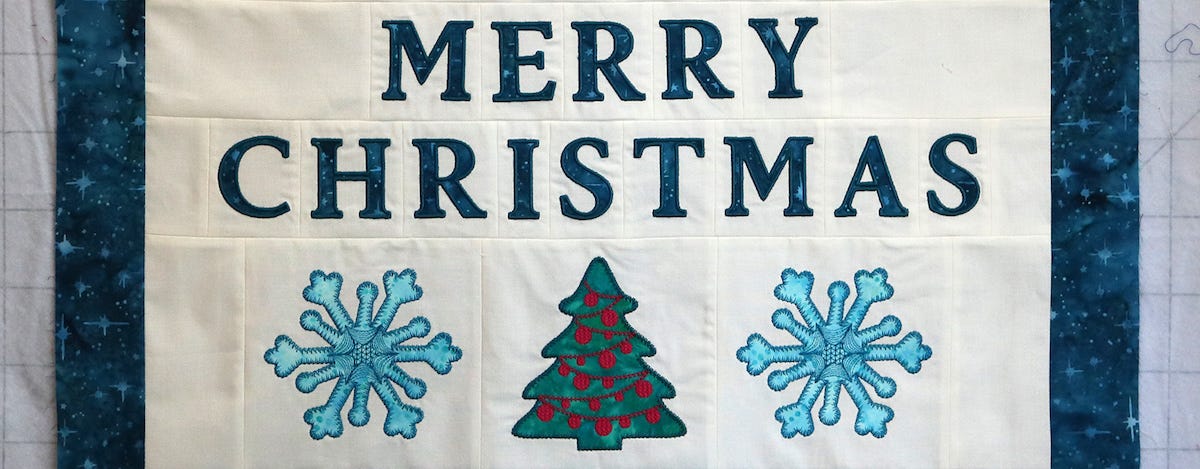
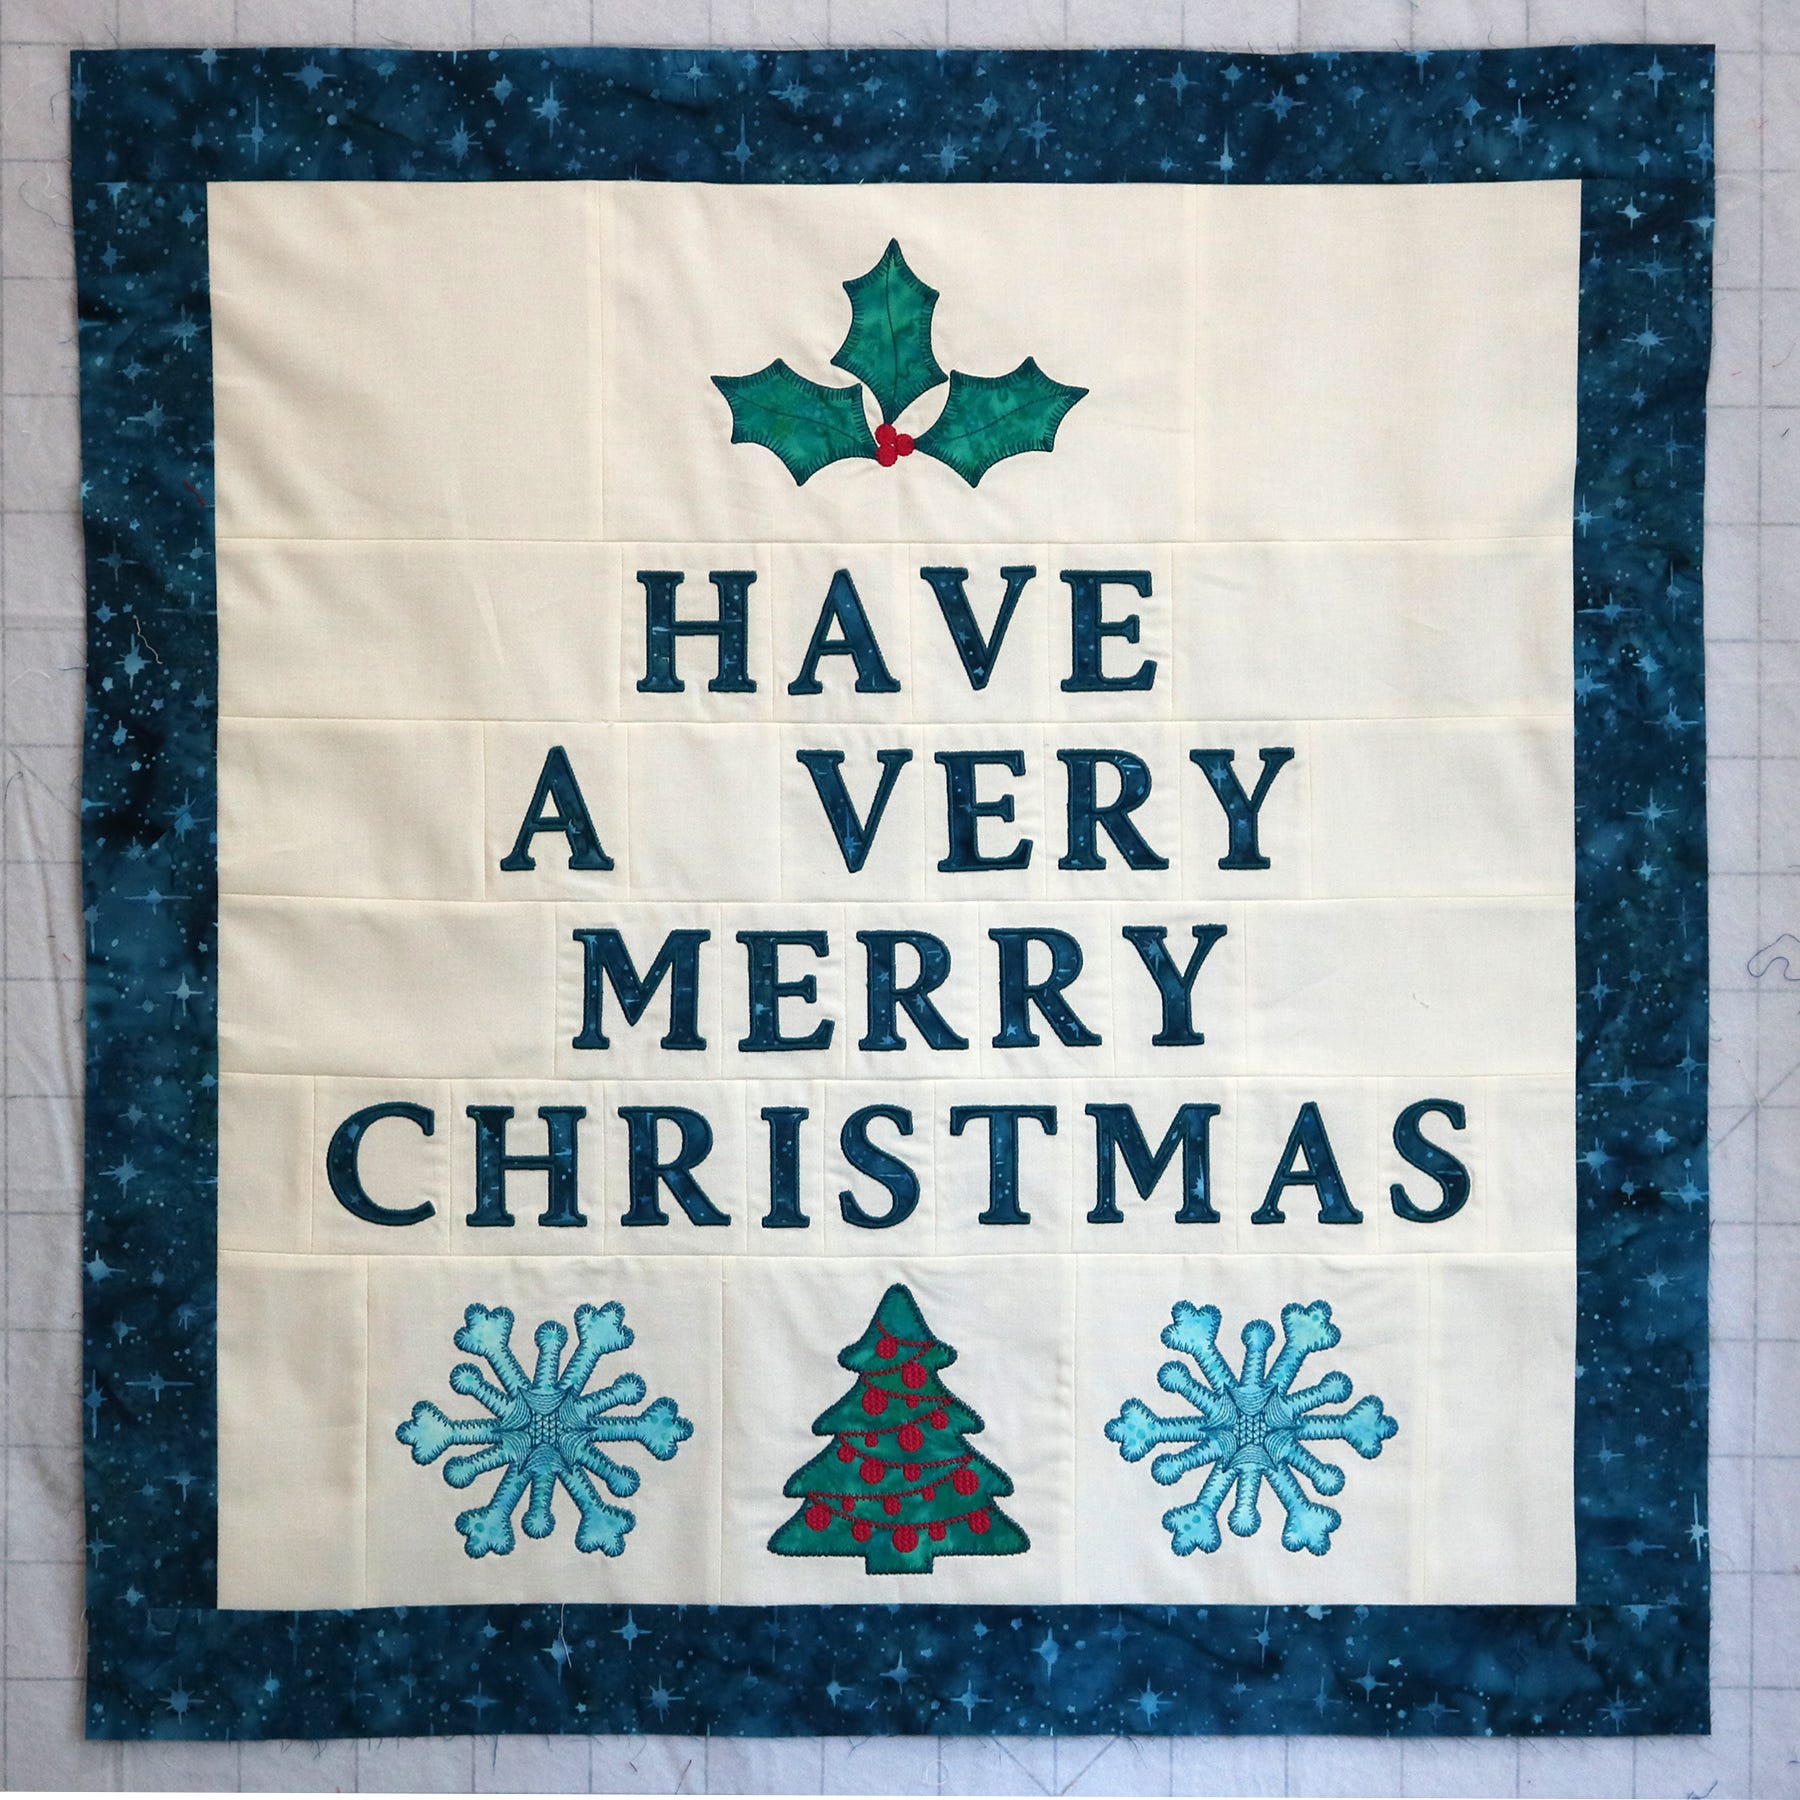
Of course, because the holidays are fast approaching, I was inspired to recreate the Let It Snow Lowercase Alphabet Wall Hanging. My new project will change up the saying (see how easy it is to personalize?) and use the newly released GO! Classic 2" Alphabet Uppercase Set Die (55559). Each letter is embroidered separately so it's easy to customize, whether you are using your sewing machine or your embroidery machine. Instructions for this project are below as well as tips to get you started on your own word project.
Supplies
- GO! Classic 2" Alphabet Uppercase Set Die (55559)
- GO! Holiday Medley Die (55043)
- GO! Strip Cutter-2½” (2" Finished) Strip Die (55017 or 55014)
- GO! Holiday Medley Embroidery Designs by Marjorie Busby (MBME55043)
- 18” or longer rotary cutting ruler
- Rotary cutter for prepping fabric
- Machine embroidery supplies including thread, scissors, fusible web and:
- Machine embroidery hoops - 150 x 150 for Holiday Medley designs and 100 x 100 for alphabet designs
- Sticky stabilizer or tear away stabilizer
- Spray adhesive (I use Sulky KK2000 which evaporates within 24 hours).
- A pair of forceps or tweezers is very helpful when placing letters within the outline.
TIP: Use stabilizer for stitching letters both on the sewing machine or the embroidery machine.
Fabric
- Letters: 6" squares for each letter plus fabric to complete remaining background
- Holiday Medley shapes: 8" squares
Creating the Project
1. Create your design.
You can use software like Electric Quilt or cut shapes (either in fabric or in paper) and actually lay out your design on a background. Move the designs around until you are pleased with the placement and look.
2. Prepare the background fabric.
Cut background fabric for each letter (6" square) and also for each appliqué shape (8" square) that will be used. You will also need 3½” strips and 6½” strips (called coping strips) for the areas which have no embroidery.
3. Cut the letters and designs using the die.
Prepare the appliqué fabric with fusible web following instructions for the specific fusible web you are using. Complete instructions for cutting appliqué shapes are included in the machine embroidery designs.
4. Complete the machine embroidery.
Following instructions that come with the machine embroidery designs, stitch the letters onto the background fabric, making sure the letter is centered on the fabric. When stitching is complete, tear away the stabilizer. Follow the same methods for stitching any additional decorative embroidery for your wall hanging such as the embroidery designs from the GO! Holiday Medley Machine Embroidery.
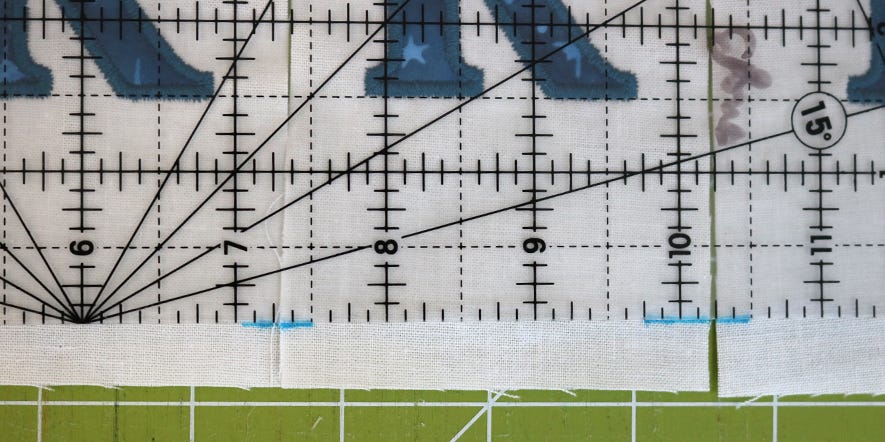
5. Trim the letters vertically.
Measure ½” from the right and left side edges of each letter to create a seam allowance on both sides of the letter. DO NOT trim the top or bottom fabric from the letter.

6. Align the lettering horizontally for each row.
When all the letters have been trimmed, lay out the letters side by side for each word. Align the lower edge of each letter with a long ruler. (Exception: the letter Q which has a tail that extends below the line). The top and bottom of the background fabric may be uneven but ignore this for now.

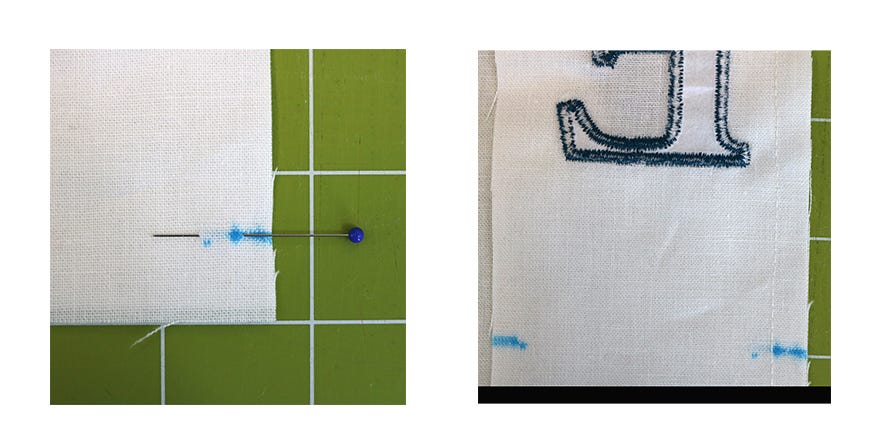
7. Mark and stitch the letters to complete the words.
Without moving the letters, use a water soluble marker to make alignment marks 1½” below the lower edge of the letters. NOTE: This mark will be cut away after the letters are stitched together.
 8. Add coping strips to complete the wall hanging background.
Use a rotary cutter and ruler to cut additional 3½” strips of background fabric to make coping strips that will make each strip the same width. I calculated that each strip needed to be 24½”. Thus I measured each set of letters and subtracted that from 24 and then divided by 2 to determine the length of each outer strip. The same process is used for the larger designs except the strips will be 6½” rather than 3½”. Even with the measurements, the strips may not come out exactly even and the outer edges will need to be trimmed.
Sew the rows together and then trim as shown.

9. Add borders to the wall hanging.
Measure the borders and stitch.
10. Quilt as desired and bind.
I added a hanging sleeve to the back of my wall hanging so that it can be hung using a dowel or a rod.